> ## Documentation Index
> Fetch the complete documentation index at: https://docs.abbyy.com/llms.txt
> Use this file to discover all available pages before exploring further.
# Set up the Processing Server in a failover cluster
> Set up the ABBYY FlexiCapture Processing Server in a Windows failover cluster, covering hardware, shared storage, the generic service, and cluster nodes.
For the Processing Server, failover clusters are used. For detailed instructions on creating a failover cluster, refer to [this page on the Microsoft website](https://docs.microsoft.com/en-us/windows-server/failover-clustering/create-failover-cluster).
## Hardware requirements
### Cluster nodes
* All cluster nodes must have identical or essentially similar hardware configuration.
* All cluster nodes must be running the same version of Windows Server.
* All cluster nodes must be joined to the same Active Directory domain, or Basic authentication must be configured for the Processing Server (see [Description of Processing Server commands](/flexi-capture/appendix/proc-server-cmd) for detailed instructions).
### Shared storage
Shared storage stores a folder containing the files required by the cluster. The disk must meet the following requirements:
* The disk must be connected using Serial Attached SCSI (SAS), iSCSI, or Fibre Channel.
* The disk must be accessible to all cluster nodes.
* The disk must not be used as a boot or system volume.
* The disk must not be used for swap, dump, or hibernation files.
The following are the most commonly used cluster storage solutions:
* Ready-made storage systems based on DAS, SAN, NAS, JBOD, or other technologies.
* A separate server machine for which the [iSCSI Target Server](https://docs.microsoft.com/en-us/system-center/vmm/storage-iscsi?view=sc-vmm-1807) role has been set up.
For detailed clustering hardware requirements, refer to [this page on the Microsoft website](https://docs.microsoft.com/en-us/previous-versions/windows/it-pro/windows-server-2012-r2-and-2012/jj612869\(v=ws.11\)).
## Set up the Processing Server in a failover cluster
To set up the Processing Server in a failover cluster, complete the following steps:
1. [Create a failover cluster](#nodes-to-cluster).
2. [Basic configuration of the failover cluster](#basic-config).
3. [Add the ABBYY FlexiCapture Processing Server service](#adding-service).
4. [Create a shared folder for the Processing Server service](#network-folder).
5. [Configure the cluster nodes](#nodes).
The addresses, computer names, domain names, and so on used in the following sections are not mandatory and may be changed by the administrator. The server configuration described here is intended only for local use in a local area network.
The names of servers, services, and shared folders must not contain spaces.
### Create a failover cluster
To cluster two machines, complete the following steps:
Check that you have all the necessary components in place and that they meet the [hardware requirements](#requirements-cluster) listed above.
Install the Failover Clustering feature.
Validate the configuration to make sure that it is suitable for failover clustering.
Create a failover cluster.
If your cluster has an even number of nodes, we strongly recommend using a quorum configuration with a witness resource (for example, a Disk Witness, a Share Witness, or a Cloud Witness); otherwise, the cluster will cease to function if half of its nodes fail. For detailed instructions, see the Configure the cluster quorum settings section on this page of the Microsoft website.
Detailed information about failover clustering is available on [this page of the Microsoft website](https://docs.microsoft.com/en-us/windows-server/failover-clustering/create-failover-cluster).
### Basic configuration of the failover cluster
This example uses a previously created FOC cluster (FOC.cluster2016.ru), located in the 192.168.0.0/23 designated network in the cluster2016.ru domain.
The cluster consists of two nodes, Node1 and Node2.
#### Addressing in the cluster
The Node1 and Node2 nodes have two network interfaces. One of them belongs to the 192.168.0.0/23 network and the other may belong to a local area network (for example 10.0.2.0/24). The data storage only interfaces with the 192.168.0.0/23 network and is available only to the cluster nodes (that is, Node1 and Node2).
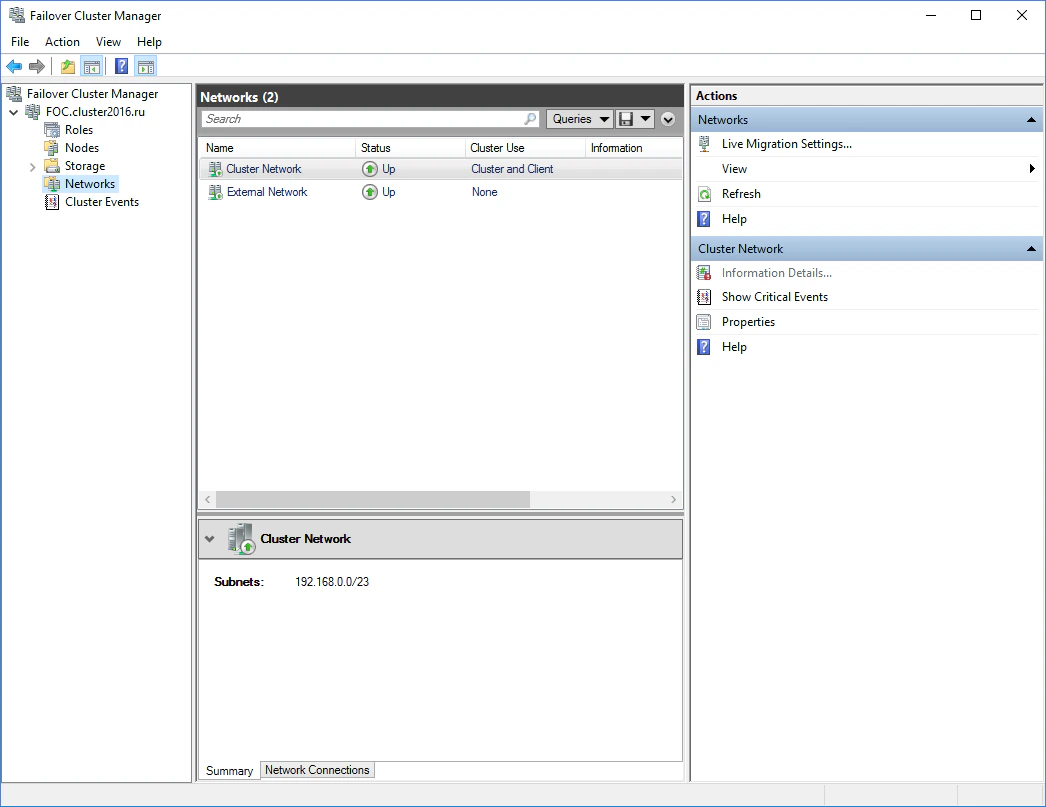
Both networks are available to the cluster FOC.cluster2016.ru. Cluster traffic should only be allowed in the designated network 192.168.0.0/23 for security and workload balancing reasons. External users can access the data storage through requests to Node1 and Node2. To allow cluster traffic in the 192.168.0.0/23 network, open the **Failover Cluster Manager**, select **Cluster Network** in the **Networks** group, and choose **Cluster and Client** in the **Cluster Use** column (see the screenshot below).
 Interfaces and their networks:
| **Interface** | **Network** | **Description** |
| -------------- | --------------- | ------------------------------------------------------------------------------------------------------------ |
| FOC | 192.168.0.10/23 | The cluster in the cluster2016.ru domain. Comprises two nodes. |
| FC12ProcServer | 192.168.0.9/23 | The address of the ABBYY FlexiCapture Processing Server service that [runs in the cluster](#adding-service). |
| Storage | 192.168.0.1/23 | [File storage](#network-folder). |
| Node1 | 192.168.0.11/23 | [First cluster node](#nodes). |
| Node2 | 192.168.0.12/23 | [Second cluster node](#nodes). |
#### Domain users
To set up domain user accounts:
1. Create two domain users, for example, cluster2016\node1admin and cluster2016\node2admin.
2. Give administrator rights to cluster2016\node1admin on Node1 and to cluster2016\node2admin on Node2.
These user accounts are used only for working with ABBYY FlexiCapture in a failover cluster, to ensure correct usage of shared network resources. Clustering requires domain accounts; you cannot work under a local user account.
### Add the ABBYY FlexiCapture Processing Server service
Install ABBYY FlexiCapture Processing Server on Node1 and Node2, and then create a shared folder (see below) for the FlexiCapture service.
To create the service, complete the following steps:
Right-click the **Roles** group and choose **Configure Role…**.
Select **Generic Service** from the list of services and click **Next**.
Choose ABBYY FlexiCapture 12 Processing Server from the list of available services and click **Next**.
Enter the name of the service (`FC12ProcServer` in this example). The IP address will be generated automatically. Click **Next**.
Choose the volume you created for centralized storage and click **Next**.
Specify the registry key `HKEY_LOCAL_MACHINE\SOFTWARE\Wow6432Node\ABBYY\FlexiCapture\12.0` (see the screenshot below).
Click **Next** to confirm the settings, and then click **Finish** to complete the creation of the service in the cluster.
### Create a shared folder for the Processing Server service
Create a shared folder for the newly created service, where the temporary files for Node1 and Node2 will be stored.
The network folder configuration described here is not fail-safe: if the storage fails, the cluster will go down. To ensure continuous operation of the cluster, you need to make your file storage fail-safe. See [Set up a distributed file system](/flexi-capture/fail-safety-dfs) for detailed instructions.
To create a shared folder, complete the following steps:
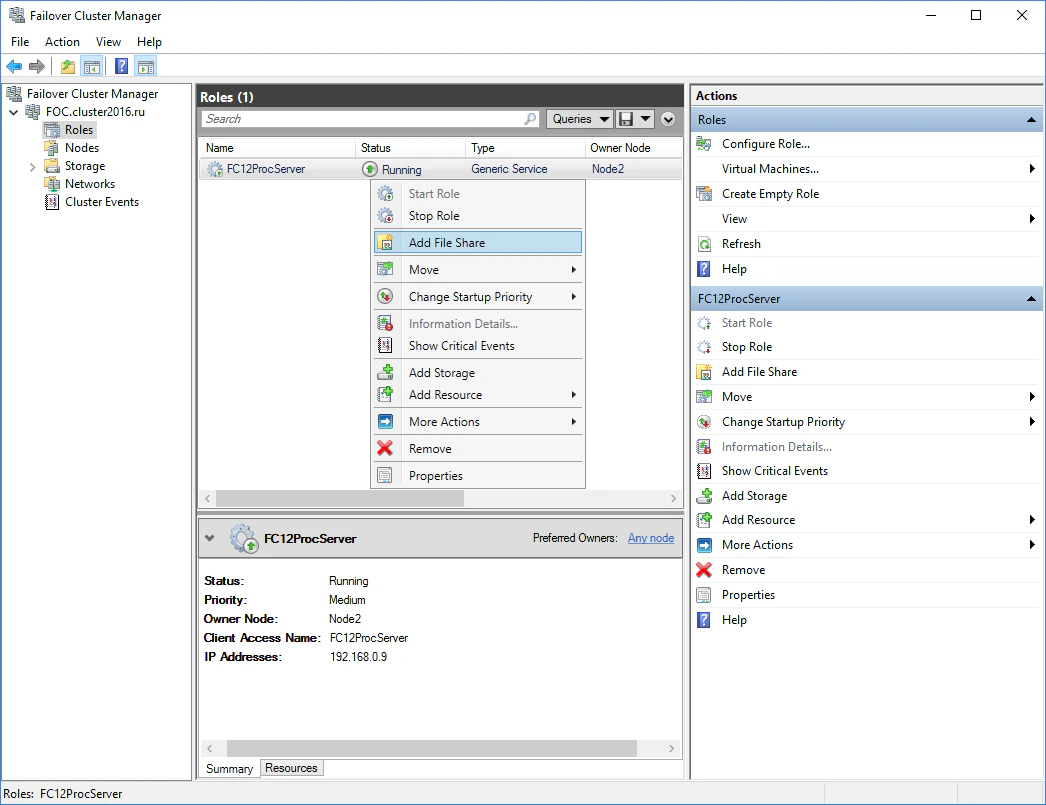
Select **Add File Share** in the local menu of the newly created service (`FC12ProcServer` in this example).
Interfaces and their networks:
| **Interface** | **Network** | **Description** |
| -------------- | --------------- | ------------------------------------------------------------------------------------------------------------ |
| FOC | 192.168.0.10/23 | The cluster in the cluster2016.ru domain. Comprises two nodes. |
| FC12ProcServer | 192.168.0.9/23 | The address of the ABBYY FlexiCapture Processing Server service that [runs in the cluster](#adding-service). |
| Storage | 192.168.0.1/23 | [File storage](#network-folder). |
| Node1 | 192.168.0.11/23 | [First cluster node](#nodes). |
| Node2 | 192.168.0.12/23 | [Second cluster node](#nodes). |
#### Domain users
To set up domain user accounts:
1. Create two domain users, for example, cluster2016\node1admin and cluster2016\node2admin.
2. Give administrator rights to cluster2016\node1admin on Node1 and to cluster2016\node2admin on Node2.
These user accounts are used only for working with ABBYY FlexiCapture in a failover cluster, to ensure correct usage of shared network resources. Clustering requires domain accounts; you cannot work under a local user account.
### Add the ABBYY FlexiCapture Processing Server service
Install ABBYY FlexiCapture Processing Server on Node1 and Node2, and then create a shared folder (see below) for the FlexiCapture service.
To create the service, complete the following steps:
Right-click the **Roles** group and choose **Configure Role…**.
Select **Generic Service** from the list of services and click **Next**.
Choose ABBYY FlexiCapture 12 Processing Server from the list of available services and click **Next**.
Enter the name of the service (`FC12ProcServer` in this example). The IP address will be generated automatically. Click **Next**.
Choose the volume you created for centralized storage and click **Next**.
Specify the registry key `HKEY_LOCAL_MACHINE\SOFTWARE\Wow6432Node\ABBYY\FlexiCapture\12.0` (see the screenshot below).
Click **Next** to confirm the settings, and then click **Finish** to complete the creation of the service in the cluster.
### Create a shared folder for the Processing Server service
Create a shared folder for the newly created service, where the temporary files for Node1 and Node2 will be stored.
The network folder configuration described here is not fail-safe: if the storage fails, the cluster will go down. To ensure continuous operation of the cluster, you need to make your file storage fail-safe. See [Set up a distributed file system](/flexi-capture/fail-safety-dfs) for detailed instructions.
To create a shared folder, complete the following steps:
Select **Add File Share** in the local menu of the newly created service (`FC12ProcServer` in this example).
 Select the **SMB Share – Applications** profile.
Specify a location for the shared folder (**Select by volume** is the default option).
If necessary, enter a name and description for the shared folder and click **Next**.
On the **Other Settings** tab, keep the default values and click **Next**.
Specify folder permissions for the previously created domain users ([node1admin@cluster2016.ru](mailto:node1admin@cluster2016.ru) and [node2admin@cluster2016.ru](mailto:node2admin@cluster2016.ru)). To do this, click **Customize permissions…**.
Click **Add**, and then click **Select a principal**. Select a user and click **OK**. Under **Basic permissions**, select the **Full control** option and click **OK**. Repeat these steps for the node2admin user and click **OK**.
Click **Next**, check that the specified settings are correct, and click **Create**. Once the shared folder is successfully created, click **Close**.
## Configure the cluster nodes
Next you need to set up the Node1 and Node2 cluster nodes. The instructions that follow are for Node1. Node2 is set up identically.
### Set up the ABBYY FlexiCapture Processing Server service
Enter the following command in the command line (cmd.exe):
```
sc config ABBYY.ProcServer.FlexiCapture.12.0 binpath= "%systemdrive%\Program Files\ABBYY FlexiCapture 12 Servers\FlexiBRSvc.exe" \service -stationType:server -inifile:\\FC12procserver\ClusterTemp\ServerSettings.xml
```
Copying and pasting the above command may introduce redundant new line characters, resulting in an error. If this is the case, type the command manually.
This command changes the default settings for the `ABBYY.ProcServer.FlexiCapture.12` process, which is launched from the file `%systemdrive%\Program Files\ABBYY FlexiCapture 12 Servers\FlexiBRSvc.exe` and sets the path to the file that contains the settings for the Processing Server: `\\FC12procserver\ClusterTemp\ServerSettings.xml`. The `ServerSettings.xml` file is then stored in the shared folder and is available to all nodes in the cluster.
The `ServerSettings.xml` file contains the Processing Server settings. If this file is not found when you start the Processing Server, it is started with the default settings and a new `ServerSettings.xml` is created.
Find the ABBYY FlexiCapture 12 Processing Server service in the list of services (**Start → Administrative Tools → Services**), right-click the service, and select **Properties**.
Make sure that the parameters you typed in the command line are displayed in the **Path to executable** field.
Click the **Log On** tab. For Node1, change the user NetworkService to node1admin. For Node2, change the user NetworkService to node2admin. Click **OK**.
### Change the %appdata% variable
The `ABBYY.ProcServer.FlexiCapture.12.0` service creates and stores session data in the location referenced by the `%appdata%` variable. The node1admin and node2admin users must have the same folder specified for `%appdata%` in order for the service to switch between the cluster nodes.
For the cluster2016\node1admin user, the `%appdata%` variable must be changed on Node1. For the cluster2016\node2admin user, the `%appdata%` variable must be changed on Node2.
You can change the `%appdata%` variable via the command line or directly in the Windows registry.
To change `%appdata%` via the command line:
Enter the following command in the command line (cmd.exe):
```
REG ADD "HKCU\Software\Microsoft\Windows\CurrentVersion\Explorer\User Shell Folders" /v AppData /t REG_EXPAND_SZ /d \\FC12ProcServer\ClusterTemp
```
where `\\FC12ProcServer\ClusterTemp` should be replaced with the path to your folder.
Copying and pasting the above command may introduce redundant new line characters, resulting in an error. If this is the case, type the command manually.
Confirm that you want to change the `AppData` folder if it already exists.
Repeat the previous steps for Node2.
To change `%appdata%` directly in the Windows registry:
Find the key `HKEY_CURRENT_USER\Software\Microsoft\Windows\CurrentVersion\Explorer\User Shell Folders` in the registry.
If no such key exists, create a `REG_EXPAND_SZ` type variable named `AppData` in this key and set its value to `\\FC12ProcServer\ClusterTemp`.
Repeat the previous steps for Node2.
### Connect the Processing Server Monitor
To connect the Processing Server Monitor, select a node for the `FC12ProcServer` service, and then open the Processing Server Monitor on any computer in your LAN and add the clustered Processing Server.
Select the **SMB Share – Applications** profile.
Specify a location for the shared folder (**Select by volume** is the default option).
If necessary, enter a name and description for the shared folder and click **Next**.
On the **Other Settings** tab, keep the default values and click **Next**.
Specify folder permissions for the previously created domain users ([node1admin@cluster2016.ru](mailto:node1admin@cluster2016.ru) and [node2admin@cluster2016.ru](mailto:node2admin@cluster2016.ru)). To do this, click **Customize permissions…**.
Click **Add**, and then click **Select a principal**. Select a user and click **OK**. Under **Basic permissions**, select the **Full control** option and click **OK**. Repeat these steps for the node2admin user and click **OK**.
Click **Next**, check that the specified settings are correct, and click **Create**. Once the shared folder is successfully created, click **Close**.
## Configure the cluster nodes
Next you need to set up the Node1 and Node2 cluster nodes. The instructions that follow are for Node1. Node2 is set up identically.
### Set up the ABBYY FlexiCapture Processing Server service
Enter the following command in the command line (cmd.exe):
```
sc config ABBYY.ProcServer.FlexiCapture.12.0 binpath= "%systemdrive%\Program Files\ABBYY FlexiCapture 12 Servers\FlexiBRSvc.exe" \service -stationType:server -inifile:\\FC12procserver\ClusterTemp\ServerSettings.xml
```
Copying and pasting the above command may introduce redundant new line characters, resulting in an error. If this is the case, type the command manually.
This command changes the default settings for the `ABBYY.ProcServer.FlexiCapture.12` process, which is launched from the file `%systemdrive%\Program Files\ABBYY FlexiCapture 12 Servers\FlexiBRSvc.exe` and sets the path to the file that contains the settings for the Processing Server: `\\FC12procserver\ClusterTemp\ServerSettings.xml`. The `ServerSettings.xml` file is then stored in the shared folder and is available to all nodes in the cluster.
The `ServerSettings.xml` file contains the Processing Server settings. If this file is not found when you start the Processing Server, it is started with the default settings and a new `ServerSettings.xml` is created.
Find the ABBYY FlexiCapture 12 Processing Server service in the list of services (**Start → Administrative Tools → Services**), right-click the service, and select **Properties**.
Make sure that the parameters you typed in the command line are displayed in the **Path to executable** field.
Click the **Log On** tab. For Node1, change the user NetworkService to node1admin. For Node2, change the user NetworkService to node2admin. Click **OK**.
### Change the %appdata% variable
The `ABBYY.ProcServer.FlexiCapture.12.0` service creates and stores session data in the location referenced by the `%appdata%` variable. The node1admin and node2admin users must have the same folder specified for `%appdata%` in order for the service to switch between the cluster nodes.
For the cluster2016\node1admin user, the `%appdata%` variable must be changed on Node1. For the cluster2016\node2admin user, the `%appdata%` variable must be changed on Node2.
You can change the `%appdata%` variable via the command line or directly in the Windows registry.
To change `%appdata%` via the command line:
Enter the following command in the command line (cmd.exe):
```
REG ADD "HKCU\Software\Microsoft\Windows\CurrentVersion\Explorer\User Shell Folders" /v AppData /t REG_EXPAND_SZ /d \\FC12ProcServer\ClusterTemp
```
where `\\FC12ProcServer\ClusterTemp` should be replaced with the path to your folder.
Copying and pasting the above command may introduce redundant new line characters, resulting in an error. If this is the case, type the command manually.
Confirm that you want to change the `AppData` folder if it already exists.
Repeat the previous steps for Node2.
To change `%appdata%` directly in the Windows registry:
Find the key `HKEY_CURRENT_USER\Software\Microsoft\Windows\CurrentVersion\Explorer\User Shell Folders` in the registry.
If no such key exists, create a `REG_EXPAND_SZ` type variable named `AppData` in this key and set its value to `\\FC12ProcServer\ClusterTemp`.
Repeat the previous steps for Node2.
### Connect the Processing Server Monitor
To connect the Processing Server Monitor, select a node for the `FC12ProcServer` service, and then open the Processing Server Monitor on any computer in your LAN and add the clustered Processing Server.