> ## Documentation Index
> Fetch the complete documentation index at: https://docs.abbyy.com/llms.txt
> Use this file to discover all available pages before exploring further.
# ABBYY FlexiCapture Connect
> Install and configure ABBYY FlexiCapture Connect, the Windows service that imports and exports documents and syncs data sets with Cloud projects.
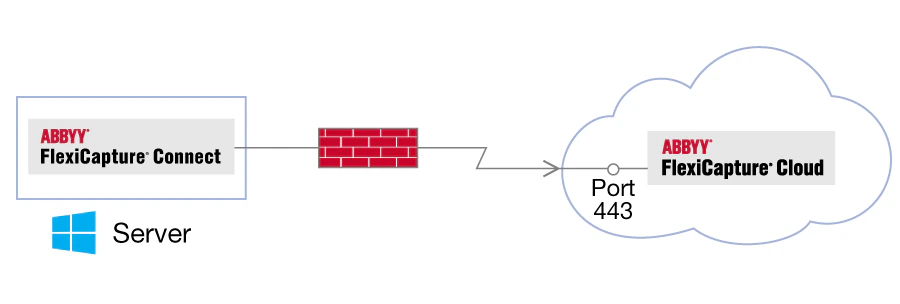
ABBYY FlexiCapture Connect runs as a Windows service and allows users to import documents into ABBYY FlexiCapture Cloud projects, export documents from ABBYY FlexiCapture Cloud projects, and synchronize data sets.
 ## System requirements
| Requirement | Details |
| ---------------------- | ------------------------------------------------------------------------------------------------------------------ |
| Operating system | Windows 10, Windows 11, or Windows Server 2012, 2012 R2, 2016, 2019, 2022, or 2025 (each with Desktop Experience). |
| RAM | At least 2.5 GB is recommended for a data set containing approximately 500,000 vendors. |
| Software compatibility | ABBYY FlexiCapture Application Server Release 3 or later; .NET Framework 4.6.1 or later. |
## Setup
To configure ABBYY FlexiCapture Connect:
We recommend that you use your service account when following the instructions in this section.
Download and run the `FlexiCapture_Connect_Installer_*.msi` file from [https://www.abbyy.com/flexicapture-downloads/cloud/](https://www.abbyy.com/flexicapture-downloads/cloud/).
If ABBYY FlexiCapture Connect is already installed and you are updating an existing version, create a backup copy of the `config.json` file, which is located in `C:\Program Files (x86)\ABBYY FlexiCapture Connect\config.json`.
Modify the `config.json` file to suit your needs (see [Configuration file explained](#configuration-file-explained) below).
1. Pause the ABBYY FlexiCapture Connect service.
2. Run the `ABBYY.FlexiCapture.Connect.exe` file. A console window with a detailed log opens.
Restart ABBYY FlexiCapture Connect.
## Configuration file explained
A typical configuration file looks like this:
```json theme={null}
{
"url": "https://europe.flexicapture.com/",
"tenant": "testtenant",
"user": "user1",
"password": "password1",
"projects": [
{
"name": "project1",
"import": {
"directory": "C:\\HotFolder\\Import",
"fileMask": "*",
"settings": {
"region": "US",
"verification_type": "NoVerification",
"export_format": "Xml"
},
"createDocument": "ForEachFile",
"period": "00:01:00",
"schedule": [ "12:00:00", "06:00:00" ]
},
"export": {
"directory": "C:\\HotFolder\\Export",
"period": "00:01:00",
"schedule": [ "12:00:00" ]
},
"templates": [
{
"name": "template",
"datasets": [
{
"name": "DataSet",
"file": "C:\\HotFolder\\DataSets\\DataSet.csv",
"period": "00:01:00",
"schedule": [ "12:00:00" ]
}
]
}
]
}
]
}
```
The sections of a typical configuration file are described below.
### General settings
* **url** — The URL of the tenant (for example, `https://europe.flexicapture.com`).
* **tenant** — The name of the tenant.
* **user** — The user name of the service account.
* **password** — The password of the service account.
* **projects** — Contains settings for individual projects, such as document import and export parameters and data set synchronization parameters.
To import and export documents, set up the tenant account as an **External User**. To synchronize data sets, the tenant account needs either the **Administrator** role or both the **Project Settings Editor** and **External User** roles. By default, all projects are accessible to the tenant account; you can change this by adjusting the access rights granted to specific user roles. For more information, see [Set up user roles and access rights](/flexi-capture/admin-guide/roles-setup).
### Project settings
* **name** — Project name.
* **import** — Settings for importing documents.
* **export** — Settings for exporting documents.
* **templates** — Settings for synchronizing data sets.
### Import settings
* **directory** — The path to the folder from which documents are imported.
* **fileMask** — A file and folder filter. The `*` and `?` wildcards are supported.
* **settings** — Batch registration parameters.
* **createDocument** — Possible values are `ForEachFile` (creates a separate document for each imported file) or `Automatically` (uses project parameters). To use this function, first select the **Automatically when Document Definition is applied** option in the ABBYY FlexiCapture project.
* **period** and **schedule** — Task schedule. The `period` property specifies how often the task starts (for example, `"period": "00:02:30"` starts the task every two and a half minutes). The `schedule` property specifies the times when the task starts (for example, `"schedule": [ "09:00:00", "19:00:00" ]` starts the task daily at 9:00 and 19:00).
A new batch is created each time files are imported. The batch name contains the current date and time. The **period** and **schedule** properties can be set independently of one another.
### Export settings
* **directory** — The path to the folder where exported files are stored.
* **period** and **schedule** — Task schedule, specified the same way as for import settings.
When documents are exported, a folder is created for each batch in the project that is currently at the “Processed” stage. These destination folders have the same names as their respective batches and contain all the processing results. If a destination folder is deleted, the program creates a new one with the same name and places the processing results there. The **period** and **schedule** properties can be set independently of one another.
### Document Definition settings
* **name** — The name of the Document Definition related to the given section.
* **datasets** — The data set synchronization parameters for the Document Definition.
### Data set synchronization settings
* **name** — The name of the data set.
* **file** — The path to the CSV file that contains the master data exported from the ERP system. The first line of the CSV file must contain the names of the data set fields separated by commas, and any values containing commas must be enclosed in double quotes.
* **period** and **schedule** — Task schedule, specified the same way as for import settings.
When synchronizing data sets:
* The current data sets are replaced with the new ones.
* Any existing records modified by a verification operator (by editing, adding, or deleting values) are saved and synchronized, while any new records added manually are deleted and not synchronized.
* For very large data sets, synchronization may take several hours.
The following example shows a "Vendors" data set CSV file with a vendor that has multiple IBANs:
```text theme={null}
Id,Name,Street,City,ZIP,CountryCode,VATID,IBAN,IBAN,BusinessUnitId
1,MacWay,9 Route d'Eschau,Illkirch-Graffenstaden,67411,FR,1A345678901,FR1420041010050500012M02606,FR7630006000011234567890189,1
2,Bottled Water Ltd,Mary Ann St,Cardiff,CF102EN,GB,123456789,GB29NWBK60161331926819,,2
3,CCcompany Ltd.,2 Wilkins Grove,Welwyn Garden City,AL86JS,GB,234567890,GB27BOFI90212729823529,,3
4,MANZANA solutions,"Calle de la Botanica, 15",Madrid,28000,ES,E73895722,ES9121000418450200051332,,4
```
## Store service account credentials in Windows Vault
Service account credentials can be stored either in the `config.json` file in the ABBYY FlexiCapture Connect service directory or, more securely, in Windows Vault. For more information, see the Microsoft documentation on [Credential Manager](https://support.microsoft.com/en-us/help/4026814/windows-accessing-credential-manager) and [cmdkey](https://docs.microsoft.com/en-us/windows-server/administration/windows-commands/cmdkey).
To enable ABBYY FlexiCapture Connect to retrieve service account credentials from Windows Vault:
Create a new Windows account, or choose an existing Windows account.
Run `cmd.exe` under that Windows account and run the following command, where `https://europe.flexicapture.com#tenant` is a combination of the ABBYY FlexiCapture URL and the tenant name:
```text theme={null}
cmdkey /generic:https://europe.flexicapture.com#tenant /user:userName /password:p@ssword
```
Delete the user name and password from the `config.json` file located in the ABBYY FlexiCapture Connect service directory.
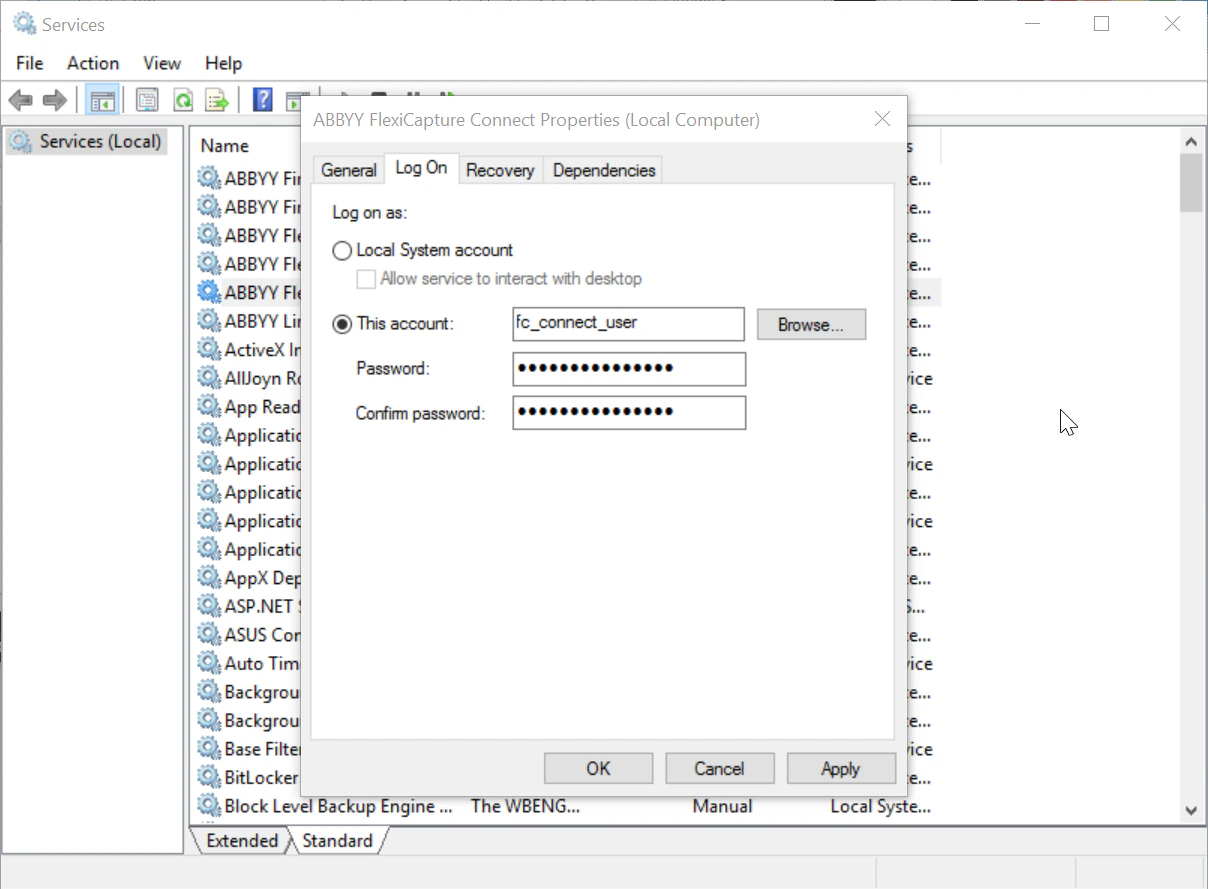
Run **Windows Service Manager** (`services.msc`) and configure ABBYY FlexiCapture Connect to launch under the same Windows account you selected in the second step:
1. In the **Services** properties, open **ABBYY FlexiCapture Connect**.
2. On the **Log On** tab, select **This account** and enter your Windows account credentials.
## System requirements
| Requirement | Details |
| ---------------------- | ------------------------------------------------------------------------------------------------------------------ |
| Operating system | Windows 10, Windows 11, or Windows Server 2012, 2012 R2, 2016, 2019, 2022, or 2025 (each with Desktop Experience). |
| RAM | At least 2.5 GB is recommended for a data set containing approximately 500,000 vendors. |
| Software compatibility | ABBYY FlexiCapture Application Server Release 3 or later; .NET Framework 4.6.1 or later. |
## Setup
To configure ABBYY FlexiCapture Connect:
We recommend that you use your service account when following the instructions in this section.
Download and run the `FlexiCapture_Connect_Installer_*.msi` file from [https://www.abbyy.com/flexicapture-downloads/cloud/](https://www.abbyy.com/flexicapture-downloads/cloud/).
If ABBYY FlexiCapture Connect is already installed and you are updating an existing version, create a backup copy of the `config.json` file, which is located in `C:\Program Files (x86)\ABBYY FlexiCapture Connect\config.json`.
Modify the `config.json` file to suit your needs (see [Configuration file explained](#configuration-file-explained) below).
1. Pause the ABBYY FlexiCapture Connect service.
2. Run the `ABBYY.FlexiCapture.Connect.exe` file. A console window with a detailed log opens.
Restart ABBYY FlexiCapture Connect.
## Configuration file explained
A typical configuration file looks like this:
```json theme={null}
{
"url": "https://europe.flexicapture.com/",
"tenant": "testtenant",
"user": "user1",
"password": "password1",
"projects": [
{
"name": "project1",
"import": {
"directory": "C:\\HotFolder\\Import",
"fileMask": "*",
"settings": {
"region": "US",
"verification_type": "NoVerification",
"export_format": "Xml"
},
"createDocument": "ForEachFile",
"period": "00:01:00",
"schedule": [ "12:00:00", "06:00:00" ]
},
"export": {
"directory": "C:\\HotFolder\\Export",
"period": "00:01:00",
"schedule": [ "12:00:00" ]
},
"templates": [
{
"name": "template",
"datasets": [
{
"name": "DataSet",
"file": "C:\\HotFolder\\DataSets\\DataSet.csv",
"period": "00:01:00",
"schedule": [ "12:00:00" ]
}
]
}
]
}
]
}
```
The sections of a typical configuration file are described below.
### General settings
* **url** — The URL of the tenant (for example, `https://europe.flexicapture.com`).
* **tenant** — The name of the tenant.
* **user** — The user name of the service account.
* **password** — The password of the service account.
* **projects** — Contains settings for individual projects, such as document import and export parameters and data set synchronization parameters.
To import and export documents, set up the tenant account as an **External User**. To synchronize data sets, the tenant account needs either the **Administrator** role or both the **Project Settings Editor** and **External User** roles. By default, all projects are accessible to the tenant account; you can change this by adjusting the access rights granted to specific user roles. For more information, see [Set up user roles and access rights](/flexi-capture/admin-guide/roles-setup).
### Project settings
* **name** — Project name.
* **import** — Settings for importing documents.
* **export** — Settings for exporting documents.
* **templates** — Settings for synchronizing data sets.
### Import settings
* **directory** — The path to the folder from which documents are imported.
* **fileMask** — A file and folder filter. The `*` and `?` wildcards are supported.
* **settings** — Batch registration parameters.
* **createDocument** — Possible values are `ForEachFile` (creates a separate document for each imported file) or `Automatically` (uses project parameters). To use this function, first select the **Automatically when Document Definition is applied** option in the ABBYY FlexiCapture project.
* **period** and **schedule** — Task schedule. The `period` property specifies how often the task starts (for example, `"period": "00:02:30"` starts the task every two and a half minutes). The `schedule` property specifies the times when the task starts (for example, `"schedule": [ "09:00:00", "19:00:00" ]` starts the task daily at 9:00 and 19:00).
A new batch is created each time files are imported. The batch name contains the current date and time. The **period** and **schedule** properties can be set independently of one another.
### Export settings
* **directory** — The path to the folder where exported files are stored.
* **period** and **schedule** — Task schedule, specified the same way as for import settings.
When documents are exported, a folder is created for each batch in the project that is currently at the “Processed” stage. These destination folders have the same names as their respective batches and contain all the processing results. If a destination folder is deleted, the program creates a new one with the same name and places the processing results there. The **period** and **schedule** properties can be set independently of one another.
### Document Definition settings
* **name** — The name of the Document Definition related to the given section.
* **datasets** — The data set synchronization parameters for the Document Definition.
### Data set synchronization settings
* **name** — The name of the data set.
* **file** — The path to the CSV file that contains the master data exported from the ERP system. The first line of the CSV file must contain the names of the data set fields separated by commas, and any values containing commas must be enclosed in double quotes.
* **period** and **schedule** — Task schedule, specified the same way as for import settings.
When synchronizing data sets:
* The current data sets are replaced with the new ones.
* Any existing records modified by a verification operator (by editing, adding, or deleting values) are saved and synchronized, while any new records added manually are deleted and not synchronized.
* For very large data sets, synchronization may take several hours.
The following example shows a "Vendors" data set CSV file with a vendor that has multiple IBANs:
```text theme={null}
Id,Name,Street,City,ZIP,CountryCode,VATID,IBAN,IBAN,BusinessUnitId
1,MacWay,9 Route d'Eschau,Illkirch-Graffenstaden,67411,FR,1A345678901,FR1420041010050500012M02606,FR7630006000011234567890189,1
2,Bottled Water Ltd,Mary Ann St,Cardiff,CF102EN,GB,123456789,GB29NWBK60161331926819,,2
3,CCcompany Ltd.,2 Wilkins Grove,Welwyn Garden City,AL86JS,GB,234567890,GB27BOFI90212729823529,,3
4,MANZANA solutions,"Calle de la Botanica, 15",Madrid,28000,ES,E73895722,ES9121000418450200051332,,4
```
## Store service account credentials in Windows Vault
Service account credentials can be stored either in the `config.json` file in the ABBYY FlexiCapture Connect service directory or, more securely, in Windows Vault. For more information, see the Microsoft documentation on [Credential Manager](https://support.microsoft.com/en-us/help/4026814/windows-accessing-credential-manager) and [cmdkey](https://docs.microsoft.com/en-us/windows-server/administration/windows-commands/cmdkey).
To enable ABBYY FlexiCapture Connect to retrieve service account credentials from Windows Vault:
Create a new Windows account, or choose an existing Windows account.
Run `cmd.exe` under that Windows account and run the following command, where `https://europe.flexicapture.com#tenant` is a combination of the ABBYY FlexiCapture URL and the tenant name:
```text theme={null}
cmdkey /generic:https://europe.flexicapture.com#tenant /user:userName /password:p@ssword
```
Delete the user name and password from the `config.json` file located in the ABBYY FlexiCapture Connect service directory.
Run **Windows Service Manager** (`services.msc`) and configure ABBYY FlexiCapture Connect to launch under the same Windows account you selected in the second step:
1. In the **Services** properties, open **ABBYY FlexiCapture Connect**.
2. On the **Log On** tab, select **This account** and enter your Windows account credentials.
 To remove credentials from Windows Vault:
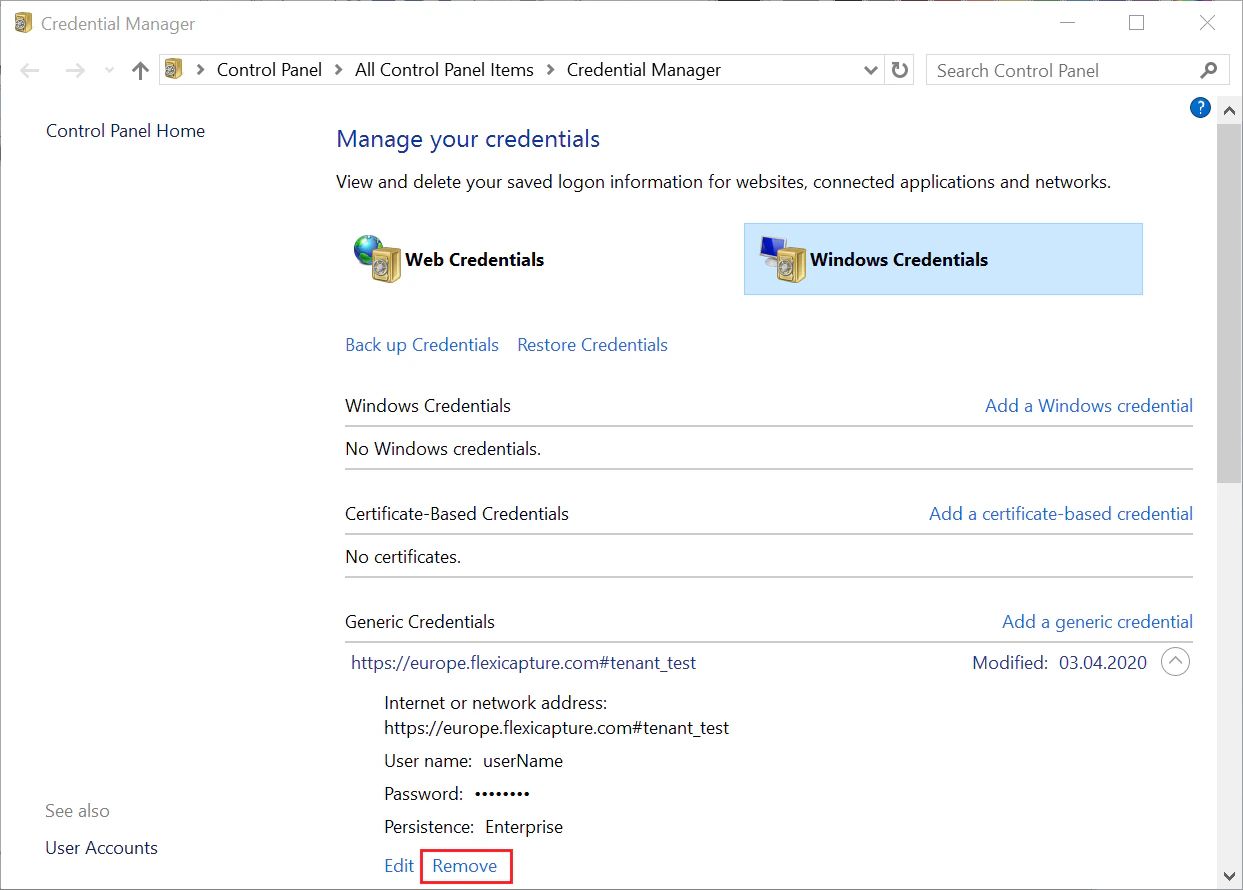
Open **Credential Manager**.
On the **Windows Credentials** tab, expand the credentials that you want to remove and click **Remove**.
To remove credentials from Windows Vault:
Open **Credential Manager**.
On the **Windows Credentials** tab, expand the credentials that you want to remove and click **Remove**.
 ## Set up export
To use ABBYY FlexiCapture Connect to export files from ABBYY FlexiCapture Cloud, adjust your project as described below.
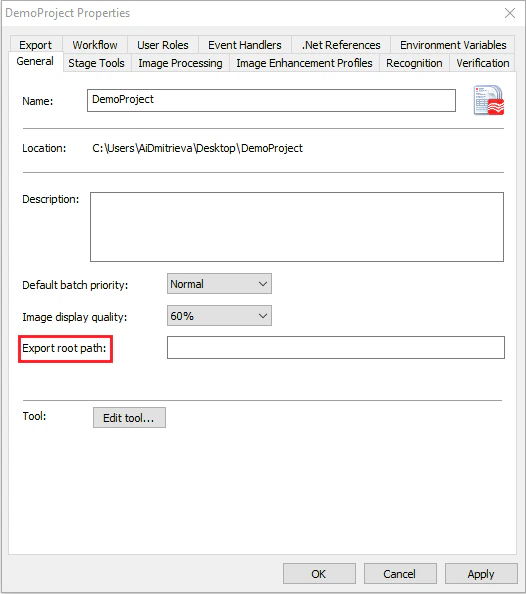
On the **General** tab of the **\ Properties** dialog box, make sure that the **Export root path** field is left empty. For more information, see [Project properties](/flexi-capture/project-settings/project-properties).
## Set up export
To use ABBYY FlexiCapture Connect to export files from ABBYY FlexiCapture Cloud, adjust your project as described below.
On the **General** tab of the **\ Properties** dialog box, make sure that the **Export root path** field is left empty. For more information, see [Project properties](/flexi-capture/project-settings/project-properties).
 In the **Export Settings** dialog box, specify the export path relative to the root path specified on the **General** tab of the **\ Properties** dialog box. Because you left this root path empty, specify the directory without the exact root path.
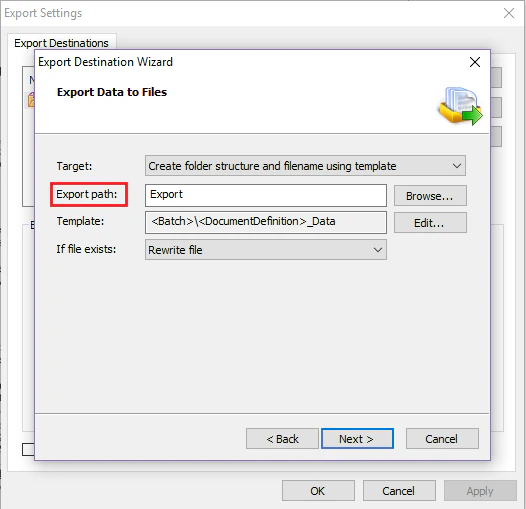 The **If file exists** option is ignored. When files are exported from ABBYY FlexiCapture Cloud via ABBYY FlexiCapture Connect, a new file is created for each new document.
## Limitations
The current version of ABBYY FlexiCapture Connect has the following limitations:
* Only data sets of up to approximately 500,000 records can be synchronized.
* While updating a data set, users will not be able to look up vendors on the web stations.
* The current version does not recognize Hot Folder import profiles that are based on project settings.
* ABBYY FlexiCapture Connect will export documents from all the batches available on the server. The project settings will not affect the name of the destination directory, which will always have the same name as the originating batch.
* ABBYY FlexiCapture Connect can only export an entire batch, which means that if you disable the **Wait for all documents in a batch** option in the project's Workflow Settings, the documents will still not be exported separately.
* The current version cannot export the results from all the documents in a batch into a single file. A separate file is created in the export directory for each document from the batch.
* The current version cannot export the results from all the batches into a single file. A separate file is created in the export directory for each document from each batch.
* The size of imported and exported files is limited to 199 MB.
* Proxy servers are not supported.
## Troubleshooting
If you encounter an error, first review the log file, which you can find in `%LocalAppData%\ABBYY\FlexiCapture\Connect\Logs`. Errors can also be caused by incorrect or incomplete settings specified in the configuration file, so review the `config.json` file for any inconsistencies or omissions.
If an error persists, contact the ABBYY Technical Support service, which may require both your `config.json` file and the log file.
The **If file exists** option is ignored. When files are exported from ABBYY FlexiCapture Cloud via ABBYY FlexiCapture Connect, a new file is created for each new document.
## Limitations
The current version of ABBYY FlexiCapture Connect has the following limitations:
* Only data sets of up to approximately 500,000 records can be synchronized.
* While updating a data set, users will not be able to look up vendors on the web stations.
* The current version does not recognize Hot Folder import profiles that are based on project settings.
* ABBYY FlexiCapture Connect will export documents from all the batches available on the server. The project settings will not affect the name of the destination directory, which will always have the same name as the originating batch.
* ABBYY FlexiCapture Connect can only export an entire batch, which means that if you disable the **Wait for all documents in a batch** option in the project's Workflow Settings, the documents will still not be exported separately.
* The current version cannot export the results from all the documents in a batch into a single file. A separate file is created in the export directory for each document from the batch.
* The current version cannot export the results from all the batches into a single file. A separate file is created in the export directory for each document from each batch.
* The size of imported and exported files is limited to 199 MB.
* Proxy servers are not supported.
## Troubleshooting
If you encounter an error, first review the log file, which you can find in `%LocalAppData%\ABBYY\FlexiCapture\Connect\Logs`. Errors can also be caused by incorrect or incomplete settings specified in the configuration file, so review the `config.json` file for any inconsistencies or omissions.
If an error persists, contact the ABBYY Technical Support service, which may require both your `config.json` file and the log file.