> ## Documentation Index
> Fetch the complete documentation index at: https://docs.abbyy.com/llms.txt
> Use this file to discover all available pages before exploring further.
# Configuring ABBYY FlexiCapture
> Upload the sample FlexiCapture project and set the workflow schema for the unattended or attended service scenario when using the Automation Anywhere connector.
Before you start configuring FC, make sure that the following requirements are met:
* The FC 12 Project Setup Station is installed.
* The FC 12 Application Server administrator's account is configured.
## Uploading the sample FC project to the Application Server
To help you get to grips with ABBYY FlexiCapture Connector for Automation Anywhere, a sample FC project is included in the distribution package, which demonstrates how the connector can be used to extract data from invoices. To upload this sample project to the FC server, complete the following steps:
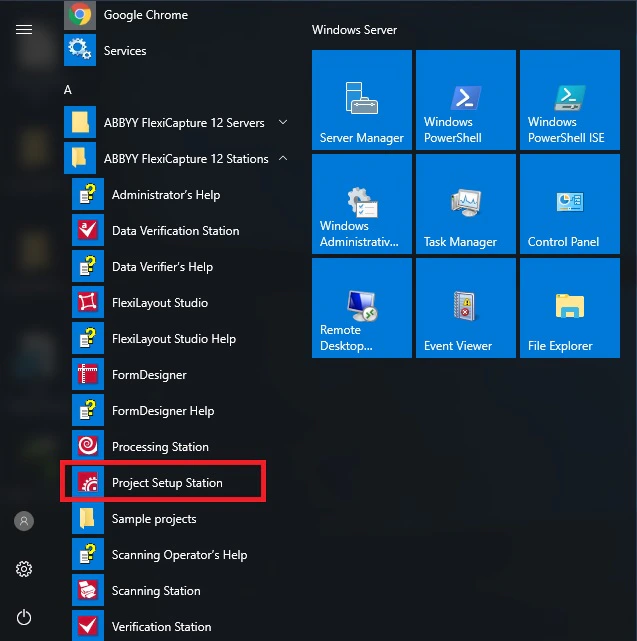
1. Open the Project Setup Station.
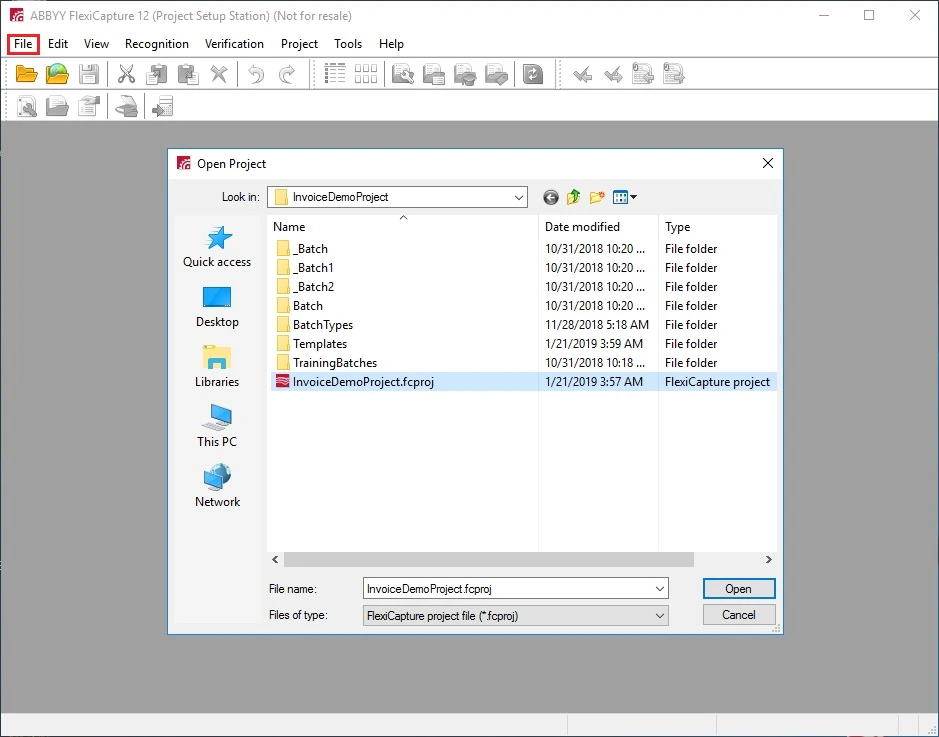
 2. Click **File → Open Project…,** browse to ABBYY FlexiCapture Connector for Automation Anywhere\Samples\FlexiCapture Projects\InvoiceDemoProject, and select the project named **InvoiceDemoProject.fcproj**.
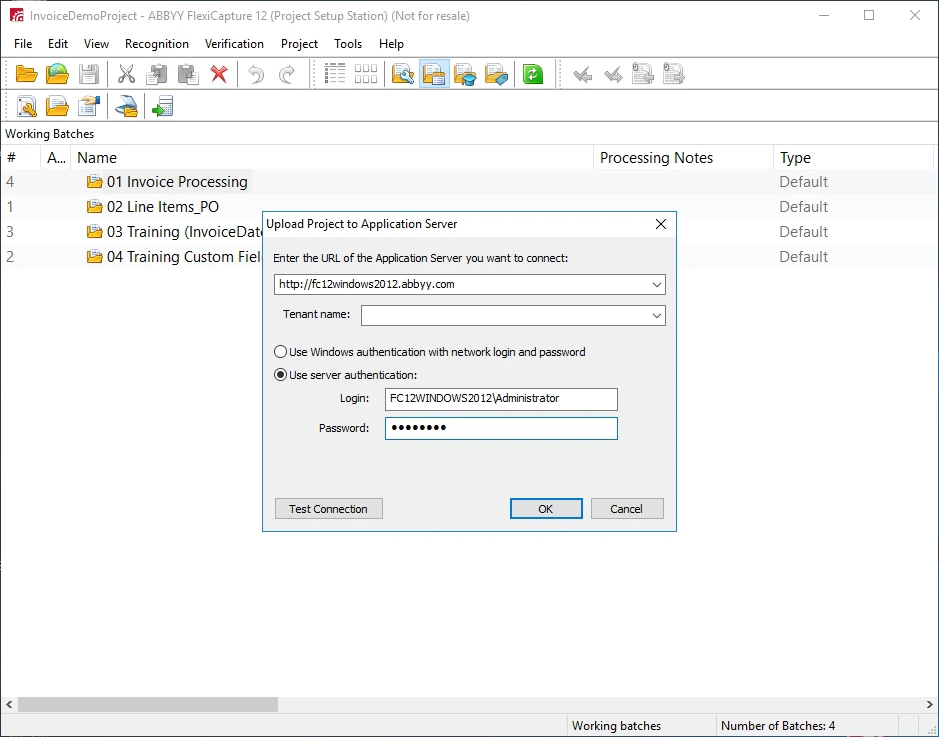
 3. Click **File → Upload Project to Server…** to upload the project to the FC server.
4. In the dialog box that opens, specify the address of the ABBYY FlexiCapture server and the ABBYY FlexiCapture administrator credentials.
If you are using a tenant, specify the name of the tenant in the corresponding field.
5. Click **OK**.
Now you can configure the sample project for the usage scenario of your choice.
## Unattended service scenario
To configure ABBYY FlexiCapture as an unattended service, complete the following steps:
1. Open the Project Setup Station.
2. Click **File → Open Project from Server...**.
3. In the **Open Existing Project from Application Server** dialog box, specify the address of the ABBYY FlexiCapture server and the FlexiCapture administrator credentials.
If you are using a tenant, specify the name of the tenant in the corresponding field.
3. Click **File → Upload Project to Server…** to upload the project to the FC server.
4. In the dialog box that opens, specify the address of the ABBYY FlexiCapture server and the ABBYY FlexiCapture administrator credentials.
If you are using a tenant, specify the name of the tenant in the corresponding field.
5. Click **OK**.
Now you can configure the sample project for the usage scenario of your choice.
## Unattended service scenario
To configure ABBYY FlexiCapture as an unattended service, complete the following steps:
1. Open the Project Setup Station.
2. Click **File → Open Project from Server...**.
3. In the **Open Existing Project from Application Server** dialog box, specify the address of the ABBYY FlexiCapture server and the FlexiCapture administrator credentials.
If you are using a tenant, specify the name of the tenant in the corresponding field.
 4. In the dialog box that opens, select the project.
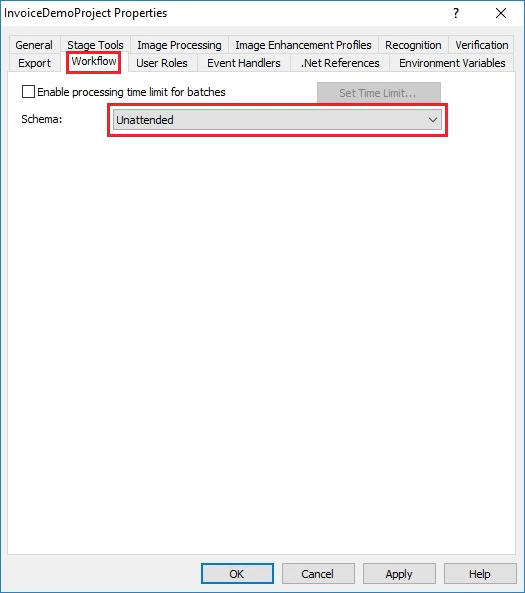
5. Click **Project → Project Properties...** and click the **Workflow** tab. From the **Schema** drop-down list, select **Unattended**.
4. In the dialog box that opens, select the project.
5. Click **Project → Project Properties...** and click the **Workflow** tab. From the **Schema** drop-down list, select **Unattended**.
 6. Click **OK**.
Next, you need to [configure Automation Anywhere](/flexi-capture/connectors/aa-setup-aa).
## Attended service scenario
To configure ABBYY FlexiCapture as an attended service, complete the following steps:
1. Open the Project Setup Station.
2. Click **File → Open Project from Server...**.
3. In the **Open Existing Project from Application Server** dialog box, specify the address of the ABBYY FlexiCapture server and the FlexiCapture administrator credentials.
If you are using a tenant, specify the name of the tenant in the corresponding field.
4. In the dialog box that opens, select the project.
5. Click **Project → Project Properties...** and click the **Workflow** tab. From the **Schema** drop-down list, select **Advanced**.
6. Select the **Verification** option.
6. Click **OK**.
Next, you need to [configure Automation Anywhere](/flexi-capture/connectors/aa-setup-aa).
## Attended service scenario
To configure ABBYY FlexiCapture as an attended service, complete the following steps:
1. Open the Project Setup Station.
2. Click **File → Open Project from Server...**.
3. In the **Open Existing Project from Application Server** dialog box, specify the address of the ABBYY FlexiCapture server and the FlexiCapture administrator credentials.
If you are using a tenant, specify the name of the tenant in the corresponding field.
4. In the dialog box that opens, select the project.
5. Click **Project → Project Properties...** and click the **Workflow** tab. From the **Schema** drop-down list, select **Advanced**.
6. Select the **Verification** option.
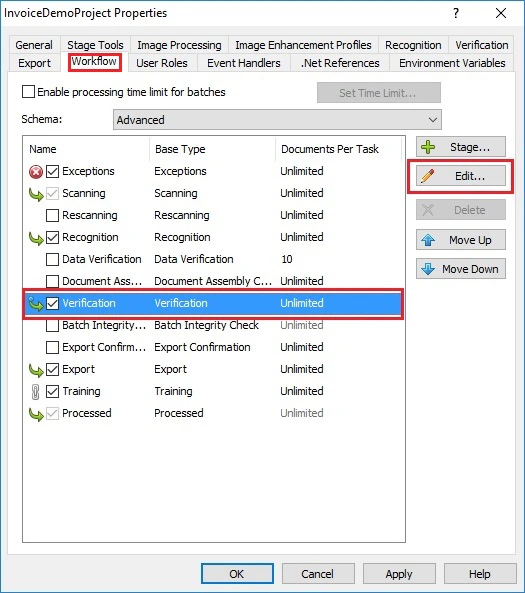 7. Click **Edit…**.
8. In the dialog box that opens, click the **General** tab and select the **Enable web stations** option.
7. Click **Edit…**.
8. In the dialog box that opens, click the **General** tab and select the **Enable web stations** option.
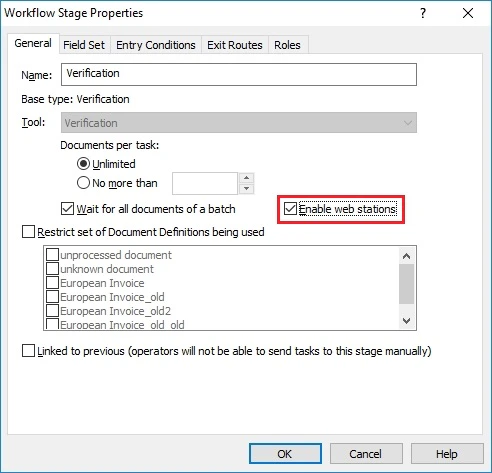 9. Click **OK**.
10. Click **OK** again to close the **Project Properties… dialog box.**
Next, you need to [configure Automation Anywhere](/flexi-capture/connectors/aa-setup-aa).
9. Click **OK**.
10. Click **OK** again to close the **Project Properties… dialog box.**
Next, you need to [configure Automation Anywhere](/flexi-capture/connectors/aa-setup-aa).