> ## Documentation Index
> Fetch the complete documentation index at: https://docs.abbyy.com/llms.txt
> Use this file to discover all available pages before exploring further.
# Configure the display of a record type
> Customize how an Appian record type appears by editing the record list columns, adding record links, and laying out fields in the summary record view.
After you create a record type in Appian Designer, configure how it appears to users. You can edit the columns in the record list, add clickable record links, and lay out the fields in the summary record view.
## Configure the record list
In Appian Designer, open the application and click **Record Type**.
1. In the **Record List** section, click the **Edit Record List** link to edit the records. Some columns were already added automatically when you created the new record type.
2. To add a new column, click **Add Column** and specify:
* **Label** – The name of the new column
* **Select Component** – The type of data to be displayed in the column (you can configure the data source by clicking the component's name)
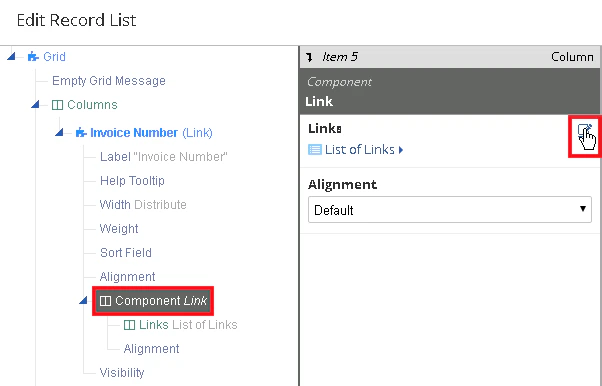
1. In the **Edit Record List** window, expand the **Columns** node, and then expand the column with a link that you want to edit, and select **Component Link**.
2. In the pane on the right, click the **Edit as Expression** icon next to **Links**. This opens a code editor.
 Paste the following code into the code editor. Clicking the link opens the record in the summary view.
```text theme={null}
a!recordLink(
label: rf!InvoiceNumber, /* After label: rf!, type the name of the field whose value should be a clickable link. */
recordType: rp!type,
identifier: rp!id
)
```
For more information, see the [Appian online documentation](https://docs.appian.com/suite/help/17.3/Records_Tutorial.html).
## Configure the record view
Users can view detailed information about each record. By default, this information appears in the summary view, but you can create your own custom views using **New View**. For more information, see the [Appian online documentation](https://docs.appian.com/suite/help/17.2/Create_a_Record_View.html).
To make the data from a table row appear in the summary view, edit the record type's summary view.
Begin editing the record type whose summary view you want to configure.
In the **Record View Details** section, click **Summary** in the **Views** table. The **Edit View** window opens.
Paste the following code into the **Interface** field:
```text theme={null}
=a!dashboardLayout(
firstColumnContents: {
a!textField(
label: "Invoice Number", /* label – This is the name of the field in the view. */
labelPosition: "ADJACENT", /* labelPosition – This is an alignment. */
value: rf!InvoiceNumber, /* value – This is a link to the field in the corresponding data type. */
readOnly: true /* readOnly – This attribute indicates whether the field can be edited or not. */
),
a!textField(
label: "Invoice Date",
labelPosition: "ADJACENT",
value: rf!InvoiceDate,
readOnly: true
),
a!textField(
label: "Total",
labelPosition: "ADJACENT",
value: rf!Total,
readOnly: true
)
}
)
```
For more information, see the [Appian online documentation](https://docs.appian.com/suite/help/17.2/Dashboard_Layout.html).
Click **OK** to save your changes to the record type.
Paste the following code into the code editor. Clicking the link opens the record in the summary view.
```text theme={null}
a!recordLink(
label: rf!InvoiceNumber, /* After label: rf!, type the name of the field whose value should be a clickable link. */
recordType: rp!type,
identifier: rp!id
)
```
For more information, see the [Appian online documentation](https://docs.appian.com/suite/help/17.3/Records_Tutorial.html).
## Configure the record view
Users can view detailed information about each record. By default, this information appears in the summary view, but you can create your own custom views using **New View**. For more information, see the [Appian online documentation](https://docs.appian.com/suite/help/17.2/Create_a_Record_View.html).
To make the data from a table row appear in the summary view, edit the record type's summary view.
Begin editing the record type whose summary view you want to configure.
In the **Record View Details** section, click **Summary** in the **Views** table. The **Edit View** window opens.
Paste the following code into the **Interface** field:
```text theme={null}
=a!dashboardLayout(
firstColumnContents: {
a!textField(
label: "Invoice Number", /* label – This is the name of the field in the view. */
labelPosition: "ADJACENT", /* labelPosition – This is an alignment. */
value: rf!InvoiceNumber, /* value – This is a link to the field in the corresponding data type. */
readOnly: true /* readOnly – This attribute indicates whether the field can be edited or not. */
),
a!textField(
label: "Invoice Date",
labelPosition: "ADJACENT",
value: rf!InvoiceDate,
readOnly: true
),
a!textField(
label: "Total",
labelPosition: "ADJACENT",
value: rf!Total,
readOnly: true
)
}
)
```
For more information, see the [Appian online documentation](https://docs.appian.com/suite/help/17.2/Dashboard_Layout.html).
Click **OK** to save your changes to the record type.