> ## Documentation Index
> Fetch the complete documentation index at: https://docs.abbyy.com/llms.txt
> Use this file to discover all available pages before exploring further.

# Configuring NX Manager

> Configure Job Creator connection settings and generate NX Manager jobs, and then set Export Connector call arguments to send scanned batches to ABBYY FlexiCapture.

## Job Creator

In order to set up the Job Creator application, do the following:

1. Launch **Abbyy.FlexiCapture.NxManager.JobCreator.exe**.
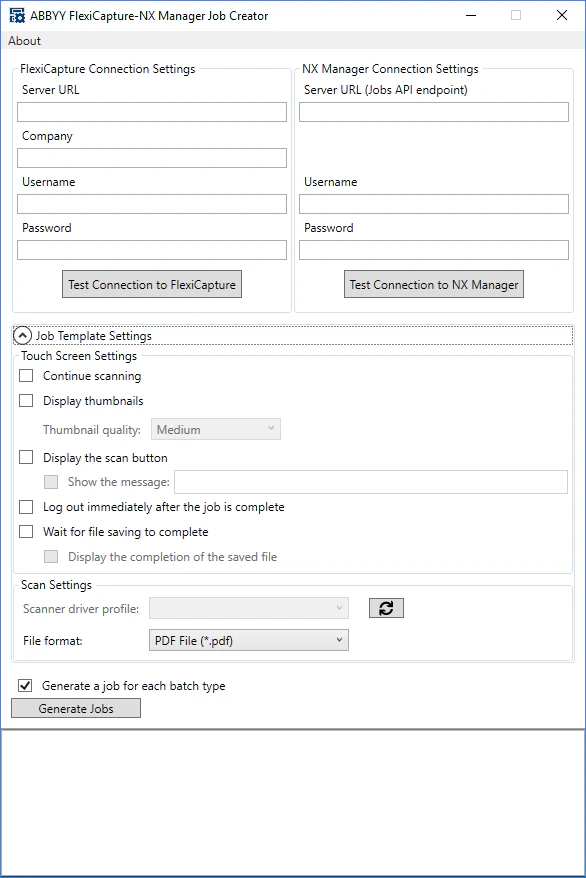
2. In the **FlexiCapture Connection Settings** section, specify the FC connection settings by filling out the following fields:
   * **Server URL** is the FC Application Server address. If you are using FC Cloud, fill in the **Server URL** field by specifying one of the following three FlexiCapture Cloud instances (you should specify the instance that your company is registered in):
     * [https://europe.flexicapture.com](https://europe.flexicapture.com)
     * [https://australia.flexicapture.com](https://australia.flexicapture.com)
     * [https://usa.flexicapture.com](https://usa.flexicapture.com)
   * **Company** (optional) is the name of the tenant (company) on the FC Application Server. Fill in this field if you are using FlexiCapture Cloud or a local multi-tenant system.
   * **Username** and **Password** are the credentials for the user's ABBYY FlexiCapture account.

<Note>
  Make sure that the user either has the role of Scanning Operator for all projects on the server, or has the Administrator role. Access rights must be set up by a FC administrator using the Administration and Monitoring Console. For more information about setting up access rights, see [Managing user accounts](/flexi-capture/web-stations/monitoring-console/users).
</Note>

To test the connection settings, click the **Test connection to FlexiCapture** button.

3. In the **NX Manager Connection Settings** section, specify the NX Manager connection settings by filling out the following fields:
   * **Server address (Jobs API endpoint)** is the address of the Jobs API endpoint on the NX Manager application server — for example, "[http://nx-manager:30447](http://nx-manager:30447)". By default, the Jobs API endpoint uses port 30447.
   * **Username** and **Password** are the credentials for the user's NX Manager account.

To test the connection settings, click the **Test connection to NX Manager** button.

4. In the **Job Template Settings** section, specify the job creation settings. These settings are identical to the job creation settings available in the NX Manager administrator window (on the web). The NX Manager administrator window can also be used to modify job settings post-creation.
5. The **Generate a job for each batch type** feature specifies whether jobs will be created for every batch type. Uncheck this box if you need to create jobs only for the Default batch type.
6. Click **Generate Jobs**. Job creation logs will be recorded in the pane in the lower part of the dialog box. A Job Group named "Send to FC" will be created, and all new jobs will be added to it.

<Frame>
  <img src="https://mintcdn.com/abbyy/KEmWsO92hkr7eybZ/images/flexi-capture/connectors/NXM3.png?fit=max&auto=format&n=KEmWsO92hkr7eybZ&q=85&s=928375314ee1604809c4c741c6d9875f" alt="Screenshot of the Job Creator application dialog, showing the FlexiCapture Connection Settings, NX Manager Connection Settings, and Job Template Settings sections with the Generate Jobs button and the job creation log pane." width="586" height="878" data-path="images/flexi-capture/connectors/NXM3.png" />
</Frame>

Next, if necessary, use the web interface of the NX Manager administrator window to set up access to the "Send to FC" job group for scanners.

## Export Connector

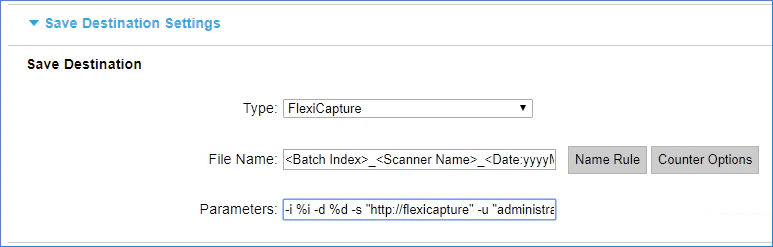
Settings are passed to the Export Connector console application via the call arguments. Job Creator records the call arguments in the **Parameters** field in **Save Destination Settings** when jobs are created. If needed, these arguments can be edited.
<Frame>
  <img src="https://mintcdn.com/abbyy/KEmWsO92hkr7eybZ/images/flexi-capture/connectors/NXM4.png?fit=max&auto=format&n=KEmWsO92hkr7eybZ&q=85&s=180f00e4a52d8788403eb3714eef0757" alt="Screenshot of the PaperStream NX Manager Save Destination Settings, showing the Parameters field that contains the Export Connector call arguments recorded by Job Creator." width="773" height="247" data-path="images/flexi-capture/connectors/NXM4.png" />
</Frame>

The table below provides a description of all available arguments:

<table width="100%"><thead><tr><th><p><strong>Shortened</strong></p></th><th><p><strong>Full</strong></p></th><th><p><strong>Required</strong></p></th><th><p><strong>Description</strong></p></th></tr></thead><tbody><tr><td><p><em>-d</em></p></td><td><p><em>--destinationFolder</em></p></td><td><p>Yes</p></td><td><p>Path to the folder where the scanning results are temporarily being stored.</p><p>When launching using NX Manager, it's enough to specify the value '<em>%d</em>'. When exporting, NX Manager will change it to the path to the folder containing the original files.</p></td></tr><tr><td><p><em>-i</em></p></td><td><p><em>--indexFile</em></p></td><td><p>Yes</p></td><td><p>Path to the index file.</p><p>When launching using NX Manager, it's enough to specify the value '<em>%</em>i'. When exporting, NX Manager will change it to the path to the index file.</p></td></tr><tr><td><p><em>-n</em></p></td><td><p><em>--names</em></p></td><td><p>No (except when <em>-v</em> passed)</p></td><td><p>Set of registration parameter names for the batch being created, separated by a space.</p><p>Together with the <em>-v</em> argument, forms the registration parameter set. The number of registration parameter names should be equal to the number of registration parameter values.</p></td></tr><tr><td><p><em>-p</em></p></td><td><p><em>--password</em></p></td><td><p>Yes</p></td><td><p>FC user password.</p></td></tr><tr><td><p><em>-P</em></p></td><td><p><em>--project</em></p></td><td><p>Yes</p></td><td><p>FC project name.</p></td></tr><tr><td><p><em>-s</em></p></td><td><p><em>--server</em></p></td><td><p>Yes</p></td><td><p>FC server address.</p></td></tr><tr><td><p><em>-t</em></p></td><td><p><em>--tenant</em></p></td><td><p>No</p></td><td><p>FC tenant name.</p></td></tr><tr><td><p><em>-T</em></p></td><td><p><em>--batchType</em></p></td><td><p>No</p></td><td><p>Name of the batch type in a FlexiCapture project.</p></td></tr><tr><td><p><em>-u</em></p></td><td><p><em>--username</em></p></td><td><p>Yes</p></td><td><p>FC user name.</p></td></tr><tr><td><p><em>-v</em></p></td><td><p><em>--values</em></p></td><td><p>No (except when <em>-n</em> passed)</p></td><td><p>Set of registration parameter values for the batch being created, separated by spaces.</p><p>Together with the <em>-n</em> argument, forms the registration parameter set. The number of registration parameter values should be equal to the number of registration parameter names.</p></td></tr></tbody></table>

<Note>
  The above table can also be viewed by using the console to call the **Export Connector** app with the *--help* option.
</Note>
