> ## Documentation Index
> Fetch the complete documentation index at: https://docs.abbyy.com/llms.txt
> Use this file to discover all available pages before exploring further.
# Installation
> Install the ABBYY FlexiCapture connector on a Pega server: import the JAR, create a library with packages and static variables, and define functions.
To install the PEGA, you need to:
[Import a connector to the Pega server](#import)
[Create a library](#lib)
[Create required functions](#func)
## Importing a connector to the Pega server
To import the connector to the server:
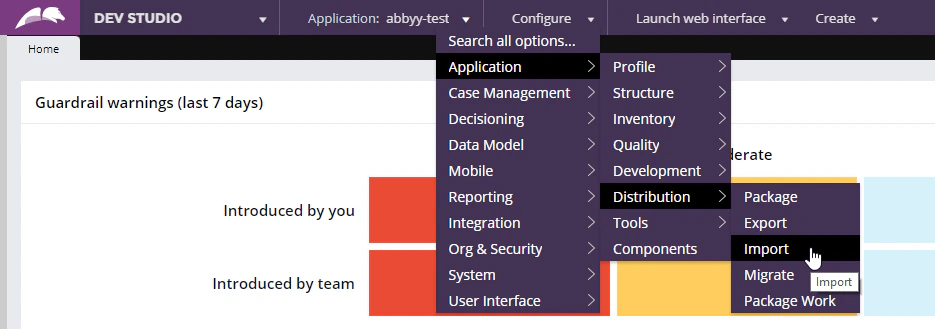
1. Open **Dev Studio** and click **Configure → Application → Distribution → Import**.
 2. Load the **abbyy.flexicapture.webapi.client.jar** file on to the server.
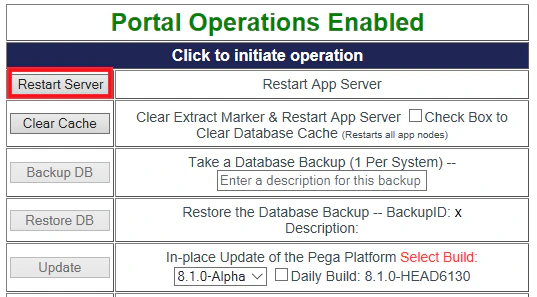
3. Open the **Pega Self-Service Portal** and click **Restart Server**.
2. Load the **abbyy.flexicapture.webapi.client.jar** file on to the server.
3. Open the **Pega Self-Service Portal** and click **Restart Server**.
 ## Creating a library
To create a library:
1. Click **Records → Technical → Library → Create**.
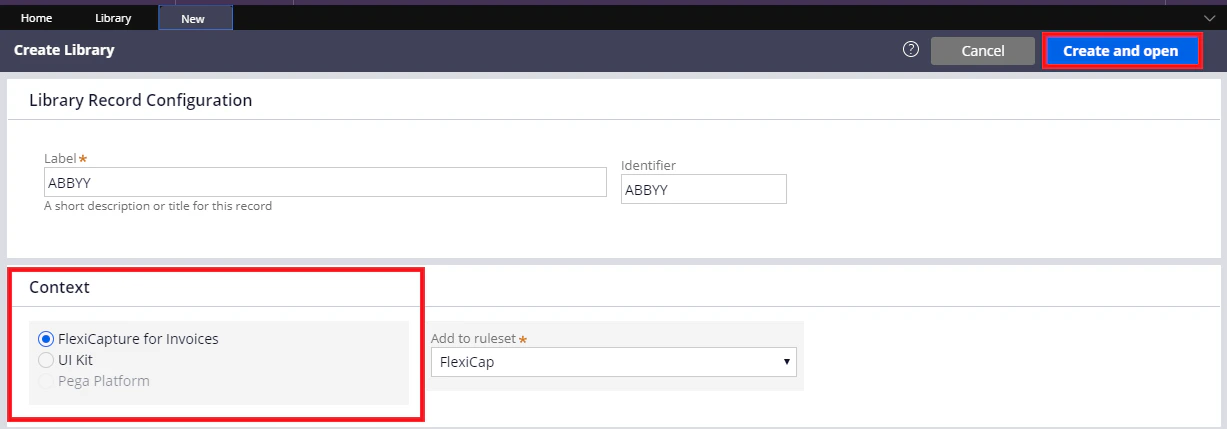
2. In the **Label** field of the **Create Library** tab, specify a name for the library (e.g. *ABBYY*) and fill in the **Identifier** field. Make sure that the library is being created within the context of your application and then click **Create and open**.
## Creating a library
To create a library:
1. Click **Records → Technical → Library → Create**.
2. In the **Label** field of the **Create Library** tab, specify a name for the library (e.g. *ABBYY*) and fill in the **Identifier** field. Make sure that the library is being created within the context of your application and then click **Create and open**.
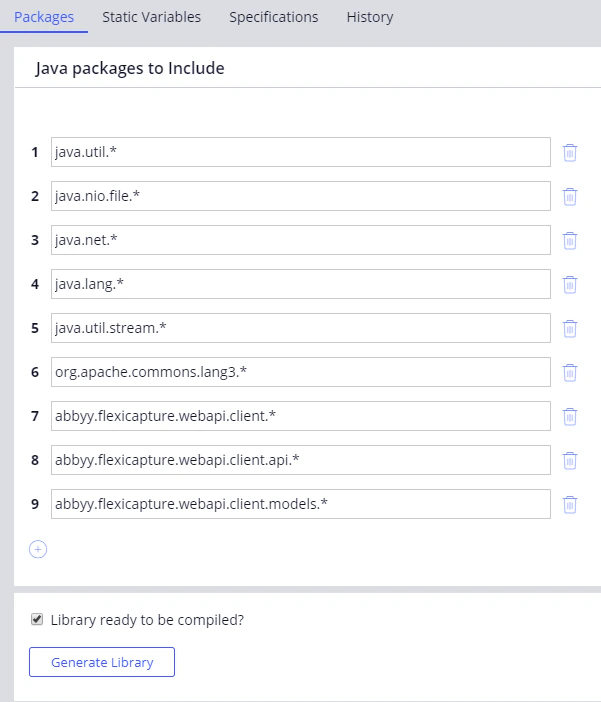
 3. On the **Packages** tab, add the following packages:
* *java.util.*\*
* *java.nio.file.*\*
* *java.net.*\*
* *java.lang.*\*
* *java.util.stream.*\*
* *org.apache.commons.lang3.*\*
* *abbyy.flexicapture.webapi.client.*\*
* *abbyy.flexicapture.webapi.client.api.*\*
* *abbyy.flexicapture.webapi.client.models.*\*
3. On the **Packages** tab, add the following packages:
* *java.util.*\*
* *java.nio.file.*\*
* *java.net.*\*
* *java.lang.*\*
* *java.util.stream.*\*
* *org.apache.commons.lang3.*\*
* *abbyy.flexicapture.webapi.client.*\*
* *abbyy.flexicapture.webapi.client.api.*\*
* *abbyy.flexicapture.webapi.client.models.*\*
 4. On the **Static Variables** tab, create the following string variables:
* *baseUri*
* *tenantName*
* *userName*
* *Password*
* *multiFileProjectName*
* *singleFileProjectName*
4. On the **Static Variables** tab, create the following string variables:
* *baseUri*
* *tenantName*
* *userName*
* *Password*
* *multiFileProjectName*
* *singleFileProjectName*
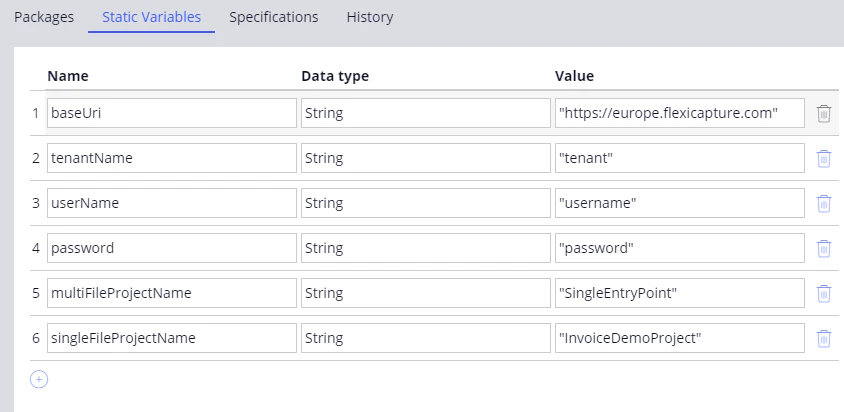 5. Click **Save** and then click **Generate Library**.
## Creating a function
A function contains Java code that is executed when the function is called from other Pega objects. The input and output parameters of a function are specified on the **Parameters** tab, while exceptions are specified on the **Imports & Exceptions** tab.
To create a function:
1. Click **Records → Technical → Function → Create** and fill in the **Label** and **Identifier** fields.
2. In the **Library** field, specify the name of the library you created earlier.
3. In the **Parameters** section, specify the following two input parameters:
| **Name** | **Java type** |
| --------------- | ------------- |
| *FileName* | *String* |
| *Base64Content* | *String* |
4. Make sure that the function is being created within the context of your application and click **Create and open**.
5. Click **Save** and then click **Generate Library**.
## Creating a function
A function contains Java code that is executed when the function is called from other Pega objects. The input and output parameters of a function are specified on the **Parameters** tab, while exceptions are specified on the **Imports & Exceptions** tab.
To create a function:
1. Click **Records → Technical → Function → Create** and fill in the **Label** and **Identifier** fields.
2. In the **Library** field, specify the name of the library you created earlier.
3. In the **Parameters** section, specify the following two input parameters:
| **Name** | **Java type** |
| --------------- | ------------- |
| *FileName* | *String* |
| *Base64Content* | *String* |
4. Make sure that the function is being created within the context of your application and click **Create and open**.
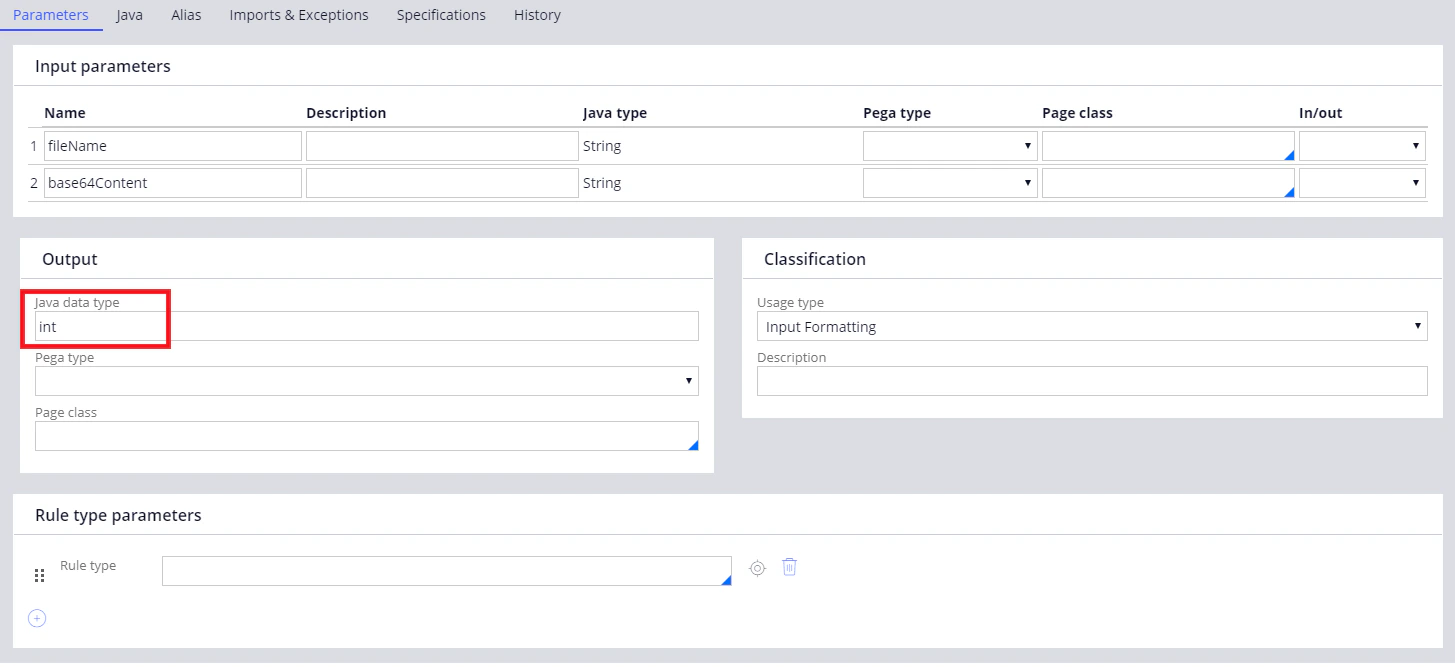
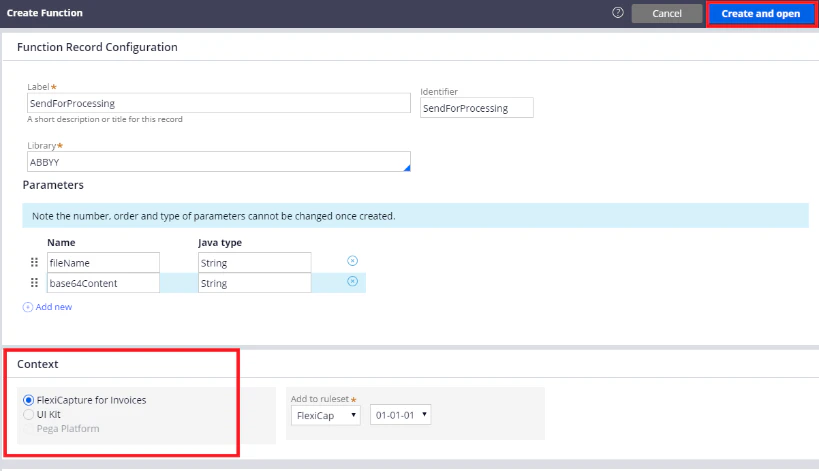 5. In the window that opens, on the **Parameters** tab, specify *int*, *string* or *boolean* as the data type in the **Java data type** field:
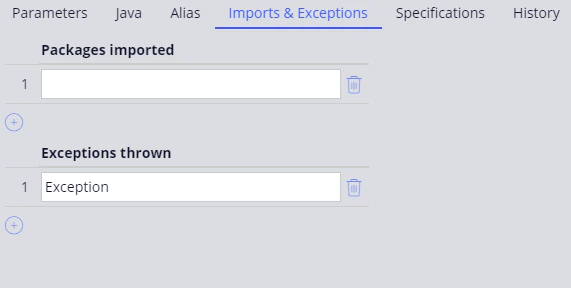
 6. Click the **Imports & Exceptions** tab and type *Exception* in the **Exceptions thrown** section.
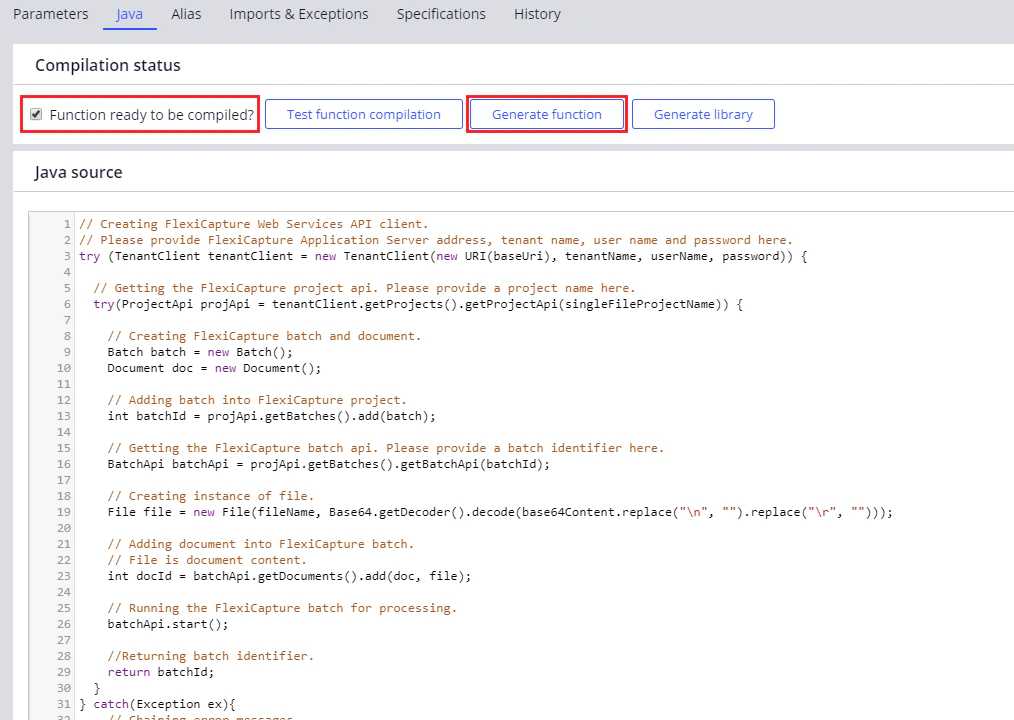
 7. Go back to the **Java** tab, insert the code for the function in the **Java source** field, select the **Function ready to be compiled?** option, save your changes, and click **Generate function**.
The code for the function can be copied from the java file, which you can find in *%Installation Path%\Connector for FlexiCapture as a Service with verification\Samples\Code examples\Pega Functions*.
7. Go back to the **Java** tab, insert the code for the function in the **Java source** field, select the **Function ready to be compiled?** option, save your changes, and click **Generate function**.
The code for the function can be copied from the java file, which you can find in *%Installation Path%\Connector for FlexiCapture as a Service with verification\Samples\Code examples\Pega Functions*.
 To implement a single-document processing scenario, you need to:
1. [Create a set of functions to be used for the processing of a single document](/flexi-capture/connectors/pega/pega-func-one-doc).
2. [Create general functions](/flexi-capture/connectors/pega/pega-func-other).
3. [Create a single-document processing case](/flexi-capture/connectors/pega/pega-one-doc-case).
4. [Configure the user interface](/flexi-capture/connectors/pega/pega-config-ui-1).
5. [Create a set of activities for your single-document processing case](/flexi-capture/connectors/pega/pega-activities-one-doc).
6. [Create a set of data transforms for your single-document processing case](/flexi-capture/connectors/pega/pega-dt-one-doc).
7. [Create a flow action](/flexi-capture/connectors/pega/pega-flow-action).
8. [Create data types for your single-document processing case](/flexi-capture/connectors/pega/pega-one-doc-data-type).
To implement a multi-document processing scenario, you need to:
1. [Create a set of functions to be used for the processing of multiple documents](/flexi-capture/connectors/pega/pega-func-multiple-docs).
2. [Create general functions](/flexi-capture/connectors/pega/pega-func-other).
3. [Create a multi-document processing case](/flexi-capture/connectors/pega/pega-many-docs-case).
4. [Create HTML fragments](/flexi-capture/connectors/pega/pega-html).
5. [Create a set of activities for your multi-document processing case](/flexi-capture/connectors/pega/pega-activities-many-docs).
6. [Create a set of data transforms for your multi-document processing case](/flexi-capture/connectors/pega/pega-dt-many-docs).
7. [Create a flow action](/flexi-capture/connectors/pega/pega-flow-action).
8. [Create data types for your multi-document processing case](/flexi-capture/connectors/pega/pega-many-docs-data-types).
To implement a single-document processing scenario, you need to:
1. [Create a set of functions to be used for the processing of a single document](/flexi-capture/connectors/pega/pega-func-one-doc).
2. [Create general functions](/flexi-capture/connectors/pega/pega-func-other).
3. [Create a single-document processing case](/flexi-capture/connectors/pega/pega-one-doc-case).
4. [Configure the user interface](/flexi-capture/connectors/pega/pega-config-ui-1).
5. [Create a set of activities for your single-document processing case](/flexi-capture/connectors/pega/pega-activities-one-doc).
6. [Create a set of data transforms for your single-document processing case](/flexi-capture/connectors/pega/pega-dt-one-doc).
7. [Create a flow action](/flexi-capture/connectors/pega/pega-flow-action).
8. [Create data types for your single-document processing case](/flexi-capture/connectors/pega/pega-one-doc-data-type).
To implement a multi-document processing scenario, you need to:
1. [Create a set of functions to be used for the processing of multiple documents](/flexi-capture/connectors/pega/pega-func-multiple-docs).
2. [Create general functions](/flexi-capture/connectors/pega/pega-func-other).
3. [Create a multi-document processing case](/flexi-capture/connectors/pega/pega-many-docs-case).
4. [Create HTML fragments](/flexi-capture/connectors/pega/pega-html).
5. [Create a set of activities for your multi-document processing case](/flexi-capture/connectors/pega/pega-activities-many-docs).
6. [Create a set of data transforms for your multi-document processing case](/flexi-capture/connectors/pega/pega-dt-many-docs).
7. [Create a flow action](/flexi-capture/connectors/pega/pega-flow-action).
8. [Create data types for your multi-document processing case](/flexi-capture/connectors/pega/pega-many-docs-data-types).