> ## Documentation Index
> Fetch the complete documentation index at: https://docs.abbyy.com/llms.txt
> Use this file to discover all available pages before exploring further.
# Running the WinActor sample workflow
> Run the UsageExample.ums5 sample workflow that sends images to ABBYY FlexiCapture, handles Web Verification Station tasks, and saves results to a folder.
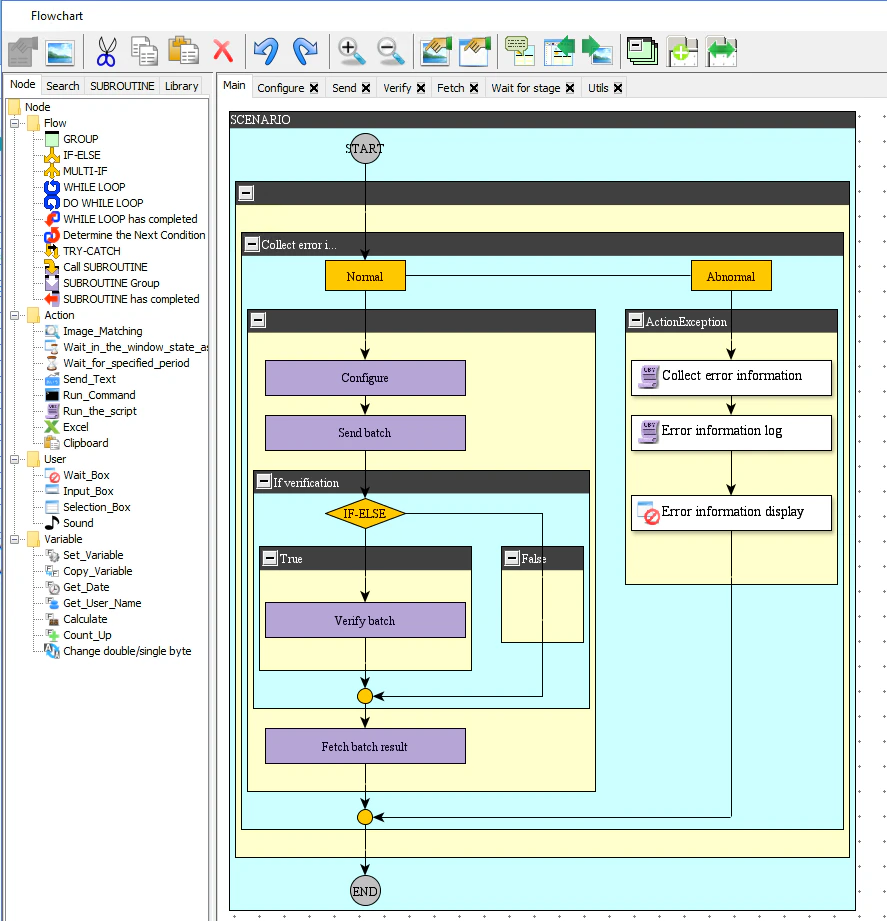
The connector distribution package includes a file named **UsageExample.ums5**, which is an example workflow that uses the ABBYY\_FlexiCapture\_12 user libraries. This usage example prompts the user to select a source image folder and sends the files from that folder to FC. Once they have been processed, the user will be prompted to specify a folder where processing results will be saved.
If the documents need to be verified, the workflow sample will open the verification tasks on the FC Web Verification Station in a browser. Once verification is finished, the user will be prompted to specify a folder where the processing results will be saved.
Before you can run this scenario, you must upload an FC project on to the FC Application Server, configure the project, and specify the FlexiCapture connection settings in the process variables.
You can find a preconfigured project in the **\Samples\FlexiCapture Project** folder of the connector distribution package.
To be able to upload projects on to the Application Server and work with uploaded projects in WinActor, you will need credentials for accessing FC (or your company's tenant if you are using FC Cloud).
The FC operator must either have the role of **Scanning Operator** and **Verification Operator** for the given project and batch type, or the role of **Administrator**. To [manage user roles](/flexi-capture/web-stations/monitoring-console/permissions), the FC Administration and Monitoring Console is used.
To run the **UsageExample.ums5** scenario:
1. Unzip the **InvoiceDemoProject.zip** archive.
2. On the Project Setup Station, open the **InvoiceDemoProject.fcproj** project and [upload it on to the Application Server](/flexi-capture/connectors/win-actor-configuring-export-from-fc#upload-to-fc-application-server).
3. In WinActor Office Robot, open the **UsageExample.ums5** example. The **Flowchart** window will display all the elements making up the scenario.
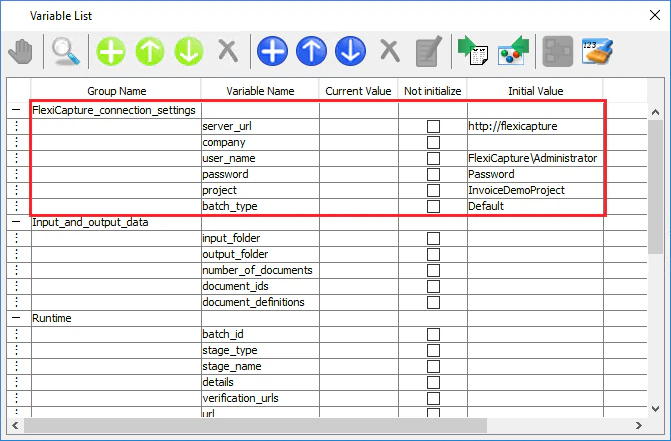
 The **Variable list** window lists all the variables used by this scenario.
4. For the **FlexiCapture\_connection\_settings** group, in the **Initial value** column, specify the settings to be used to connect to FC, i.e. the address of the server, the name of your company (if you are using FC Cloud), your user name, and your password. These settings will be used to send image files to FC.
The **Variable list** window lists all the variables used by this scenario.
4. For the **FlexiCapture\_connection\_settings** group, in the **Initial value** column, specify the settings to be used to connect to FC, i.e. the address of the server, the name of your company (if you are using FC Cloud), your user name, and your password. These settings will be used to send image files to FC.
 5. Click **Run** to run the scenario.
6. As input, select the **Images** folder in the **InvoiceDemoProject** folder. Wait until document processing has finished. Specify a folder where the processing results will be saved.
5. Click **Run** to run the scenario.
6. As input, select the **Images** folder in the **InvoiceDemoProject** folder. Wait until document processing has finished. Specify a folder where the processing results will be saved.