> ## Documentation Index
> Fetch the complete documentation index at: https://docs.abbyy.com/llms.txt
> Use this file to discover all available pages before exploring further.
# Table rows
> Divide a table into rows on the Rows tab: detect rows automatically from separators and gaps, use master columns, and list words that never start a row.
After the program has detected the columns, it starts to look for rows. FlexiLayout Studio can detect rows automatically by relying on the black separators and white gaps.
Sometimes a column can contain a fairly large fragment of text, such as a long description of a product. In this case the text is often carried over to the next line, and the white gaps between these lines should be ignored when dividing the table into rows. If the number of text lines in a cell varies from column to column, you can use one or more master columns to divide the table into rows. The rows of the master columns then serve as a pattern for the entire table.
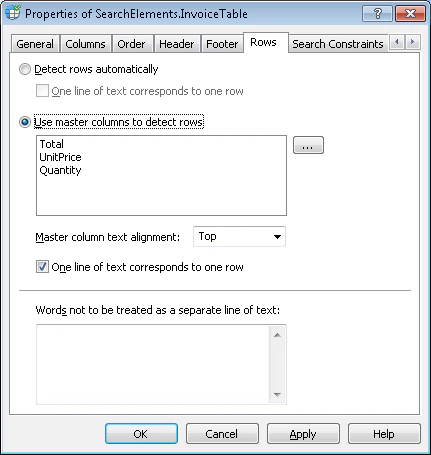
You select a method of dividing a table into rows and specify the row properties on the **Rows** tab of the **Table** element's **Properties** dialog box.
 ## Detect rows automatically
To detect rows automatically, select the **Detect rows automatically** option. The program relies on the black separators and white gaps present in all of the columns to divide them into rows.
To mark each line of text as a row, select **One line of text corresponds to one row**.
## Use master columns to detect rows
If a table has columns whose data defines how the table splits into rows, select the **Use master columns to detect rows** option and specify the columns in the **Master columns** list. The first **Master column** found in the image is used to detect the table rows.
Select the columns whose rows are used to divide the rest of the columns into rows. Since the composition of columns can vary from image to image, the list of master columns must cover all the possible variations. To create a list of master columns, follow these steps:
Click the
## Detect rows automatically
To detect rows automatically, select the **Detect rows automatically** option. The program relies on the black separators and white gaps present in all of the columns to divide them into rows.
To mark each line of text as a row, select **One line of text corresponds to one row**.
## Use master columns to detect rows
If a table has columns whose data defines how the table splits into rows, select the **Use master columns to detect rows** option and specify the columns in the **Master columns** list. The first **Master column** found in the image is used to detect the table rows.
Select the columns whose rows are used to divide the rest of the columns into rows. Since the composition of columns can vary from image to image, the list of master columns must cover all the possible variations. To create a list of master columns, follow these steps:
Click the  button next to the **Use master columns to detect rows** option.
In the **Select Master Columns** dialog box, select the required columns from the **List1** list and click
button next to the **Use master columns to detect rows** option.
In the **Select Master Columns** dialog box, select the required columns from the **List1** list and click  . The names of the selected columns appear in the **List2** list. Use the
  and
and  buttons to arrange the columns in order of priority. The program uses the top-most column it finds in the image to detect rows.
Click **OK** to display the selected columns in the **Use master columns to detect rows** list.
To edit the list of master columns, click . Then use the ,
buttons to arrange the columns in order of priority. The program uses the top-most column it finds in the image to detect rows.
Click **OK** to display the selected columns in the **Use master columns to detect rows** list.
To edit the list of master columns, click . Then use the ,  ,
,  , , and buttons to make the necessary changes to the **List2** list.
To specify how text within the cells of the master columns is aligned, use **Master column text alignment**. **Top** specifies alignment by the top border, and **Bottom** specifies alignment by the bottom border.
To draw a row for each line of text in a master column, select **One line of text corresponds to one row**.
## Prevent words from starting a new row
Some tables can contain narrow columns that hold numerical data accompanied by units of measurement, such as sums of money with currency symbols. If the unit of measurement does not fit on the same line, it can be carried over to the next line. In this case the column contains additional lines of text. To prevent the program from drawing separate rows for such lines, add these carried currency symbols, units of measurement, and the like to the **Words not to be treated as a separate line of text** list.
To create a list of stop words or phrases that do not merit a separate row, type such words or phrases into the **Words not to be treated as a separate line of text** field. Press **Enter** after typing each word or phrase.
Words you type in the **Words not to be treated as a separate line of text** field are used both when detecting rows automatically and when detecting rows by means of master columns.
, , and buttons to make the necessary changes to the **List2** list.
To specify how text within the cells of the master columns is aligned, use **Master column text alignment**. **Top** specifies alignment by the top border, and **Bottom** specifies alignment by the bottom border.
To draw a row for each line of text in a master column, select **One line of text corresponds to one row**.
## Prevent words from starting a new row
Some tables can contain narrow columns that hold numerical data accompanied by units of measurement, such as sums of money with currency symbols. If the unit of measurement does not fit on the same line, it can be carried over to the next line. In this case the column contains additional lines of text. To prevent the program from drawing separate rows for such lines, add these carried currency symbols, units of measurement, and the like to the **Words not to be treated as a separate line of text** list.
To create a list of stop words or phrases that do not merit a separate row, type such words or phrases into the **Words not to be treated as a separate line of text** field. Press **Enter** after typing each word or phrase.
Words you type in the **Words not to be treated as a separate line of text** field are used both when detecting rows automatically and when detecting rows by means of master columns.