> ## Documentation Index
> Fetch the complete documentation index at: https://docs.abbyy.com/llms.txt
> Use this file to discover all available pages before exploring further.
# Generate element relations
> Train element relations from a reference layout in FlexiLayout Studio: pick reference elements, review generated relations, and save the ones you need.
Apart from specifying a [relative search area](/flexi-capture/fls/template/relations) for elements manually, you can also train element relations based on the reference layout of the selected pages.
## Prerequisites for relation training
* The **Reference layout** must contain elements for which relations are to be generated.
* All pages to be included in the training set must be marked as **Use for Training** on the **Batch** tab.
The element being trained must be located lower down the tree of elements than the elements that relations are created with. All elements must be non-recurring.
## Generate element relations
On the element's shortcut menu, select **Train Element** → **Generate Element Relations**. The **Select Element** dialog box opens.
Add the elements to the right side of the window by clicking  (to add a selected element) or
  (to add all available elements), or by double-clicking an element. The selected elements are highlighted in bold on the left side of the window.
The **Choose Trained Element Relations** dialog box opens. It contains three lists:
* **Reference elements** – The elements that relations have been created with.
* **New Relations** – New relations obtained from training.
* **Old Relations** – Previously created relations.
(to add all available elements), or by double-clicking an element. The selected elements are highlighted in bold on the left side of the window.
The **Choose Trained Element Relations** dialog box opens. It contains three lists:
* **Reference elements** – The elements that relations have been created with.
* **New Relations** – New relations obtained from training.
* **Old Relations** – Previously created relations.
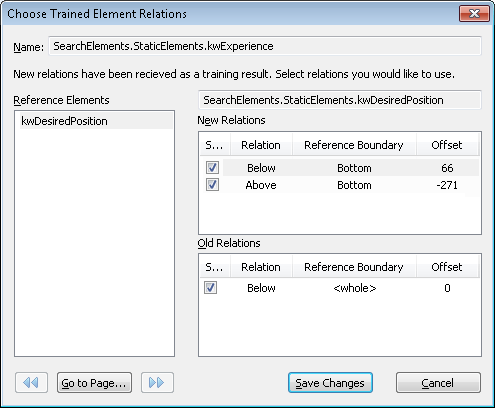 Select a relation in the list to view its visualization in the **Image** window. The reference element in the **Image** window is enclosed in a thick frame and the search area is highlighted with a green background.
When selecting several relations, the intersection of the selected relations is displayed. The intersection area is highlighted with a green background, while the areas outside the intersection borders are highlighted in blue.
To view visualized relations on the next or previous page from the training set, click
Select a relation in the list to view its visualization in the **Image** window. The reference element in the **Image** window is enclosed in a thick frame and the search area is highlighted with a green background.
When selecting several relations, the intersection of the selected relations is displayed. The intersection area is highlighted with a green background, while the areas outside the intersection borders are highlighted in blue.
To view visualized relations on the next or previous page from the training set, click  and in the bottom left corner of the window respectively. To go to the page with a specified number, click the **Go to Page...** button.
Select the checkbox next to the relations you want to use and click the **Save Changes** button.
and in the bottom left corner of the window respectively. To go to the page with a specified number, click the **Go to Page...** button.
Select the checkbox next to the relations you want to use and click the **Save Changes** button.