> ## Documentation Index
> Fetch the complete documentation index at: https://docs.abbyy.com/llms.txt
> Use this file to discover all available pages before exploring further.
# Relative search area
> Specify a relative search area on the Relations tab with Left of, Right of, Above, or Below relations to reference elements, boundaries, and offsets.
On the **Relations** tab of an element's **Properties** dialog box, you can specify a search area relative to other elements.
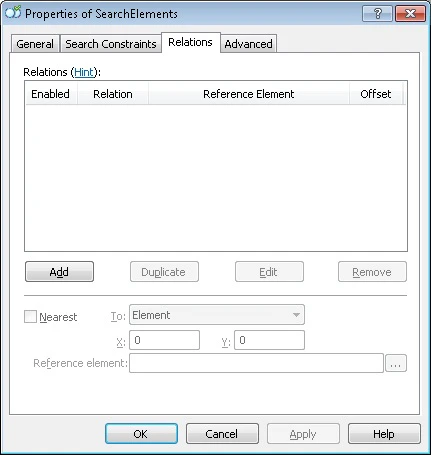 The **Properties** dialog box appears when you create a new element.
* To add a new relation, click **Add**. The **Add New Relation...** dialog box opens.
* To edit an existing relation, click **Edit**.
* To duplicate a selected relation, click **Duplicate**.
* To remove a selected relation, click **Remove**.
To open the **Properties** dialog box for an existing element, do one of the following:
* Right-click the element in the tree of elements and select **Properties...** on the shortcut menu.
* Double-click the element in the tree of elements.
In the **Properties** dialog box, click the **Relations** tab.
## Specify the boundaries of a search area relative to another element
In the **Add New Relation** or **Edit Relation** dialog box, specify the relation parameters:
In the **Type** field, select **Left of**, **Right of**, **Above**, or **Below**.
Click the
The **Properties** dialog box appears when you create a new element.
* To add a new relation, click **Add**. The **Add New Relation...** dialog box opens.
* To edit an existing relation, click **Edit**.
* To duplicate a selected relation, click **Duplicate**.
* To remove a selected relation, click **Remove**.
To open the **Properties** dialog box for an existing element, do one of the following:
* Right-click the element in the tree of elements and select **Properties...** on the shortcut menu.
* Double-click the element in the tree of elements.
In the **Properties** dialog box, click the **Relations** tab.
## Specify the boundaries of a search area relative to another element
In the **Add New Relation** or **Edit Relation** dialog box, specify the relation parameters:
In the **Type** field, select **Left of**, **Right of**, **Above**, or **Below**.
Click the  button next to the **Reference element** field, and then select the element relative to which you define the search-area boundaries. For instructions on defining a search area relative to subelements of a repeating group, see [Use instances of a Repeating Group as reference, excluded, or source elements](/flexi-capture/fls/template/select-repeatable-group).
In the **Reference boundary** field, select the boundary of the element's region relative to which you define the boundary of the search area.
In the **Offset** field, set the offset value for the boundary of the search area.
Click **Add Relation** to add a new relation, or **Save Changes** to save the relation after editing. All relations are displayed in the **Relations** table.
You can also select the relation type, the element boundary, and the offset type (negative, zero, or positive) using pictures in the **Choose relation parameters by picture** dialog box. On the **Left of**, **Right of**, **Above**, and **Below** tabs, you can see the relative position of the element and the search area, and how the search area changes depending on the selected boundary and offset types.
To open the **Choose relation parameters by picture** dialog box, click **Choose...** in the **Add New Relation** or **Edit Relation** dialog box.
button next to the **Reference element** field, and then select the element relative to which you define the search-area boundaries. For instructions on defining a search area relative to subelements of a repeating group, see [Use instances of a Repeating Group as reference, excluded, or source elements](/flexi-capture/fls/template/select-repeatable-group).
In the **Reference boundary** field, select the boundary of the element's region relative to which you define the boundary of the search area.
In the **Offset** field, set the offset value for the boundary of the search area.
Click **Add Relation** to add a new relation, or **Save Changes** to save the relation after editing. All relations are displayed in the **Relations** table.
You can also select the relation type, the element boundary, and the offset type (negative, zero, or positive) using pictures in the **Choose relation parameters by picture** dialog box. On the **Left of**, **Right of**, **Above**, and **Below** tabs, you can see the relative position of the element and the search area, and how the search area changes depending on the selected boundary and offset types.
To open the **Choose relation parameters by picture** dialog box, click **Choose...** in the **Add New Relation** or **Edit Relation** dialog box.
 The elements used as reference elements and the elements excluded from the search area must be located higher up the tree of elements than the element for which the constraint is being specified.
ABBYY FlexiLayout Studio lets you keep several **Properties** dialog boxes open at the same time.
To copy a property that defines the boundary of a search area, select it in the **Relations** table and drag it into the **Properties** dialog box of another element. You can copy the constraints specified on the **Advanced** tab in the same way.
## Visualization of relations
When you edit relation properties or select a relation in the **Relations** table, the relation appears in the **Image** window. The reference element is enclosed in a thick frame, and the search area is highlighted with a green background.
The elements used as reference elements and the elements excluded from the search area must be located higher up the tree of elements than the element for which the constraint is being specified.
ABBYY FlexiLayout Studio lets you keep several **Properties** dialog boxes open at the same time.
To copy a property that defines the boundary of a search area, select it in the **Relations** table and drag it into the **Properties** dialog box of another element. You can copy the constraints specified on the **Advanced** tab in the same way.
## Visualization of relations
When you edit relation properties or select a relation in the **Relations** table, the relation appears in the **Image** window. The reference element is enclosed in a thick frame, and the search area is highlighted with a green background.
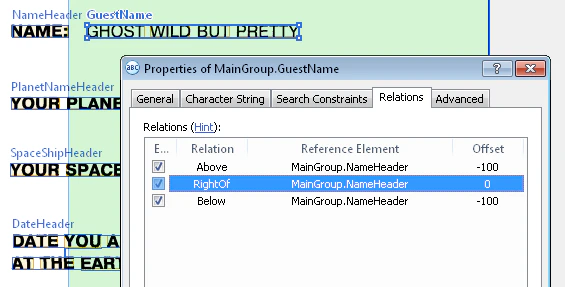 When you edit the boundary type and offset value, the search area in the **Image** window changes accordingly.
In **Reference layout** mode, you can also drag the offset boundary with the mouse directly in the **Image** window to change the offset value. If **Matched layout** is selected, the relation is displayed in read-only mode, and offsets cannot be edited in the **Image** window.
When you select several relations, the intersection of the selected relations is displayed. The intersection area is highlighted with a green background, and the areas outside the intersection borders are highlighted in blue.
When you edit the boundary type and offset value, the search area in the **Image** window changes accordingly.
In **Reference layout** mode, you can also drag the offset boundary with the mouse directly in the **Image** window to change the offset value. If **Matched layout** is selected, the relation is displayed in read-only mode, and offsets cannot be edited in the **Image** window.
When you select several relations, the intersection of the selected relations is displayed. The intersection area is highlighted with a green background, and the areas outside the intersection borders are highlighted in blue.
 ## Select the element closest to a certain object
The **Nearest** property tells the program that, all other things being equal, it must look for a hypothesis located closest to a certain element or point on the image. Specify the closest element, point, or coordinate axis in the **Nearest** property of the element.
To instruct the program to select the element closest to a certain object on the image, select the **Nearest** option, and then choose the object from the **To** drop-down list.
The option you select determines what else you specify:
| Option | What to specify |
| -------------------- | ----------------------------------------------------------- |
| **Element** | The name of the element in the **Reference element** field. |
| **X coordinate** | The X-coordinate value. |
| **Y coordinate** | The Y-coordinate value. |
| **Point** | The coordinates of the point. |
| **Page top edge** | No additional value is required. |
| **Page bottom edge** | No additional value is required. |
| **Page left edge** | No additional value is required. |
| **Page right edge** | No additional value is required. |
The **Minimum quality** parameter specifies the minimum quality of the element hypothesis. By default, its value is equal to the quality of the null hypothesis.
The element closest to the given element is selected based on the shortest distance between element centers.
For more information, see [Search for elements with Nearest and FuzzyQuality](/flexi-capture/fls/tips-tricks/date9).
## Related topics
* [Search constraints](/flexi-capture/fls/template/basic-constraints)
* [Additional search constraints](/flexi-capture/fls/template/advanced-constraints)
## Select the element closest to a certain object
The **Nearest** property tells the program that, all other things being equal, it must look for a hypothesis located closest to a certain element or point on the image. Specify the closest element, point, or coordinate axis in the **Nearest** property of the element.
To instruct the program to select the element closest to a certain object on the image, select the **Nearest** option, and then choose the object from the **To** drop-down list.
The option you select determines what else you specify:
| Option | What to specify |
| -------------------- | ----------------------------------------------------------- |
| **Element** | The name of the element in the **Reference element** field. |
| **X coordinate** | The X-coordinate value. |
| **Y coordinate** | The Y-coordinate value. |
| **Point** | The coordinates of the point. |
| **Page top edge** | No additional value is required. |
| **Page bottom edge** | No additional value is required. |
| **Page left edge** | No additional value is required. |
| **Page right edge** | No additional value is required. |
The **Minimum quality** parameter specifies the minimum quality of the element hypothesis. By default, its value is equal to the quality of the null hypothesis.
The element closest to the given element is selected based on the shortest distance between element centers.
For more information, see [Search for elements with Nearest and FuzzyQuality](/flexi-capture/fls/tips-tricks/date9).
## Related topics
* [Search constraints](/flexi-capture/fls/template/basic-constraints)
* [Additional search constraints](/flexi-capture/fls/template/advanced-constraints)