> ## Documentation Index
> Fetch the complete documentation index at: https://docs.abbyy.com/llms.txt
> Use this file to discover all available pages before exploring further.
# Sample 3. Step 11: Detecting the right border of the Delivery Address field with a wgAddressRight element
> Set up a wgAddressRight White Gap element that marks the right border of the Delivery Address field and limits its search area in the FlexiLayout.
To specify the right boundary of the search area of the DeliveryAddress element, describe the corresponding vertical white gap.
To create the wgAddressRight element:
1. In the `InvoiceHeader.grAddress` element, create an element of type [White Gap](/flexi-capture/fls/template/white-gap) and name it **wgAddressRight**.
2. Click the White Gap tab.
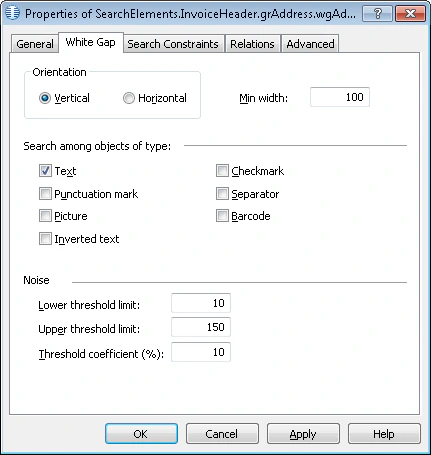
3. In the **Orientation** group, choose Vertical. Set Min width to 100.
Prior to setting values for height or width of white gaps, you may want to analyze the geometrical properties (that is, size and boundaries) of the neighboring objects detected during pre-recognition. Values for the noise threshold in the white gap area are selected by trial and error.
4. Set **Lower threshold limit:** and **Threshold coefficient (%):** to 10.
The values of **Lower threshold limit**, **Upper threshold limit**, and **Threshold coefficient (%)** are selected by trial and error.\
For more information, see [White Gap](/flexi-capture/fls/template/white-gap).
5. Leave the default values for the other parameters of the element.
 1. Click the Relations tab.
2. Since the sought white gap can only be located to the right of the keywords of the name **kwDeliveryAddress**, set the following search constraint:
* Right of the element **kwDeliveryAddress**, Offset = 0
3. Click the Advanced tab.
4. Since the **Delivery Address** field is optional on the images but whenever it occurs it has a name, set the following [additional search constraint](/flexi-capture/fls/template/advanced-constraints) in the Advanced pre-search relations field: Look for the object only if the **kwDeliveryAddress** element has been detected. In the [FlexiLayout language](/flexi-capture/fls/code/general-code):\
`If InvoiceHeader.kwDeliveryAddress.IsNull Then DontFind;`
5. Since the sought white gap is adjacent to the **Invoice Number** field, set the following [additional search constraint](/flexi-capture/fls/template/advanced-constraints) in the Advanced pre-search relations field: Look for the object on the image which is nearest to the **kwInvoiceNumber** element. In the [FlexiLayout language](/flexi-capture/fls/code/general-code):\
`Nearest: InvoiceHeader.kwInvoiceNumber;`
The **Nearest** constraint can also be specified via the program’s graphical user interface. Click the **Relations** tab, select **Nearest**, and in the **To:** drop-down list select **Element** and specify **kwInvoiceNumber** as the **Reference** element.
6. Try matching the FlexiLayout with the test images and make sure that the program successfully detects the element on all the images where the **Delivery Address** field occurs.
1. Click the Relations tab.
2. Since the sought white gap can only be located to the right of the keywords of the name **kwDeliveryAddress**, set the following search constraint:
* Right of the element **kwDeliveryAddress**, Offset = 0
3. Click the Advanced tab.
4. Since the **Delivery Address** field is optional on the images but whenever it occurs it has a name, set the following [additional search constraint](/flexi-capture/fls/template/advanced-constraints) in the Advanced pre-search relations field: Look for the object only if the **kwDeliveryAddress** element has been detected. In the [FlexiLayout language](/flexi-capture/fls/code/general-code):\
`If InvoiceHeader.kwDeliveryAddress.IsNull Then DontFind;`
5. Since the sought white gap is adjacent to the **Invoice Number** field, set the following [additional search constraint](/flexi-capture/fls/template/advanced-constraints) in the Advanced pre-search relations field: Look for the object on the image which is nearest to the **kwInvoiceNumber** element. In the [FlexiLayout language](/flexi-capture/fls/code/general-code):\
`Nearest: InvoiceHeader.kwInvoiceNumber;`
The **Nearest** constraint can also be specified via the program’s graphical user interface. Click the **Relations** tab, select **Nearest**, and in the **To:** drop-down list select **Element** and specify **kwInvoiceNumber** as the **Reference** element.
6. Try matching the FlexiLayout with the test images and make sure that the program successfully detects the element on all the images where the **Delivery Address** field occurs.