> ## Documentation Index
> Fetch the complete documentation index at: https://docs.abbyy.com/llms.txt
> Use this file to discover all available pages before exploring further.
# Sample 4. Step 5.1: Name of Invoice Number field, kwInvoiceNumber element
> Define the required kwInvoiceNumber Static Text element that finds the Invoice Number field name and serves as the identifier for the invoice document type.
Once you have examined the images, you will notice that:
* The name of the **Invoice Number** field is present on all the images and it is the name that can be used to differentiate them from other documents. For this reason, make the name of the **Invoice Number** field a required element, that is, it will be used as an identifier for this document type. For more information, see [Required, optional, and prohibited elements](/flexi-capture/fls/template/elements-optional).
* The name may contain one of the following phrases: **Invoice no.**, **Credit note No**, **Invoice Number:**, **Invoice Number**.\
List all the possible variants in the search string. Type each phrase without spaces so that the maximum number of errors applies to the entire phrase and not to separate words.
* Only the field located on the first page of each document, in the upper part of the first page, is of interest (some of the first pages contain static text which is similar to the name but located at the bottom of the page).
To create a kwInvoiceNumber element:
1. In the **InvoiceHeader** element, create an element of type Static Text and name it **kwInvoiceNumber**.
2. Select **Required element** on the General tab, as decided earlier.
3. Click the Static Text tab.
4. In the Search text field, type the search text: `InvoiceNo.|CreditNoteNo|InvoiceNumber:|InvoiceNumber`
5. Set Max error percentage to 20.
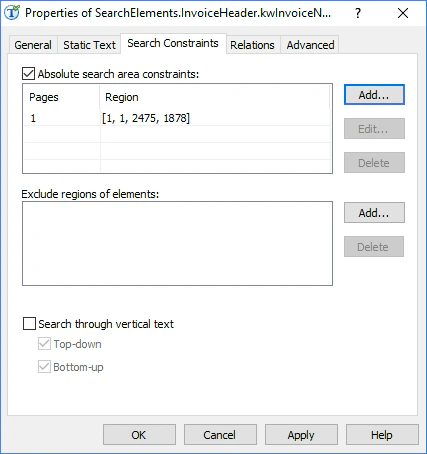
6. Click the Search Constraints tab and use absolute coordinates to specify the rectangular search area on the first page:
* Select Absolute search area constraints
* In the Pages field, select Range from the drop-down list
* In the Range field, type 1
* In the Region field, specify the coordinates of the rectangle \[1, 1, 2475, 1878]
* Once you have specified the properties of the search area, click Add.... The search area will appear in the **Search areas** list
 7. Click the Advanced tab.
8. In the **Advanced pre-search relations** field, specify additional constraints:
```text theme={null}
WholeWordMode: true;// Only whole text objects will be treated as possible hypotheses
MaxGapInLine: 50dt;// The maximum distance between neighboring words
```
9. By specifying an additional check in the **Advanced post-search relations** field, you can influence the quality of the generated hypotheses. For example: If the element has been detected, calculate the difference between the reference width and the width of the region of the detected element and check if it belongs to the fuzzy interval. In the [FlexiLayout language](/flexi-capture/fls/code/general-code), this condition can be written as follows:
```text theme={null}
If not IsNull then
{ FuzzyQuality: 600dt - width, {-70000,0,0,70000}*dt;
}
//This condition means that the greater the difference, the greater the penalty
```
To specify the locations of objects and the distances among them, a two-dimensional coordinate system is used. The (0, 0) point, where the vertical and horizontal axes intersect, is located in the top left corner of the image. The abscissa axis is directed left to right, the ordinate axis is directed top to bottom.
10. Temporarily exclude the **InvoiceFooter** element and match the FlexiLayout.
To exclude an element, select it in the tree of elements and then select Disable from the FlexiLayout menu.
7. Click the Advanced tab.
8. In the **Advanced pre-search relations** field, specify additional constraints:
```text theme={null}
WholeWordMode: true;// Only whole text objects will be treated as possible hypotheses
MaxGapInLine: 50dt;// The maximum distance between neighboring words
```
9. By specifying an additional check in the **Advanced post-search relations** field, you can influence the quality of the generated hypotheses. For example: If the element has been detected, calculate the difference between the reference width and the width of the region of the detected element and check if it belongs to the fuzzy interval. In the [FlexiLayout language](/flexi-capture/fls/code/general-code), this condition can be written as follows:
```text theme={null}
If not IsNull then
{ FuzzyQuality: 600dt - width, {-70000,0,0,70000}*dt;
}
//This condition means that the greater the difference, the greater the penalty
```
To specify the locations of objects and the distances among them, a two-dimensional coordinate system is used. The (0, 0) point, where the vertical and horizontal axes intersect, is located in the top left corner of the image. The abscissa axis is directed left to right, the ordinate axis is directed top to bottom.
10. Temporarily exclude the **InvoiceFooter** element and match the FlexiLayout.
To exclude an element, select it in the tree of elements and then select Disable from the FlexiLayout menu.