> ## Documentation Index
> Fetch the complete documentation index at: https://docs.abbyy.com/llms.txt
> Use this file to discover all available pages before exploring further.
# Adapt the sample project for use with the ABBYY FlexiCapture Cloud REST API
> Adapt the sample Banking Card Application project for the FlexiCapture Cloud REST API: configure workflow stages and export settings, and then upload it.
## REST API workflow
The typical REST API workflow is as follows:
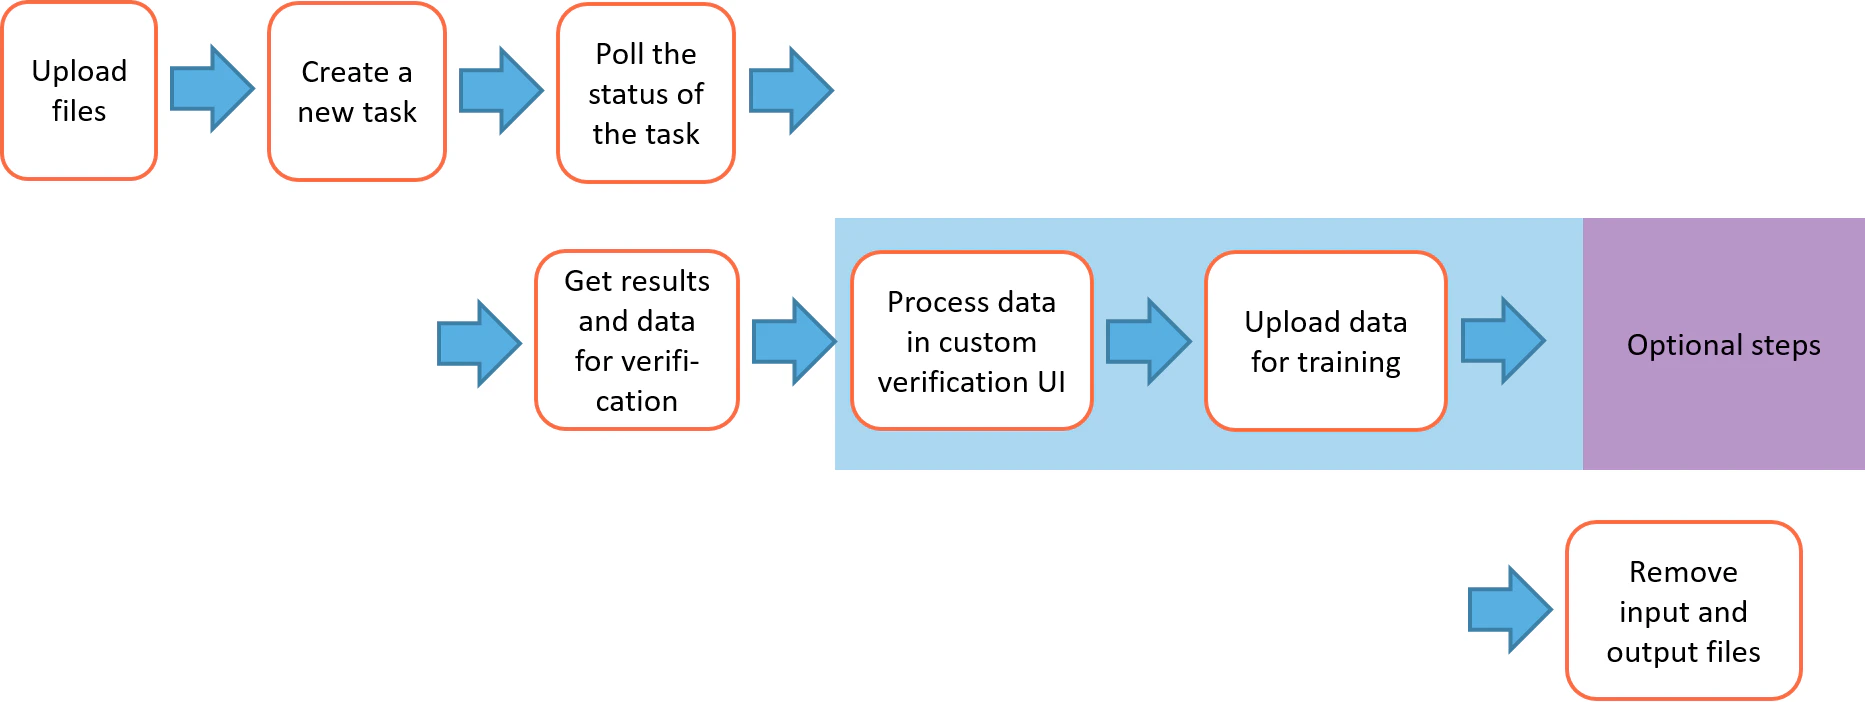 Any FlexiCapture project to be used with your REST API application must include a properly configured workflow. The instructions below show how to adapt the workflow of the sample Banking Card Application project for use with the REST API. For more information about the sample projects, see [ABBYY FlexiCapture sample projects](/flexi-capture/appendix/samples).
Before proceeding with this walkthrough, launch the Project Setup Station and open the sample Banking Card Application project (the default location is `C:\Users\Public\ABBYY\FlexiCapture\12.0\Samples\FlexiCapture\English\Banking_eng\banking_eng.fcproj`).
## Adjust workflow stages
The REST API always submits data to be processed as the "Default" batch type. For this reason, all document processing in the project must be configured for the "Default" batch type.
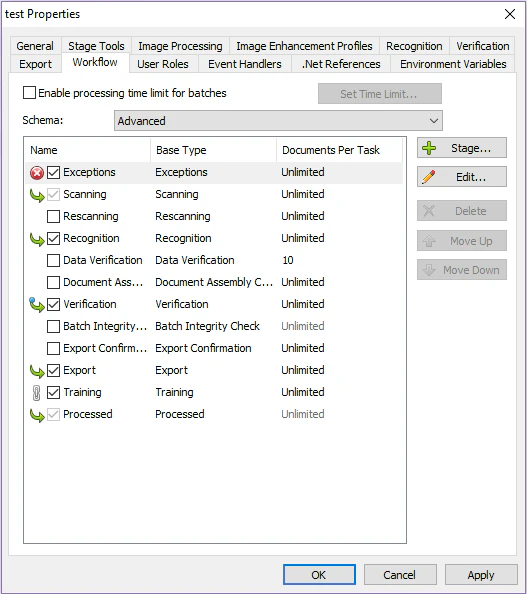
On the **Project** menu, click **Project Properties** and then click the **Workflow** tab. From the **Schema** drop-down list, select **Advanced** and modify the workflow settings as shown below.
Any FlexiCapture project to be used with your REST API application must include a properly configured workflow. The instructions below show how to adapt the workflow of the sample Banking Card Application project for use with the REST API. For more information about the sample projects, see [ABBYY FlexiCapture sample projects](/flexi-capture/appendix/samples).
Before proceeding with this walkthrough, launch the Project Setup Station and open the sample Banking Card Application project (the default location is `C:\Users\Public\ABBYY\FlexiCapture\12.0\Samples\FlexiCapture\English\Banking_eng\banking_eng.fcproj`).
## Adjust workflow stages
The REST API always submits data to be processed as the "Default" batch type. For this reason, all document processing in the project must be configured for the "Default" batch type.
On the **Project** menu, click **Project Properties** and then click the **Workflow** tab. From the **Schema** drop-down list, select **Advanced** and modify the workflow settings as shown below.
 Click **Verification** → **General** and select the **Enable web stations** option.
**Note:** You can omit this setting if you don't need a verification stage in your project.
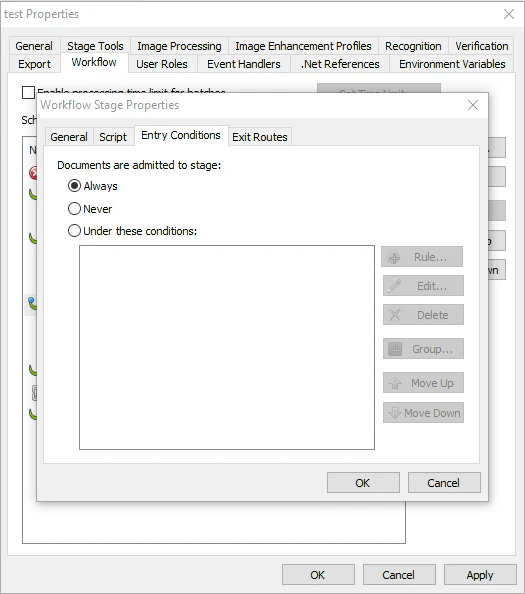
Click **Verification** → **Entry Conditions** and set the **Documents are admitted to stage** option to **Always**.
Depending on the requirements of your solution, you may want to disable the verification stage temporarily or conditionally using a script-based rule on the Entry Conditions tab.
Click **Verification** → **General** and select the **Enable web stations** option.
**Note:** You can omit this setting if you don't need a verification stage in your project.
Click **Verification** → **Entry Conditions** and set the **Documents are admitted to stage** option to **Always**.
Depending on the requirements of your solution, you may want to disable the verification stage temporarily or conditionally using a script-based rule on the Entry Conditions tab.
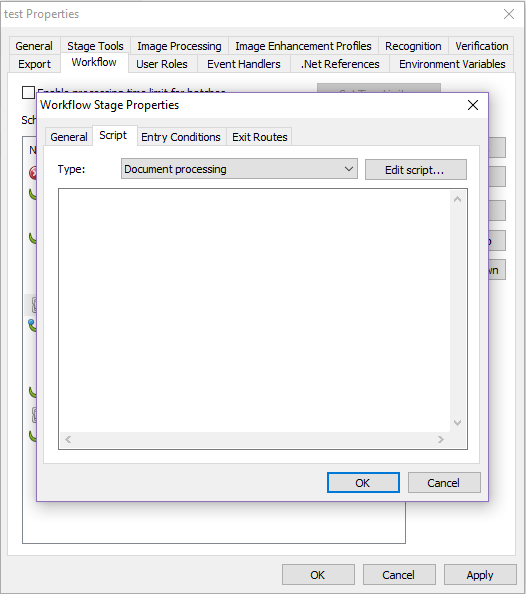
 To enable the `training/layout/{taskId}/{fileId}` endpoint for your project, export the XML file containing the field data and layout. Create a document processing stage immediately preceding the verification stage.
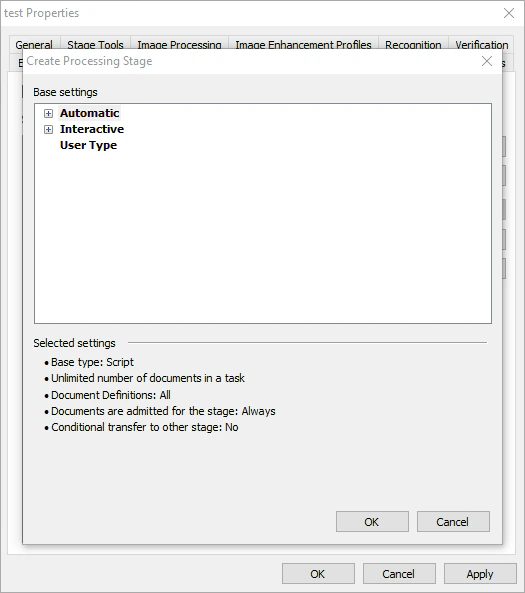 On the **Entry Conditions** tab, choose **Always**.
On the **Script** tab, click **Edit script…**.
On the **Entry Conditions** tab, choose **Always**.
On the **Script** tab, click **Edit script…**.
 Change the script language to **C# .NET**.
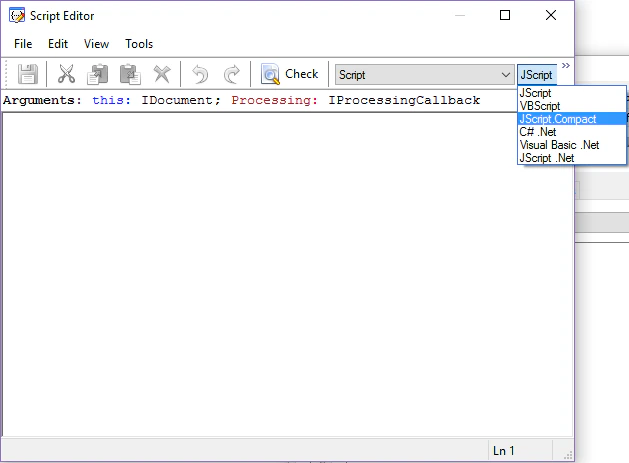 Copy and paste the following code snippet into the script pane:
```csharp theme={null}
using System;
Document.SaveXmlToFileStorage();
```
Click **OK** to save your changes.
The project settings on document assembly (Image processing → Create document) are ignored when uploading files via the REST API. A separate document is created for each file.
## Adjust data export settings
Once a batch submitted through the REST API is processed, the REST API picks up any exported files to make them available for download by the client.
ABBYY FlexiCapture Cloud stores exported files in object storage. For this reason, you must not use rooted export paths in your REST API project.
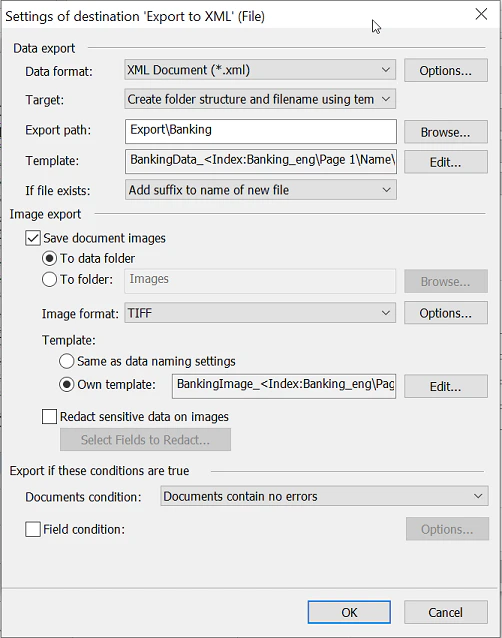
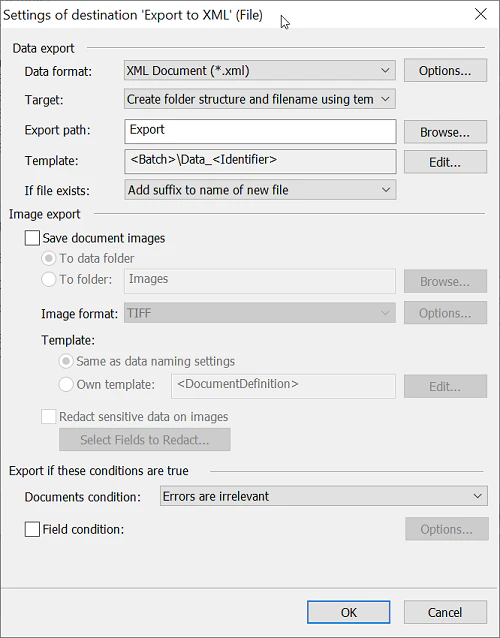
REST API projects do not require any special folder structure. You can use a flat folder structure, using the name of the root folder for each batch and document IDs as parts of file names. The REST API services assign a unique, random batch name to each batch submitted via the REST API, so unique file names are generated when exporting data from those batches.
The following screenshot shows the original export settings, which result in a multi-level folder structure:
Copy and paste the following code snippet into the script pane:
```csharp theme={null}
using System;
Document.SaveXmlToFileStorage();
```
Click **OK** to save your changes.
The project settings on document assembly (Image processing → Create document) are ignored when uploading files via the REST API. A separate document is created for each file.
## Adjust data export settings
Once a batch submitted through the REST API is processed, the REST API picks up any exported files to make them available for download by the client.
ABBYY FlexiCapture Cloud stores exported files in object storage. For this reason, you must not use rooted export paths in your REST API project.
REST API projects do not require any special folder structure. You can use a flat folder structure, using the name of the root folder for each batch and document IDs as parts of file names. The REST API services assign a unique, random batch name to each batch submitted via the REST API, so unique file names are generated when exporting data from those batches.
The following screenshot shows the original export settings, which result in a multi-level folder structure:
 The following screenshot shows the modified export settings, which result in a flat folder structure:
 ## Upload your modified project to ABBYY FlexiCapture Cloud
Click **File** > **Upload Project to Server...** to upload your project to ABBYY FlexiCapture Cloud.
In the dialog box that opens, enter the URL of the cloud server hosting your tenant and specify the name of your tenant.
Select **Use server authentication** and enter your tenant admin credentials.
Click **Test connection** to check your connection settings.
Click **OK** and wait until your project is uploaded.
## Your next steps
Once you have uploaded your project to ABBYY FlexiCapture Cloud, here is what you can try next:
* Create an application that is connected to your project. For more information, see [Create applications using the FlexiCapture REST API interface](/flexi-capture/rest-api-apps).
* To test whether you have connected your application correctly, process a sample batch.
* If you encounter any problems, see [Processing error diagnostics](/flexi-capture/rest-api-tasks).
## Upload your modified project to ABBYY FlexiCapture Cloud
Click **File** > **Upload Project to Server...** to upload your project to ABBYY FlexiCapture Cloud.
In the dialog box that opens, enter the URL of the cloud server hosting your tenant and specify the name of your tenant.
Select **Use server authentication** and enter your tenant admin credentials.
Click **Test connection** to check your connection settings.
Click **OK** and wait until your project is uploaded.
## Your next steps
Once you have uploaded your project to ABBYY FlexiCapture Cloud, here is what you can try next:
* Create an application that is connected to your project. For more information, see [Create applications using the FlexiCapture REST API interface](/flexi-capture/rest-api-apps).
* To test whether you have connected your application correctly, process a sample batch.
* If you encounter any problems, see [Processing error diagnostics](/flexi-capture/rest-api-tasks).