> ## Documentation Index
> Fetch the complete documentation index at: https://docs.abbyy.com/llms.txt
> Use this file to discover all available pages before exploring further.
# Image Processing Parameters
> Set up image processing in ABBYY Scanning Station: despeckle, deskew, rotate, convert to black-and-white, apply profiles, and convert office files.
The Scanning Station lets you process images to improve their quality or prepare them for editing. This can be done either automatically, when new images are loaded, or manually, when all the data have been imported.
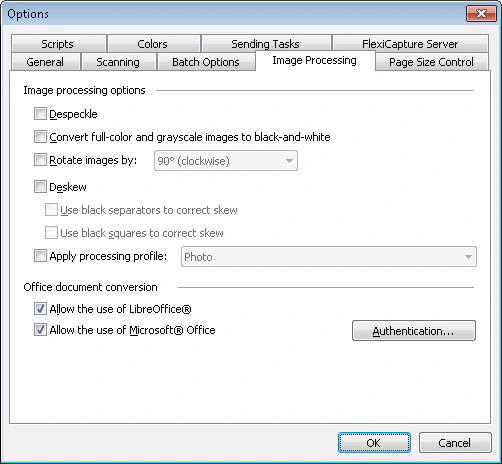 You can specify processing parameters for both of the following:
* Images that use the [options dialog box](/flexi-capture/scanning-station/interface/options) settings.
* Batches of certain types configured in the [Batch Type Properties dialog box](/flexi-capture/scanning-station/shared/interface/batch-type-properties).
Automatic image processing may considerably slow down image loading.
## Image processing operations
The following image processing operations are available:
| Option | Description |
| -------------------------------------------------------------- | ------------------------------------------------------------------------------------------------------------------------------------------------------------------------------------------------- |
| **Despeckle** | Removes any speckles that may occur when scanning medium- or low-quality documents. |
| **Convert full-color and grayscale images to black-and-white** | Converts images to black-and-white. |
| **Rotate images by** | Rotates images 90° clockwise and counter-clockwise or 180°. |
| **Deskew** | Automatically [corrects image skew](/flexi-capture/scanning-station/shared/scan-station/how-to-work-with-images). The Scanning Station can correct skew using separators, black squares, or both. |
| **Apply processing profile** | Applies one of the preconfigured [image enhancement profiles](/flexi-capture/scanning-station/shared/scan-station/how-to-image-enhancement-profile) to input images. |
## Import office files
Besides document images, you can import [common office files](/flexi-capture/scanning-station/shared/appendix/image-formats), and you can import both in one flow. Office files are converted to PDFs using a built-in tool.
To convert files with a third-party application instead, enable one of the following options:
* **Allow the use of LibreOffice®** – Converts files with LibreOffice (supports LibreOffice 4.2, 4.3, 4.4, 5, 6.3, and 6.4).
* **Allow the use of Microsoft® Office** – Converts files with Microsoft Office (supports Microsoft Office 2010, 2013, 2016, and 2019).
Keep the following in mind when converting office files:
* Processing results may vary depending on the application you use.
* If you import from email, message bodies can be used as documents.
* If both third-party options are enabled, FlexiCapture selects the best option automatically and logs its choice in the task log.
* Conversion with a third-party application works only if that application is installed on the processing station used to import documents.
* To convert with Microsoft Office, the application must be activated, and the conversion must run under a user account with administrator permissions on the processing computer. To open the authentication dialog box, click **Authentication...**.
* Remote processing stations do not support the office file processing module.
* If the **Send text layers of pages** option is enabled on the **Send To** tab of the batch type properties, FlexiCapture receives a PDF with a text layer.
## Restore the original image
If you are not satisfied with the results of automatic or manual image processing, you can revert to the original image without rescanning the document. To restore the original image, right-click the page and click **Back to Source Image** on the shortcut menu. This option is available only if you have made any changes to the original image.
## Process images with scripts
You can use scripts to process images.
For example:
```csharp theme={null}
IWorkspaceItem page = Workspace.Selection[0];
page.FlipHorizontal();
```
You can use a script to save original images rather than processed images.
In the [IImageSavingOptions](/flexi-capture/scanning-station/shared/scripts/saving-options) interface, specify the values of the `ColorType` and `Format` properties and set `UseRawImage` to `true`.
Save the image using this method:
```text theme={null}
IWorkspaceItem.SaveAs(fileName: string, [optional] options: IImageSavingOptions).
```
You can specify processing parameters for both of the following:
* Images that use the [options dialog box](/flexi-capture/scanning-station/interface/options) settings.
* Batches of certain types configured in the [Batch Type Properties dialog box](/flexi-capture/scanning-station/shared/interface/batch-type-properties).
Automatic image processing may considerably slow down image loading.
## Image processing operations
The following image processing operations are available:
| Option | Description |
| -------------------------------------------------------------- | ------------------------------------------------------------------------------------------------------------------------------------------------------------------------------------------------- |
| **Despeckle** | Removes any speckles that may occur when scanning medium- or low-quality documents. |
| **Convert full-color and grayscale images to black-and-white** | Converts images to black-and-white. |
| **Rotate images by** | Rotates images 90° clockwise and counter-clockwise or 180°. |
| **Deskew** | Automatically [corrects image skew](/flexi-capture/scanning-station/shared/scan-station/how-to-work-with-images). The Scanning Station can correct skew using separators, black squares, or both. |
| **Apply processing profile** | Applies one of the preconfigured [image enhancement profiles](/flexi-capture/scanning-station/shared/scan-station/how-to-image-enhancement-profile) to input images. |
## Import office files
Besides document images, you can import [common office files](/flexi-capture/scanning-station/shared/appendix/image-formats), and you can import both in one flow. Office files are converted to PDFs using a built-in tool.
To convert files with a third-party application instead, enable one of the following options:
* **Allow the use of LibreOffice®** – Converts files with LibreOffice (supports LibreOffice 4.2, 4.3, 4.4, 5, 6.3, and 6.4).
* **Allow the use of Microsoft® Office** – Converts files with Microsoft Office (supports Microsoft Office 2010, 2013, 2016, and 2019).
Keep the following in mind when converting office files:
* Processing results may vary depending on the application you use.
* If you import from email, message bodies can be used as documents.
* If both third-party options are enabled, FlexiCapture selects the best option automatically and logs its choice in the task log.
* Conversion with a third-party application works only if that application is installed on the processing station used to import documents.
* To convert with Microsoft Office, the application must be activated, and the conversion must run under a user account with administrator permissions on the processing computer. To open the authentication dialog box, click **Authentication...**.
* Remote processing stations do not support the office file processing module.
* If the **Send text layers of pages** option is enabled on the **Send To** tab of the batch type properties, FlexiCapture receives a PDF with a text layer.
## Restore the original image
If you are not satisfied with the results of automatic or manual image processing, you can revert to the original image without rescanning the document. To restore the original image, right-click the page and click **Back to Source Image** on the shortcut menu. This option is available only if you have made any changes to the original image.
## Process images with scripts
You can use scripts to process images.
For example:
```csharp theme={null}
IWorkspaceItem page = Workspace.Selection[0];
page.FlipHorizontal();
```
You can use a script to save original images rather than processed images.
In the [IImageSavingOptions](/flexi-capture/scanning-station/shared/scripts/saving-options) interface, specify the values of the `ColorType` and `Format` properties and set `UseRawImage` to `true`.
Save the image using this method:
```text theme={null}
IWorkspaceItem.SaveAs(fileName: string, [optional] options: IImageSavingOptions).
```