> ## Documentation Index
> Fetch the complete documentation index at: https://docs.abbyy.com/llms.txt
> Use this file to discover all available pages before exploring further.
# Set up Single Sign-On with Azure Active Directory
> Configure SAML-based Single Sign-On between ABBYY FlexiCapture and Azure Active Directory, from an enterprise application to the SetIdentityProvider script.
You can set up SAML-based Single Sign-On for ABBYY FlexiCapture web stations using Azure Active Directory. First register an application in Azure Active Directory, and then configure ABBYY FlexiCapture with a script.
## Register an application in Azure Active Directory
1. Go to [https://portal.azure.com/](https://portal.azure.com/) and log in to your Microsoft Azure account.
2. Go to the **Azure Active Directory > Enterprise applications** section.
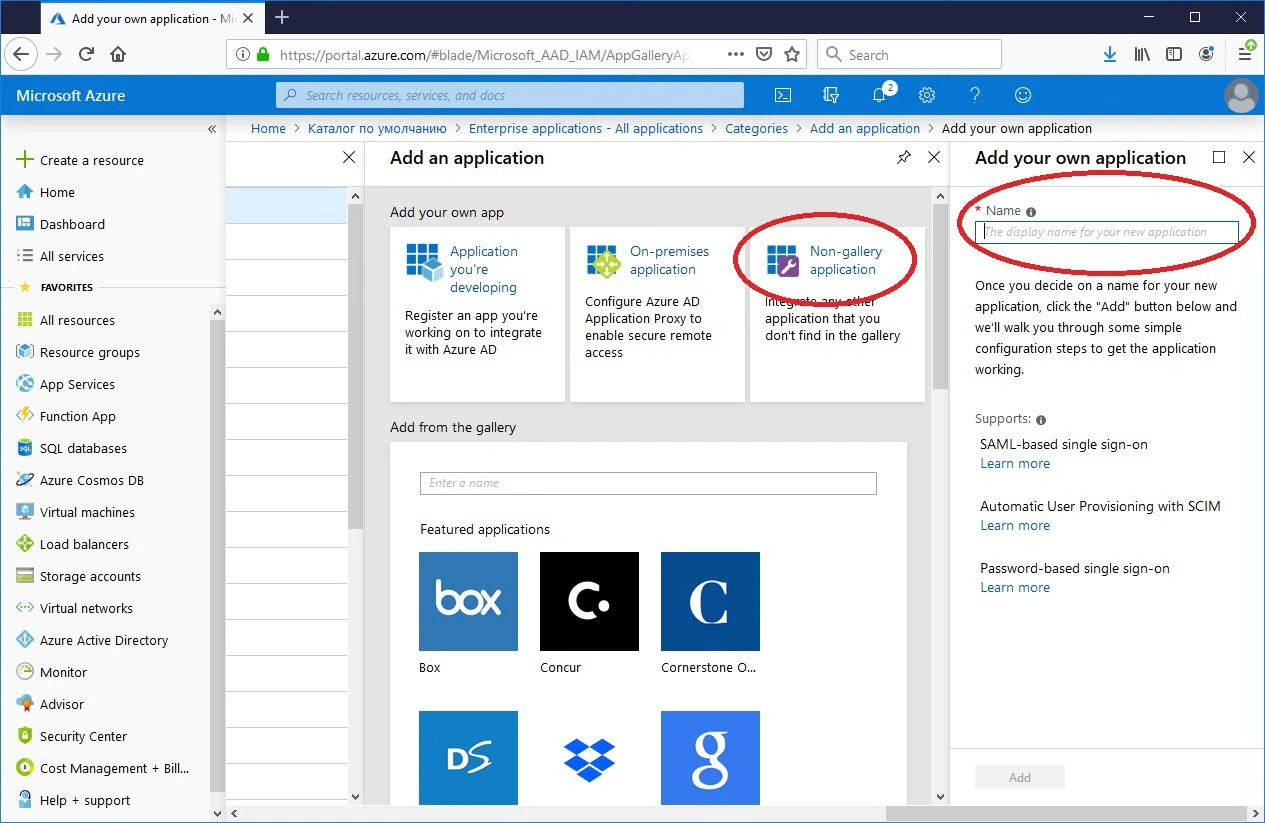
3. In the **Add an application** window, go to the **Non-gallery application** section and specify a name for the new application. If several tenants are used, create a separate application for each.
 4. Go to the **Users and groups** section and add all required users. Give them the **User** role.
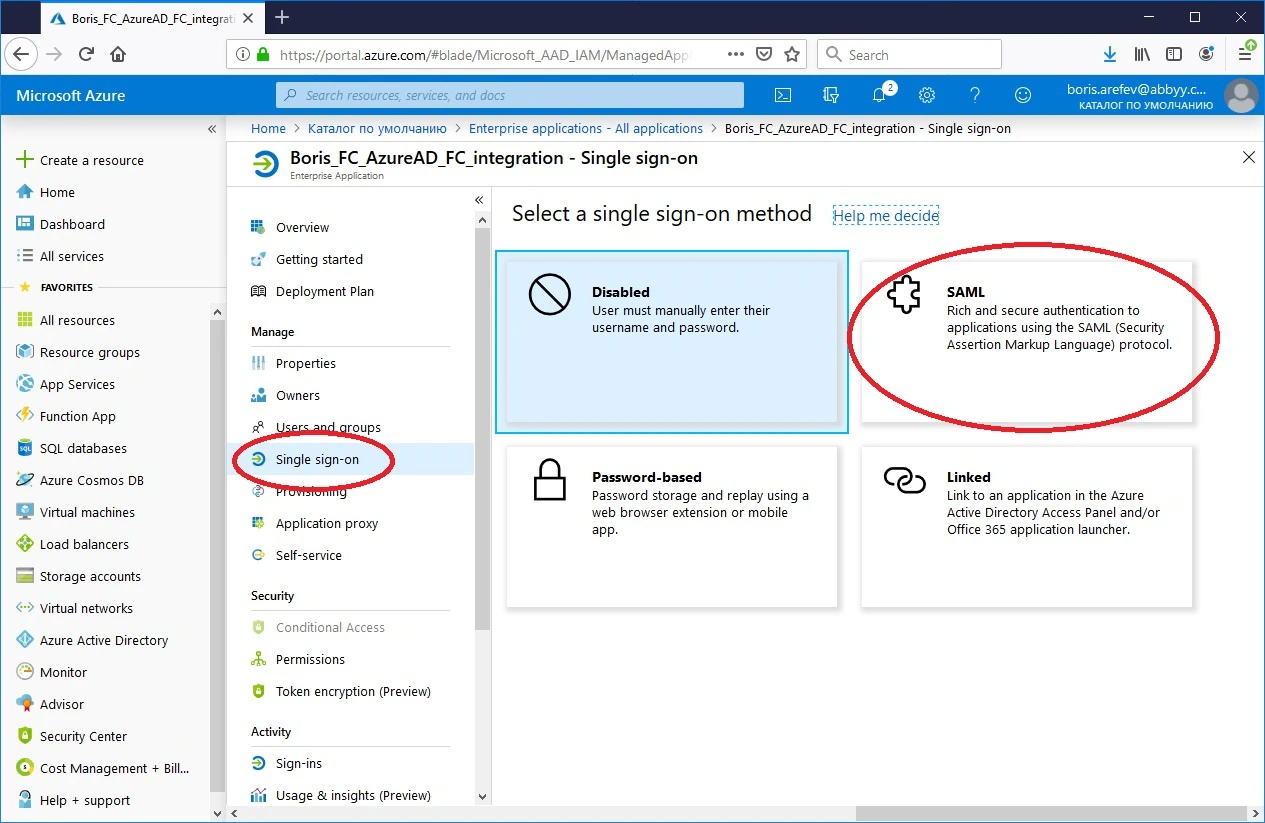
5. Go to the **Single sign-on** subsection and select **SAML**.
4. Go to the **Users and groups** section and add all required users. Give them the **User** role.
5. Go to the **Single sign-on** subsection and select **SAML**.
 6. Edit the **Basic SAML Configuration** section. In the **Identifier (Entity ID)** and **Reply URL (Assertion Consumer Service URL)** fields, enter `https:///FlexiCapture12/Login/AccessToken/Saml`, and leave the rest of the fields blank.
When setting up a tenant, specify the URLs in this format: `https:///FlexiCapture12/Login//AccessToken/Saml`
6. Edit the **Basic SAML Configuration** section. In the **Identifier (Entity ID)** and **Reply URL (Assertion Consumer Service URL)** fields, enter `https:///FlexiCapture12/Login/AccessToken/Saml`, and leave the rest of the fields blank.
When setting up a tenant, specify the URLs in this format: `https:///FlexiCapture12/Login//AccessToken/Saml`
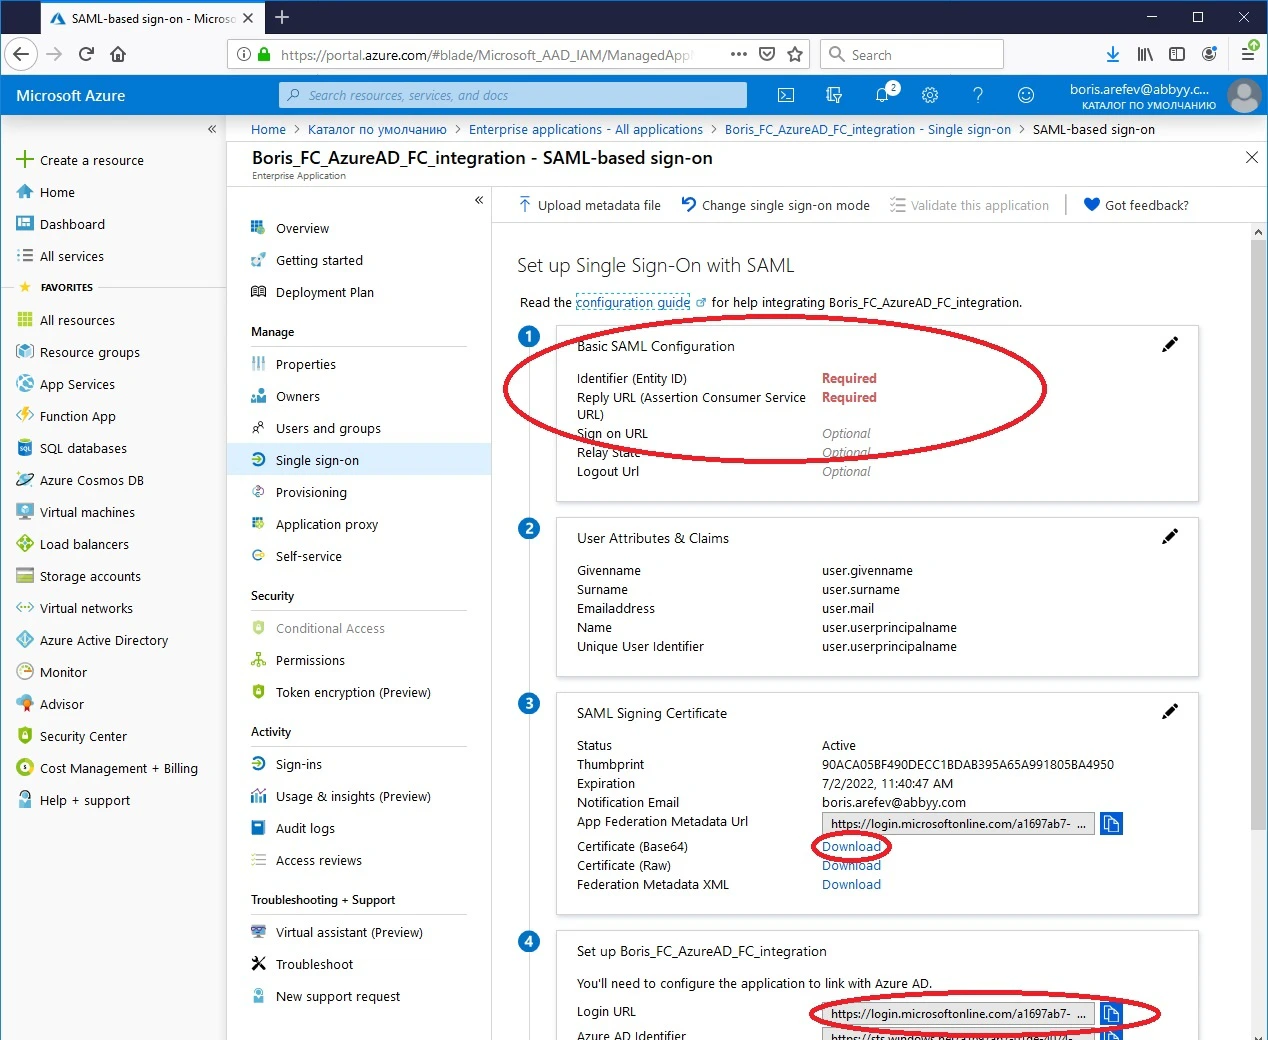 7. In the **SAML Signing Certificate** section, download your public certificate in Base64 format by clicking the link next to **Certificate (Base64)**.
8. From the **Login URL** field in the **Set up \[application name]** section, copy the URL for accessing the server of the external identity provider.
## Configure ABBYY FlexiCapture
To set up the required parameters in ABBYY FlexiCapture, run a PowerShell script:
1. Obtain the `SetIdentityProvider.ps1` script.
2. On the machine where ABBYY FlexiCapture is installed, open the Windows PowerShell console as an administrator.
3. Run the script with the path to the script and the required parameters. For example:
```powershell theme={null}
C:\Temp\SetIdentityProvider.ps1 /url 'https://localhost' /certFilePath C:\Temp\AzureAD_FC_integration.cer /pictureFilePath 'C:\Temp\index.svg' /tenant 'TenantName' /providerName 'Azure AD' /Reference 'https://login.microsoftonline.com/123e4567-e89b-12d3-a456-426655440000/saml2'
```
Where:
* `/url` — The path to the Application Server. Example: `'https://localhost'`.
* `/certFilePath` — The path to the public certificate. Example: `'C:\Temp\AzureAD_FC_integration.cer'`.
* `/pictureFilePath` — The path to the image used for the new button (`.svg`, `.jpg`, and `.png` formats are supported). Example: `'C:\Temp\index.svg'`.
* `/tenant` — The tenant for which the parameters are set. Example: `'TenantName'`. Specify this only if multiple tenants are used.
* `/providerName` — The external identity provider. Example: `'Azure AD'`. The login button will then read **Log in with Azure AD**.
* `/Reference` — The URL for accessing the external identity provider. Example: `'https://login.microsoftonline.com/123e4567-e89b-12d3-a456-426655440000/saml2'`.
As a result, the **Log in with Azure AD** button appears on the web station's login page.
For more technical details about the SAML authentication requests and responses that Azure Active Directory supports for Single Sign-On, see [this article on Microsoft.com](https://docs.microsoft.com/en-us/azure/active-directory/develop/single-sign-on-saml-protocol).
7. In the **SAML Signing Certificate** section, download your public certificate in Base64 format by clicking the link next to **Certificate (Base64)**.
8. From the **Login URL** field in the **Set up \[application name]** section, copy the URL for accessing the server of the external identity provider.
## Configure ABBYY FlexiCapture
To set up the required parameters in ABBYY FlexiCapture, run a PowerShell script:
1. Obtain the `SetIdentityProvider.ps1` script.
2. On the machine where ABBYY FlexiCapture is installed, open the Windows PowerShell console as an administrator.
3. Run the script with the path to the script and the required parameters. For example:
```powershell theme={null}
C:\Temp\SetIdentityProvider.ps1 /url 'https://localhost' /certFilePath C:\Temp\AzureAD_FC_integration.cer /pictureFilePath 'C:\Temp\index.svg' /tenant 'TenantName' /providerName 'Azure AD' /Reference 'https://login.microsoftonline.com/123e4567-e89b-12d3-a456-426655440000/saml2'
```
Where:
* `/url` — The path to the Application Server. Example: `'https://localhost'`.
* `/certFilePath` — The path to the public certificate. Example: `'C:\Temp\AzureAD_FC_integration.cer'`.
* `/pictureFilePath` — The path to the image used for the new button (`.svg`, `.jpg`, and `.png` formats are supported). Example: `'C:\Temp\index.svg'`.
* `/tenant` — The tenant for which the parameters are set. Example: `'TenantName'`. Specify this only if multiple tenants are used.
* `/providerName` — The external identity provider. Example: `'Azure AD'`. The login button will then read **Log in with Azure AD**.
* `/Reference` — The URL for accessing the external identity provider. Example: `'https://login.microsoftonline.com/123e4567-e89b-12d3-a456-426655440000/saml2'`.
As a result, the **Log in with Azure AD** button appears on the web station's login page.
For more technical details about the SAML authentication requests and responses that Azure Active Directory supports for Single Sign-On, see [this article on Microsoft.com](https://docs.microsoft.com/en-us/azure/active-directory/develop/single-sign-on-saml-protocol).