> ## Documentation Index
> Fetch the complete documentation index at: https://docs.abbyy.com/llms.txt
> Use this file to discover all available pages before exploring further.
# MAPI import errors
> Resolve MAPI import errors when integrating ABBYY FlexiCapture with Microsoft Office 365 by creating and configuring a COM+ application for the connector.
Users who choose to integrate ABBYY FlexiCapture with Microsoft Office365 may encounter errors like the following: "Unhandled exception at 0x00007FFAEAB2A839 (KernelBase.dll) in FlexiEx.exe: 0xC06D007E: Module not found (parameters: 0x000000E126EFE040)." The issue can be solved by creating and configuring a COM+ application.
Before creating a COM+ application:
* Make sure that the ABBYY FlexiCapture services are running under the same user account that is used for the Microsoft Outlook profile. This can be achieved by opening Microsoft Outlook under the required account and adding a mail box from which the program will import documents.
* Make sure that this user account under which the ABBYY FlexiCapture services are running has administrative permissions, because you will use this user account to create your COM+ application.
To create a COM+ application:
1. Open the **Component Services console** and navigate to **Console Root → Computers → My Computer → COM+ Applications**.
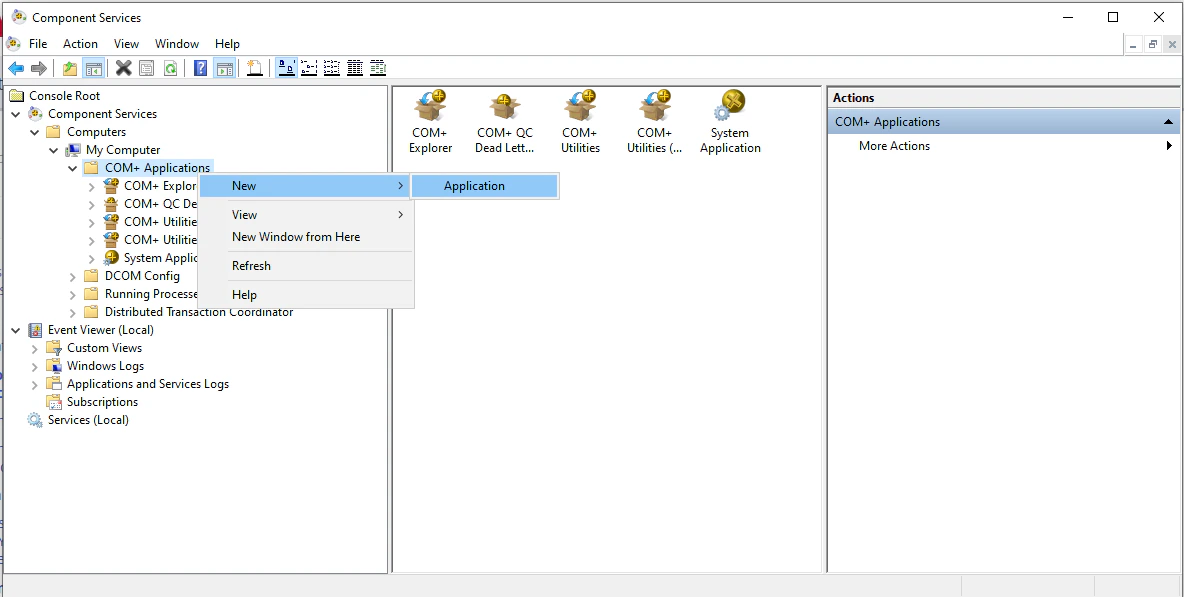
2. Right-click **COM+ Applications** and then click **New → Application** on the shortcut menu. The **COM+ Application Install Wizard** will open.
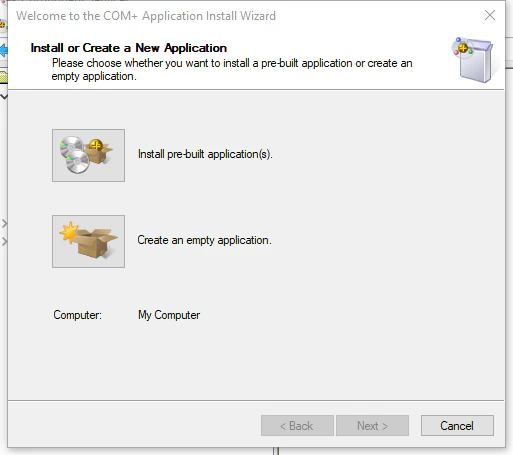
 3. In the **Install or Create a New Application** dialog box, click **Create an empty application**.
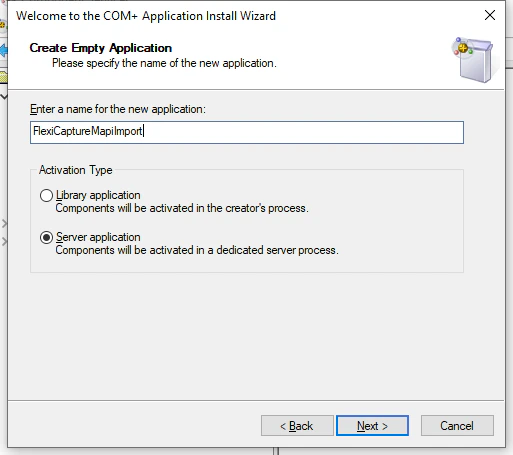
 4. In the **Create Empty Application** dialog box, enter a name for your application, select **Server application**, and click **Next**.
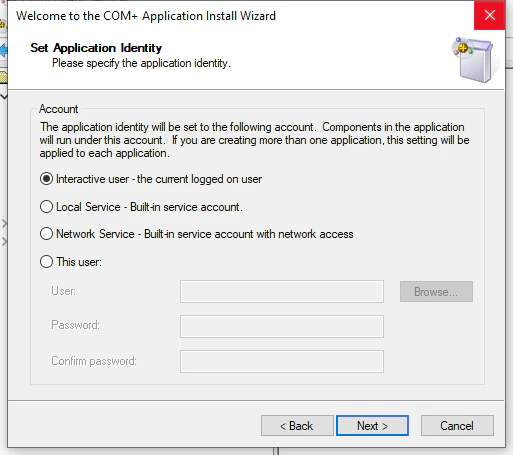
 5. In the **Set Application Identity** dialog box, select **Interactive user - the current logged on user** and click **Next**.
 6. In the remaining dialog boxes, simply click **Next**, leaving the default settings. Complete the creation of your COM+ application.
Once you have created your COM+ application, you need to import the required FlexiCapture component:
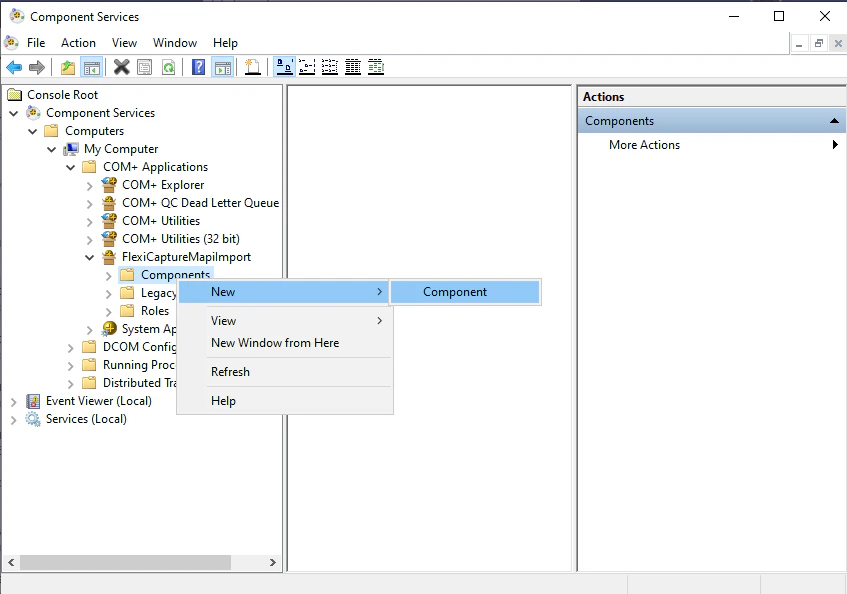
1. In the list of available applications, locate your newly created COM+ application, right-click the **Components** folder, and then click **New → Component**.
6. In the remaining dialog boxes, simply click **Next**, leaving the default settings. Complete the creation of your COM+ application.
Once you have created your COM+ application, you need to import the required FlexiCapture component:
1. In the list of available applications, locate your newly created COM+ application, right-click the **Components** folder, and then click **New → Component**.
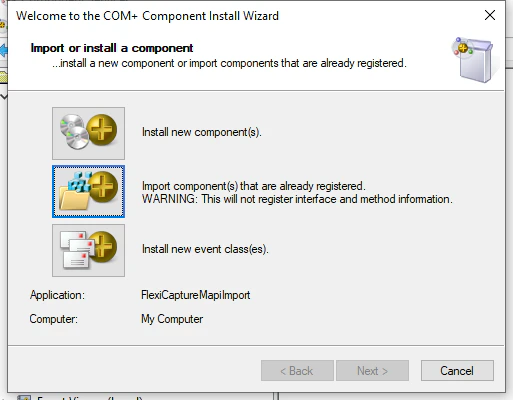
 2. In the **Import or install a component** dialog box, click **Import component(s) that are already registered.**
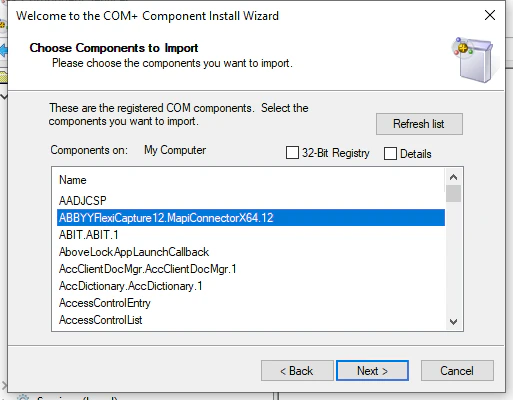
 3. In the **Choose Components to Import** dialog box:
* If you are using a 64-bit version of Microsoft Office, select the ABBYYFlexiCapture12.MapiConnectorX64.12 component and click **Next**.
* If you are using a 32-bit version of Microsoft Office, select the **32-Bit Registry** option, then select the ABBYYFlexiCapture12.MapiConnectorX86.12 component, and click **Next**.
3. In the **Choose Components to Import** dialog box:
* If you are using a 64-bit version of Microsoft Office, select the ABBYYFlexiCapture12.MapiConnectorX64.12 component and click **Next**.
* If you are using a 32-bit version of Microsoft Office, select the **32-Bit Registry** option, then select the ABBYYFlexiCapture12.MapiConnectorX86.12 component, and click **Next**.
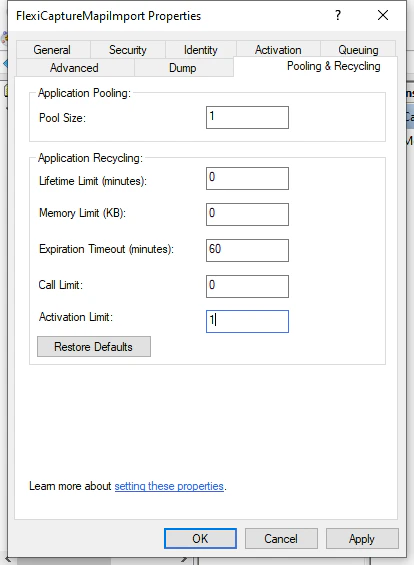
 4. Once you have imported the required component, right-click your COM+ application in the list of available applications and click **Properties** on the shortcut menu. In the application properties dialog box that opens, click the **Pooling & Recycling** tab.
5. In the **Expiration Timeout (minutes)** box, type 60. In the **Activation Limit** box, type 1. Click **OK** to save your changes.
4. Once you have imported the required component, right-click your COM+ application in the list of available applications and click **Properties** on the shortcut menu. In the application properties dialog box that opens, click the **Pooling & Recycling** tab.
5. In the **Expiration Timeout (minutes)** box, type 60. In the **Activation Limit** box, type 1. Click **OK** to save your changes.
 For the new import settings to take effect, you will need to restart the Processing Station.
It is recommended to turn off the Processing Station before configuring MAPI import. If you have not turned off the Processing Station and receive the "The RPC server is unavailable" error while configuring MAPI import, restart ABBYY FlexiCapture and the Processing Stations.
We recommend that you use Microsoft Outlook 2016 when importing to ABBYY FlexiCapture 12 using the MAPI protocol. Later versions of Microsoft Outlook are not supported.
For the new import settings to take effect, you will need to restart the Processing Station.
It is recommended to turn off the Processing Station before configuring MAPI import. If you have not turned off the Processing Station and receive the "The RPC server is unavailable" error while configuring MAPI import, restart ABBYY FlexiCapture and the Processing Stations.
We recommend that you use Microsoft Outlook 2016 when importing to ABBYY FlexiCapture 12 using the MAPI protocol. Later versions of Microsoft Outlook are not supported.