> ## Documentation Index
> Fetch the complete documentation index at: https://docs.abbyy.com/llms.txt
> Use this file to discover all available pages before exploring further.
# Laserfiche サーバーへの接続パラメーター
> FlexiCapture で Laserfiche サーバーの接続パラメーター(サーバー アドレス、リポジトリ名、アカウント認証情報、新しいドキュメントを追加するための権限)を設定します。
次のパラメーターを指定する必要があります。
* Laserfiche サーバーのアドレス
* 使用する Laserfiche リポジトリの名前
* ドキュメントのアップロードに使用する Laserfiche アカウントの Username とパスワード
Username とパスワードを空のままにした場合、ドキュメントは、アップロード処理を実行している Windows ユーザーアカウントを使用してアップロードされます。アップロード処理がどのアカウントで実行されるかは、その開始方法によって異なります。Processing Station によってアップロードが開始された場合、アップロード処理は Processing Station と同じアカウントで実行されます。ユーザーによってアップロードが開始された場合、アップロード処理は、そのユーザーがアップロードを開始した ABBYY FlexiCapture ステーションにログインする際に使用したアカウントで実行されます。
エクスポート設定の指定に XML ファイルを使用すると、Laserfiche アカウントのパスワードがこのファイルに含まれるため、誰でも閲覧できる状態になることに注意してください。詳細は、[スクリプトを使用してエクスポート設定を指定する](/ja/flexi-capture/connectors/laserfiche/lf-export-script)、[XML ファイルを使用してエクスポート設定を指定する](/ja/flexi-capture/connectors/laserfiche/lf-export-xml) を参照してください。
このアカウントには、ユーザーがリポジトリに新しいドキュメントを追加できる十分な権限が必要です。ユーザーにこの権限を付与するには、次の手順を実行します。
1. **Laserfiche Administration Console** を開き、管理者アカウントを使用してリポジトリにログインします。
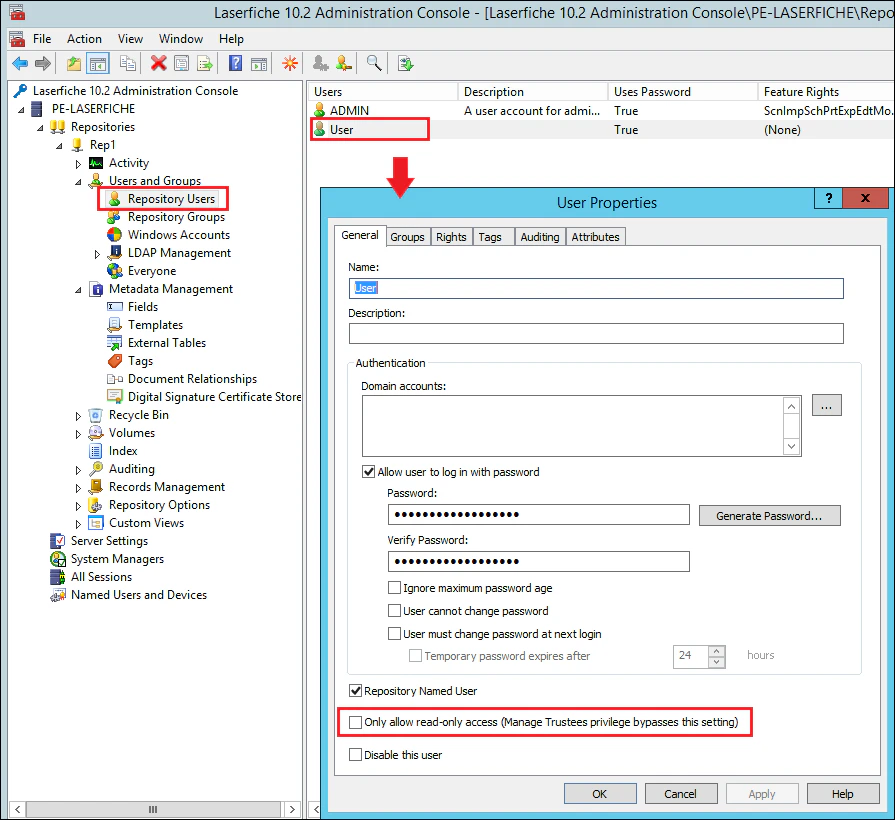
2. 左側のペインで **Users and Groups** ノードに移動し、**Repository Users** を選択します。
3. ユーザーリストから、ドキュメントのエクスポートに使用するアカウントのユーザーを選択し、そのアカウントのプロパティを開きます。
4. **General** タブで、**Only allow read-only access (Manage Trustees privilege bypasses this setting)** チェックボックスがオフになっていることを確認します。
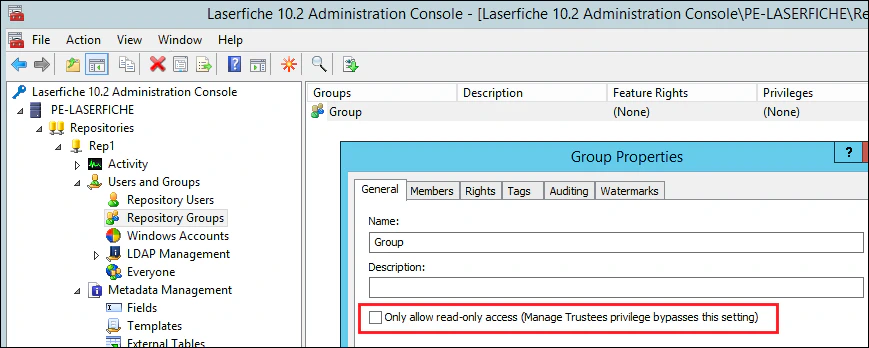
 5. ユーザーがグループに割り当てられている場合は、そのグループの設定を開き、**General** タブで **Only allow read-only access (Manage Trustees privilege bypasses this setting)** チェックボックスがオフになっていることを確認します。
 6. 次に、Laserfiche クライアントを開き、管理者アカウントを使用してリポジトリにログインします。
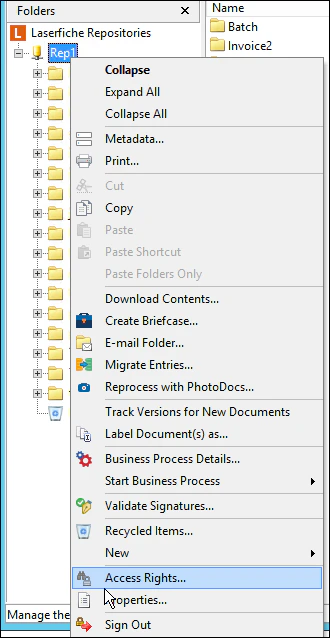
7. リポジトリのコンテキストメニューから **Access Rights...** を選択します。
6. 次に、Laserfiche クライアントを開き、管理者アカウントを使用してリポジトリにログインします。
7. リポジトリのコンテキストメニューから **Access Rights...** を選択します。
 8. 開いたダイアログで、**Access Rights** タブの適切なユーザーを選択します。ユーザーが一覧にない場合は、**Add…** をクリックし、**Create Access Control Entry** ダイアログでユーザーを選択します。ドロップダウンリストから *This folder, subfolder and documents* を選択し、**OK** をクリックします。
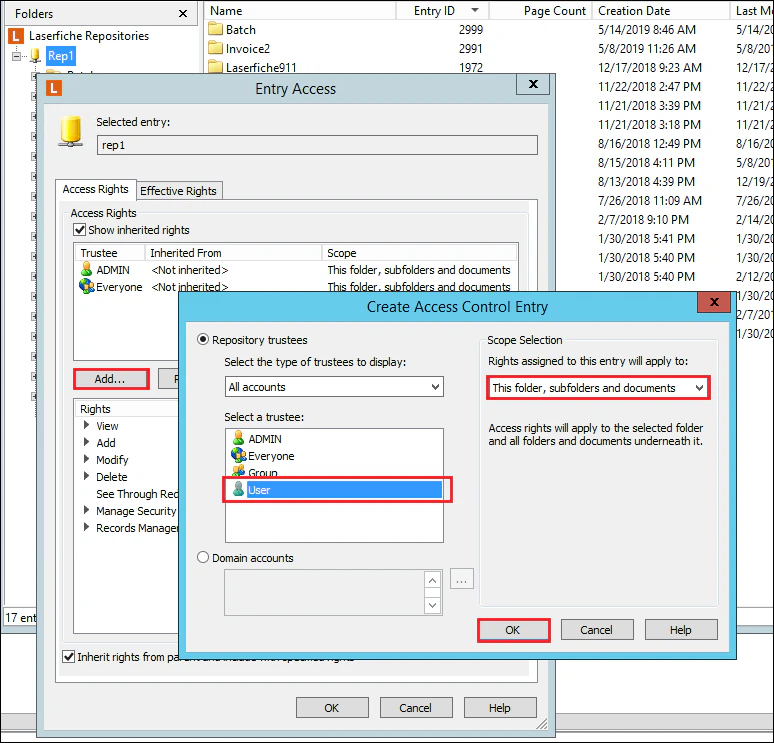 9. **Entry Access** ウィンドウで、追加したユーザーを選択し、次のオプションを有効にします。
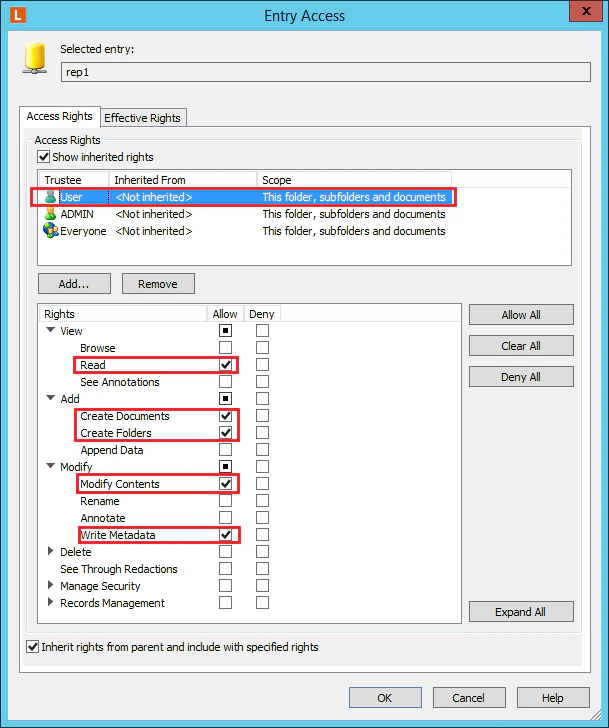 10. **OK** をクリックします。