> ## Documentation Index
> Fetch the complete documentation index at: https://docs.abbyy.com/llms.txt
> Use this file to discover all available pages before exploring further.

# カスタムデータ型の作成

> Pega Dev Studio でカスタムデータ型を追加し、ラベルと説明を設定してから、抽出した FlexiCapture の値を格納するデータモデルフィールドを定義します。

カスタムデータ型を作成するには、次の手順に従います。

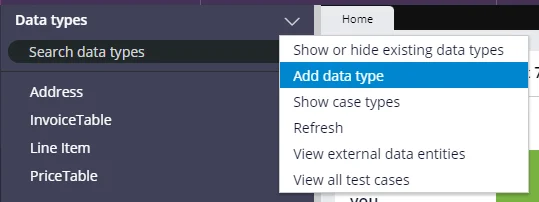
1. **Dev Studio** で **Data types** のコンテキストメニューを開き、**Add data type** を選択します。
   <Frame>
     <img src="https://mintcdn.com/abbyy/Xgx3EG8BZs5YQjIJ/images/flexi-capture/connectors/Pega193.png?fit=max&auto=format&n=Xgx3EG8BZs5YQjIJ&q=85&s=eeff0ccc05bdc9fa36a89905e8f56b7a" alt="Pega Dev Studio の Data types エクスプローラーでコンテキストメニューを開き、Add data type が強調表示されているスクリーンショット。" width="539" height="202" data-path="images/flexi-capture/connectors/Pega193.png" />
   </Frame>

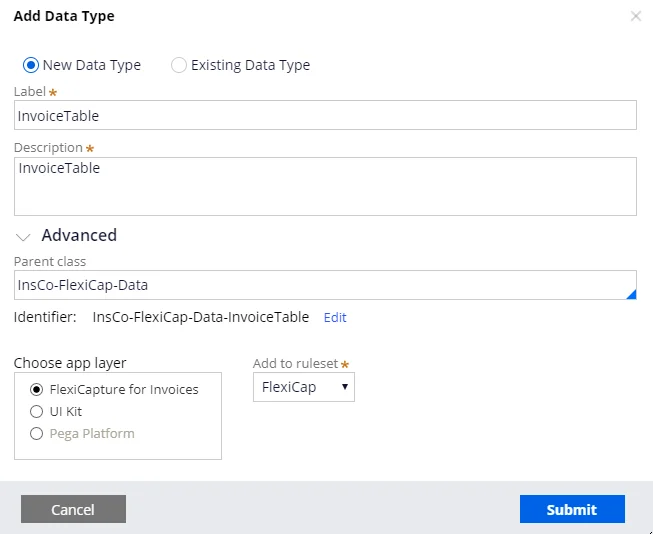
2. **Label** フィールドと **Description** フィールドに必要な情報を入力します。
   <Frame>
     <img src="https://mintcdn.com/abbyy/Xgx3EG8BZs5YQjIJ/images/flexi-capture/connectors/Pega194.png?fit=max&auto=format&n=Xgx3EG8BZs5YQjIJ&q=85&s=3b63ded550c45e011e96f7b2fa078255" alt="新しいデータ型用に Label フィールドと Description フィールドが入力された Pega Dev Studio の Add Data Type ダイアログのスクリーンショット。" width="653" height="534" data-path="images/flexi-capture/connectors/Pega194.png" />
   </Frame>

3. **Submit** をクリックします。

4. **Data model** タブをクリックし、必須フィールドを追加します。
