> ## Documentation Index
> Fetch the complete documentation index at: https://docs.abbyy.com/llms.txt
> Use this file to discover all available pages before exploring further.

# ユーザーインターフェースの設定

> 単一ドキュメントのCase用にPega UIを構築します。ファイル添付を追加し、iframeを介してFlexiCaptureの検証ページを埋め込み、pyCaseInformationを追加します。

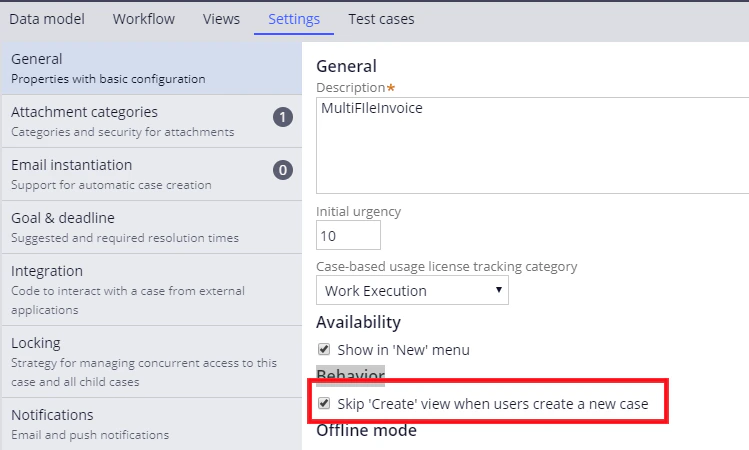
新しいCaseの作成時に **Create** ビューをスキップして、直接Case設定に進むには、次の手順を実行します。

1. **Case types** でCaseを開き、**Settings** をクリックします。
2. **General** タブで、**Skip ‘Create’ view when users create a new case** を選択します。

<Frame>
  <img src="https://mintcdn.com/abbyy/jk6a9TGm7KRcVxRI/images/flexi-capture/connectors/Pega76.png?fit=max&auto=format&n=jk6a9TGm7KRcVxRI&q=85&s=304eb1ad72f5ff71359985239bdad6cc" alt="新しいCaseの作成時にユーザーが「Create」ビューをスキップするオプションが選択された、PegaのCase typeのSettings内のGeneralタブのスクリーンショット。" width="749" height="450" data-path="images/flexi-capture/connectors/Pega76.png" />
</Frame>

<div id="adding-files-to-a-case">
  ## Case にファイルを追加する
</div>

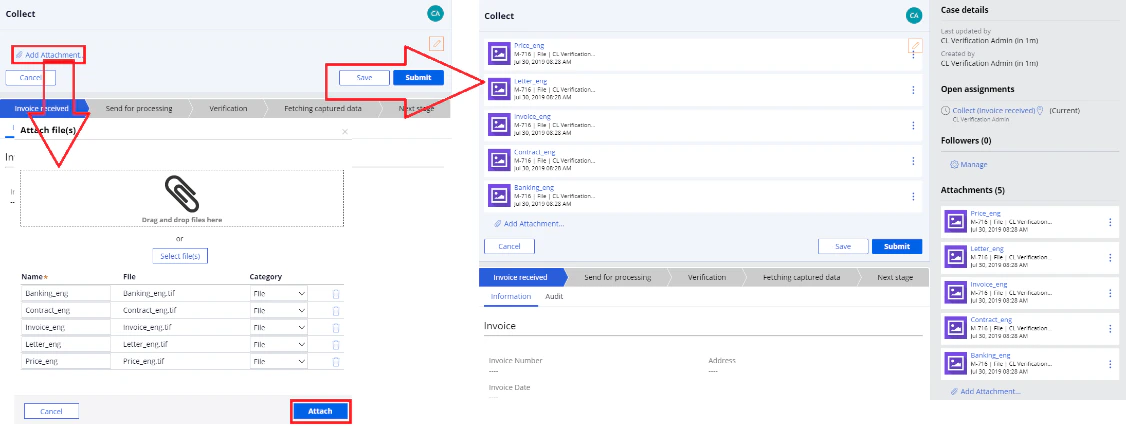
設定済みの Case にファイルを追加するには、次の手順に従います。

1. **Add attachment… → File from device** をクリックします。
2. ファイルを選択し、表示されたダイアログで **Attach** をクリックします。
3. **Submit** をクリックしてワークフローを実行します。

<Frame>
  <img src="https://mintcdn.com/abbyy/jk6a9TGm7KRcVxRI/images/flexi-capture/connectors/Pega77.png?fit=max&auto=format&n=jk6a9TGm7KRcVxRI&q=85&s=f3884ea01d10c09d3b58663390f111e6" alt="ファイルをドラッグまたは選択して追加する Add Attachment ダイアログと、送信準備が整った添付済みの請求書ファイルが一覧表示される Collect ビューを示す Pega の Case のスクリーンショット。" width="1126" height="426" data-path="images/flexi-capture/connectors/Pega77.png" />
</Frame>

ファイルを追加するためのインターフェイスを作成するには、次の手順に従います。

1. **Record → Process → Flow** または **App → \<case name> → Process → Flow** をクリックして、**Dev Studio** で *InvoiceReceived\_Flow* フローを開きます。
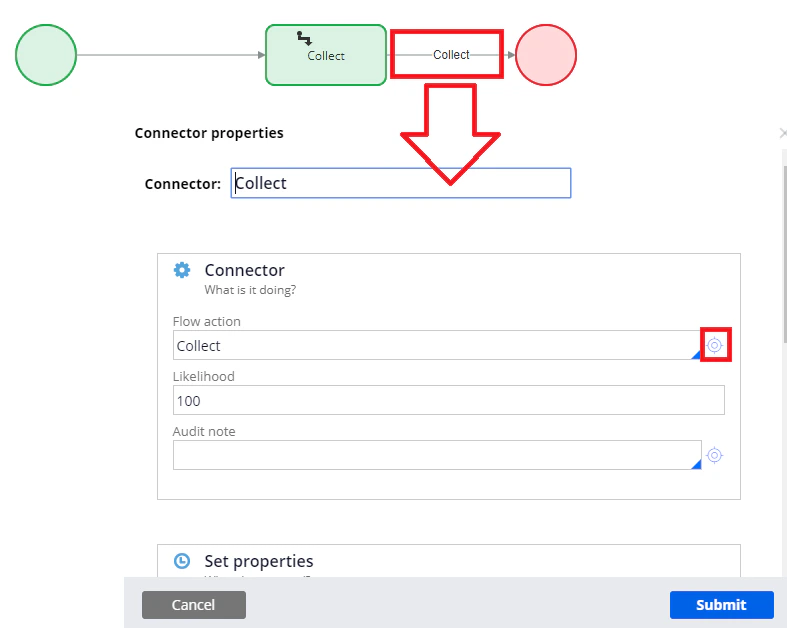
2. 2 つのステージをつなぐコネクタのプロパティを開きます。**フローアクション** field に、ファイルを追加するためのフローアクションを追加します。詳細については、[フローアクションの作成](/ja/flexi-capture/connectors/pega/pega-flow-action)を参照してください。

<Frame>
  <img src="https://mintcdn.com/abbyy/jk6a9TGm7KRcVxRI/images/flexi-capture/connectors/Pega78.png?fit=max&auto=format&n=jk6a9TGm7KRcVxRI&q=85&s=9ae41120188addf327e4c25a0e4b3655" alt="フロー上の Collect コネクタのプロパティを表示し、フローアクション field に Collect フローアクションが割り当てられている Pega Dev Studio のスクリーンショット。" width="787" height="628" data-path="images/flexi-capture/connectors/Pega78.png" />
</Frame>

<div id="verification-page">
  ## 検証ページ
</div>

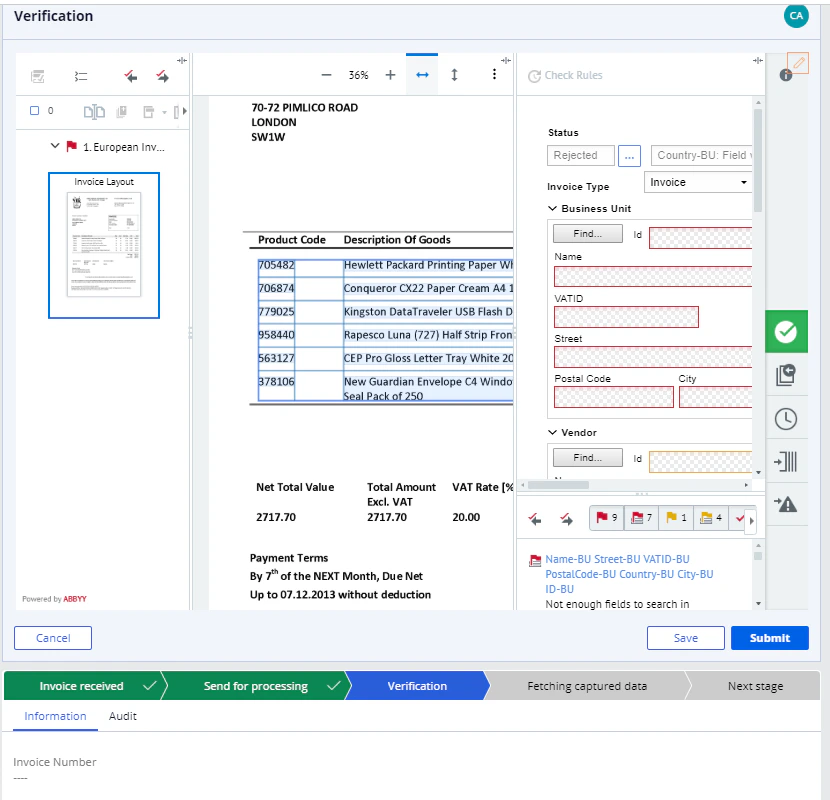
ドキュメントが検証ステージに到達すると、検証ページがCaseヘッダーに表示されます。検証完了後にドキュメントの処理を続行するには、**Complete Task** をクリックし、「Task completed」というメッセージが表示されるのを待ってから、**Submit** をクリックします。
<Frame>
  <img src="https://mintcdn.com/abbyy/jk6a9TGm7KRcVxRI/images/flexi-capture/connectors/Pega79.png?fit=max&auto=format&n=jk6a9TGm7KRcVxRI&q=85&s=76d1970a18dbcb92428d3e56fb6f36a9" alt="PegaのCaseヘッダーに埋め込まれたABBYY FlexiCaptureの検証ページのスクリーンショット。請求書画像、field確認パネル、Verificationステージが強調表示されたPegaのCaseステージバーが表示されています。" width="830" height="800" data-path="images/flexi-capture/connectors/Pega79.png" />
</Frame>

検証ページのインターフェイスを作成するには、次の手順に従います。

1. **Dev Studio** で *Verification\_Flow* フローを開きます (**Record → Process → Flow** または **App → \<case name> → Process → Flow** をクリック) 。
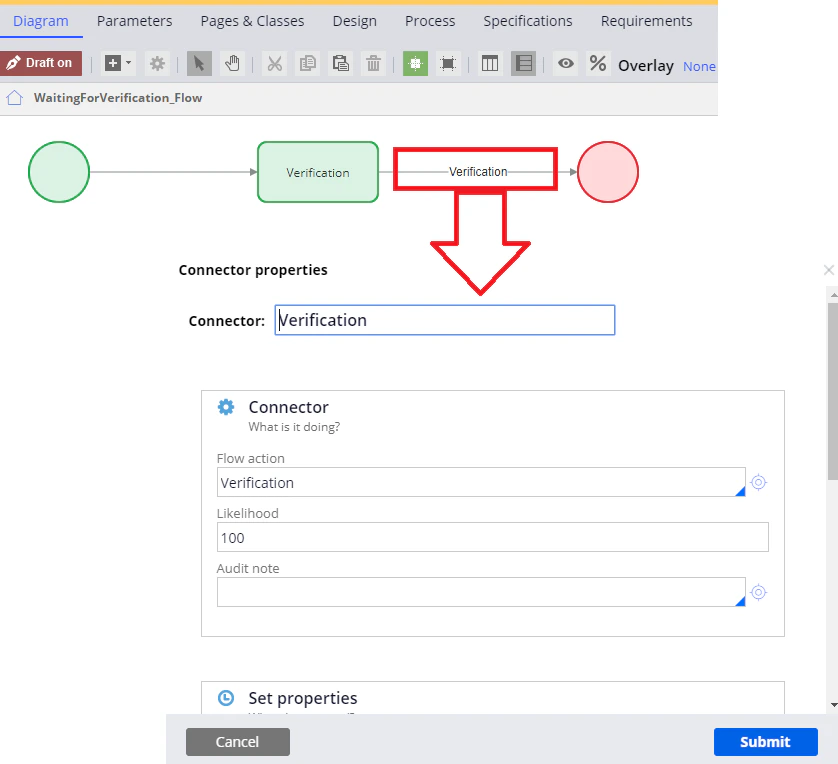
2. 2 つのステージをつなぐコネクタのプロパティを開きます。**フローアクション** field に、検証ページを含むフローアクションを追加します。詳細については、[フローアクションの作成](/ja/flexi-capture/connectors/pega/pega-flow-action) を参照してください。

<Frame>
  <img src="https://mintcdn.com/abbyy/jk6a9TGm7KRcVxRI/images/flexi-capture/connectors/Pega80.png?fit=max&auto=format&n=jk6a9TGm7KRcVxRI&q=85&s=36921e0685f57dc0a259dbdf4f23acdc" alt="WaitingForVerification_Flow図とVerificationコネクタのプロパティが表示されたPega Dev Studioのスクリーンショット。フローアクション field にVerificationフローアクションが割り当てられています。" width="838" height="764" data-path="images/flexi-capture/connectors/Pega80.png" />
</Frame>

## <a id="1" />検証ステージをスキップする

FC 側で検証ステージが設定されていない場合、またはその他の理由でバッチが検証をスキップして *処理完了* ステージに直接進む場合は、このバッチを検証する必要もありません。

ワークフローで検証ステージをスキップするには、次の手順を実行します。

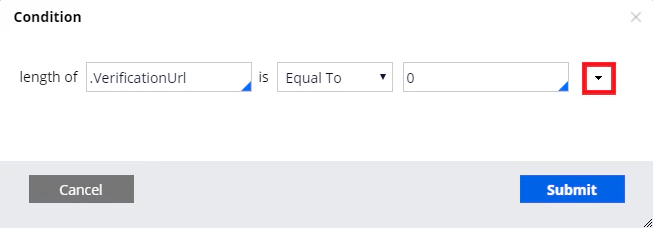
1. ワークフローで検証ステージを選択し、**Validation** タブをクリックして、新しい *VerificationUrlEmpty* を作成します。
2. *length of .VerificationUrl is Equal To 0* ルールを作成します。

<Frame>
  <img src="https://mintcdn.com/abbyy/Xgx3EG8BZs5YQjIJ/images/flexi-capture/connectors/Pega63.png?fit=max&auto=format&n=Xgx3EG8BZs5YQjIJ&q=85&s=de24ea6d88dcb4429e8d47bcb53cf5fe" alt="Verification ステージの Validation タブに、VerificationUriEmpty という名前の Skip stage When ルールと、VerificationUrl の length が 0 と等しいという When 条件が表示されている Pega Dev Studio のスクリーンショット。" width="1224" height="243" data-path="images/flexi-capture/connectors/Pega63.png" />
</Frame>

<Frame>
  <img src="https://mintcdn.com/abbyy/Xgx3EG8BZs5YQjIJ/images/flexi-capture/connectors/Pega64.png?fit=max&auto=format&n=Xgx3EG8BZs5YQjIJ&q=85&s=18193096c7959db092d541ff350c2098" alt="value field が強調表示された、length of .VerificationUrl is Equal To 0 ルールを作成している Pega Condition ダイアログのスクリーンショット。" width="653" height="228" data-path="images/flexi-capture/connectors/Pega64.png" />
</Frame>

<div id="the-pycaseinformation-section">
  ## pyCaseInformation セクション
</div>

FC から受信したデータを Pega のCaseに表示するには、セクションを作成して設定する必要があります。

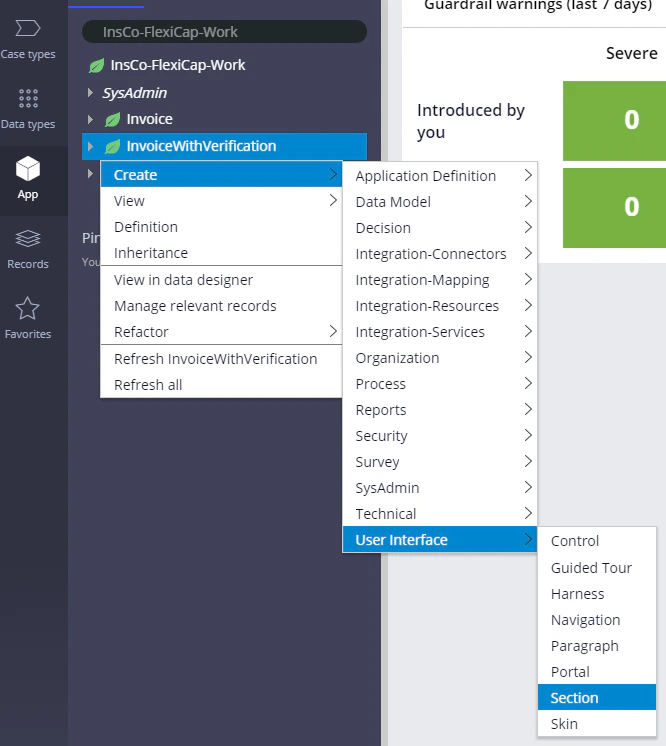
ユーザーインターフェースのセクションを作成するには、次の手順を実行します。

1. **App** タブで、**Create → User Interface → Section** をクリックします。
   <Frame>
     <img src="https://mintcdn.com/abbyy/jk6a9TGm7KRcVxRI/images/flexi-capture/connectors/Pega81.png?fit=max&auto=format&n=jk6a9TGm7KRcVxRI&q=85&s=f31b640533bdb9ac2ee856a54ab2fdcb" alt="Create → User Interface メニューが開かれ、InvoiceWithVerification Case型に対して Section が選択されている Pega App Explorer のスクリーンショット。" width="666" height="746" data-path="images/flexi-capture/connectors/Pega81.png" />
   </Frame>

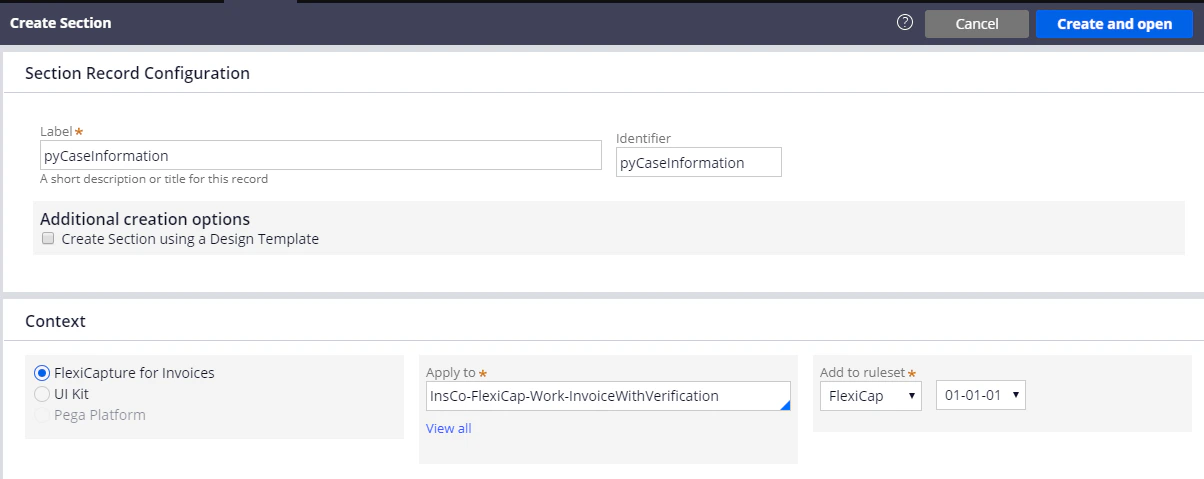
2. **Label** field と **Identifier** field に、次の値を入力します: *pyCaseInformation*。セクションがアプリケーションのコンテキスト内に作成されていること、および **Apply to** field にCase型の完全名が指定されていることを確認してください。次に、**Create and open** をクリックします。
   <Frame>
     <img src="https://mintcdn.com/abbyy/jk6a9TGm7KRcVxRI/images/flexi-capture/connectors/Pega82.png?fit=max&auto=format&n=jk6a9TGm7KRcVxRI&q=85&s=4d03a1821d177c4f0d458307e1938c4b" alt="Label field と Identifier field に pyCaseInformation が入力され、Apply to field に InsCo-FlexiCap-Work-InvoiceWithVerification Case型が入力されている Pega Create Section フォームのスクリーンショット。" width="1204" height="479" data-path="images/flexi-capture/connectors/Pega82.png" />
   </Frame>

3. 作成したセクションを開き、HTML タブをクリックして、**Auto-generated HTML** オプションをオフにします。

4. **HTML Source** field に、**pyCaseInformation.html** ファイルのコードを貼り付けます。このファイルは *%Installation Path%\Connector for FlexiCapture as a Service with verification\Samples\Code examples\Configure UI\Single document* にあります。
