> ## Documentation Index
> Fetch the complete documentation index at: https://docs.abbyy.com/llms.txt
> Use this file to discover all available pages before exploring further.
# ABBYY FlexiCapture の設定
> Pega コネクタ向けに ABBYY FlexiCapture Project を準備します。Project を開くか作成し、FlexiCapture Application Server または Cloud にアップロードします。
FC では、文書は Project 内で処理されます。FC は各文書の種類を識別し、その種類専用に用意された適切な Document Definition を適用します。各 Document Definition には、文書画像とデータのエクスポートに使用する 1 つ以上のエクスポートプロファイルが含まれます。FC からデータをエクスポートするよう設定するには、FC の Project に新しいスクリプト エクスポートプロファイルを作成する必要があります。
FC を設定する前に、次のソフトウェアがインストールされていることを確認してください。
* ABBYY FlexiCapture 12 Project Setup Station (ABBYY FlexiCapture Distributed Edition または ABBYY FlexiCapture Cloud を使用している場合は必須) 。
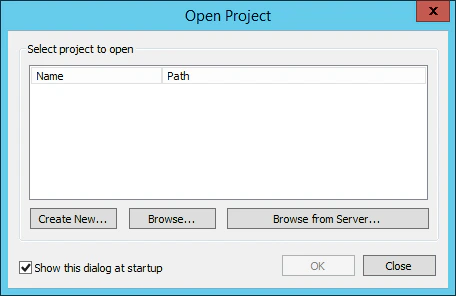
Pega へのデータ エクスポートを設定する対象の FC Project がすでにある場合は、その Project を開きます。ない場合は、Project を作成する必要があります。Project Setup Station を起動し、**Open Project** ダイアログで次のいずれかをクリックします。
* 新しい Project を作成するには **Create New\...**
* ローカル ドライブに保存されている既存の Project を開くには **Browse...**
* 以前に FC Application Server にアップロードした Project を開くには **Browse from Server...**
 次に、Project を ABBYY FlexiCapture Application Server にアップロードする必要があります。
1. **File → Upload Project to Server...** をクリックします。
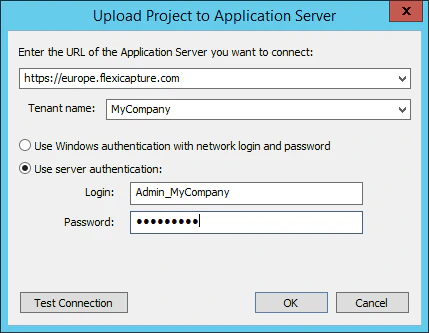
2. **Upload Project to Application Server** ダイアログで、サーバーのアドレス、使用するプロトコル、および認証情報を指定します。
3. ABBYY FlexiCapture Cloud を使用している場合は、**URL** フィールドに次の 3 つの FlexiCapture Cloud インスタンスのいずれかを指定します (自社が登録されているインスタンスを指定してください) 。
* *[https://europe.flexicapture.com](https://europe.flexicapture.com)*
* *[https://australia.flexicapture.com](https://australia.flexicapture.com)*
* *[https://usa.flexicapture.com](https://usa.flexicapture.com)*
4. **Tenant name** フィールドに会社名を指定し、**Use server authentication** オプションを選択して、認証情報を入力します。
5. **Test Connection** をクリックして、入力内容が正しいことを確認します。
6. **OK** をクリックして、Project を Application Server にアップロードします。
次に、Project を ABBYY FlexiCapture Application Server にアップロードする必要があります。
1. **File → Upload Project to Server...** をクリックします。
2. **Upload Project to Application Server** ダイアログで、サーバーのアドレス、使用するプロトコル、および認証情報を指定します。
3. ABBYY FlexiCapture Cloud を使用している場合は、**URL** フィールドに次の 3 つの FlexiCapture Cloud インスタンスのいずれかを指定します (自社が登録されているインスタンスを指定してください) 。
* *[https://europe.flexicapture.com](https://europe.flexicapture.com)*
* *[https://australia.flexicapture.com](https://australia.flexicapture.com)*
* *[https://usa.flexicapture.com](https://usa.flexicapture.com)*
4. **Tenant name** フィールドに会社名を指定し、**Use server authentication** オプションを選択して、認証情報を入力します。
5. **Test Connection** をクリックして、入力内容が正しいことを確認します。
6. **OK** をクリックして、Project を Application Server にアップロードします。
 Project をクラウドにアップロードするとき、またはクラウドから Project を開くときに、"Application server version is not compatible." というエラーが発生する場合があります。このエラーが表示された場合、使用している Project Setup Station のバージョンがクラウドベースの Application Server のバージョンと一致していません。互換性のあるバージョンの FC を入手するには、お住まいの地域を担当する ABBYY の営業窓口にお問い合わせください ([https://www.abbyy.com/contacts](https://www.abbyy.com/contacts) を参照) 。
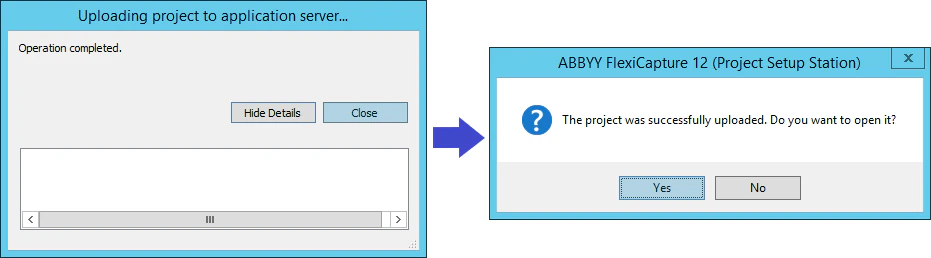
7. "Operation completed" というメッセージが表示されたら、**Close** をクリックします。次のダイアログで **Yes** をクリックし、サーバー上のアップロード済み Project を開きます。
Project をクラウドにアップロードするとき、またはクラウドから Project を開くときに、"Application server version is not compatible." というエラーが発生する場合があります。このエラーが表示された場合、使用している Project Setup Station のバージョンがクラウドベースの Application Server のバージョンと一致していません。互換性のあるバージョンの FC を入手するには、お住まいの地域を担当する ABBYY の営業窓口にお問い合わせください ([https://www.abbyy.com/contacts](https://www.abbyy.com/contacts) を参照) 。
7. "Operation completed" というメッセージが表示されたら、**Close** をクリックします。次のダイアログで **Yes** をクリックし、サーバー上のアップロード済み Project を開きます。
 次に、[ABBYY FlexiCapture を unattended service として設定し](/ja/flexi-capture/connectors/pega/pega-fc-unattended)、[エクスポートプロファイルを作成する](/ja/flexi-capture/connectors/pega/pega-export-profile-2) 必要があります。