> ## Documentation Index
> Fetch the complete documentation index at: https://docs.abbyy.com/llms.txt
> Use this file to discover all available pages before exploring further.
# インストール
> FlexiCaptureConnector.jar をサーバーにインポートし、そのクラスを呼び出す Java 関数を作成して、Pega 用 ABBYY FlexiCapture コネクターをインストールします。
PEGA をインストールするには、[コネクターをサーバーにインポート](#import)し、[Pega で Java 関数を作成](#java)する必要があります。
コネクターをサーバーにインポートするには、次の手順を実行します。
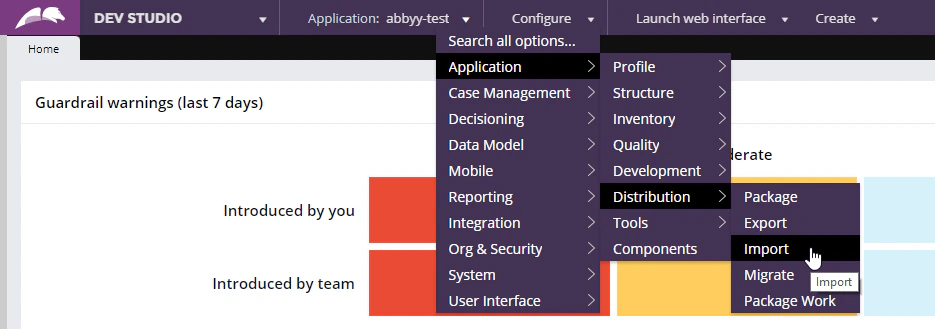
1. **Dev Studio** を開き、**Configure → Application → Distribution → Import** をクリックします。
 2. **FlexiCaptureConnector.jar** ファイルをサーバーにロードします。
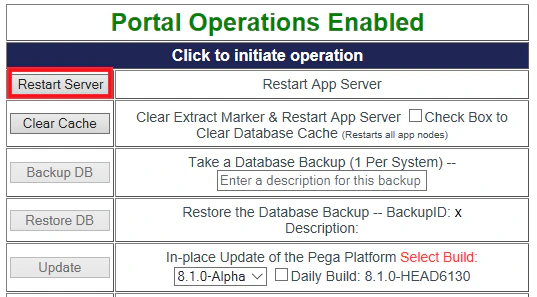
3. **Pega Self-Service Portal** を開き、**Restart Server** をクリックします。
2. **FlexiCaptureConnector.jar** ファイルをサーバーにロードします。
3. **Pega Self-Service Portal** を開き、**Restart Server** をクリックします。
 コネクターのクラスからメソッドを呼び出す Java 関数を作成するには、次の手順を実行します。
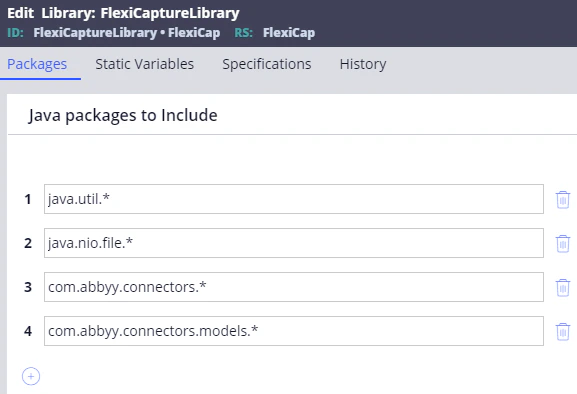
1. **Records → Technical → Library → Create** をクリックして新しいライブラリを作成し、たとえば *FlexiCaptureLibrary* という名前を付けます。次に、以下のパッケージを追加します。
* *java.util.*\*
* *java.nio.file.*\*
* *com.abbyy.connectors.*\*
* *com.abbyy.connectors.models.*\*
コネクターのクラスからメソッドを呼び出す Java 関数を作成するには、次の手順を実行します。
1. **Records → Technical → Library → Create** をクリックして新しいライブラリを作成し、たとえば *FlexiCaptureLibrary* という名前を付けます。次に、以下のパッケージを追加します。
* *java.util.*\*
* *java.nio.file.*\*
* *com.abbyy.connectors.*\*
* *com.abbyy.connectors.models.*\*
 2. **Save** をクリックし、続けて **Generate Library** をクリックします。
3. **Records → Technical →** **Function → Create** をクリックして、新しい関数を作成します。
4. **Label** フィールドに、新しい関数の名前 (例: *CaptureData*) を入力します。
5. **Parameters** セクションで、次の 2 つの入力パラメーターを指定します。
| **Name** | **Java type** |
| --------------- | ------------- |
| *FileName* | *String* |
| *Base64Content* | *String* |
6. **Library** フィールドに、手順 1 で作成したライブラリの名前を入力し、**Create and open** をクリックします。
7. 開いたウィンドウの **Parameters** タブで、**Java data type** フィールドのデータ型として *String* を指定します。
2. **Save** をクリックし、続けて **Generate Library** をクリックします。
3. **Records → Technical →** **Function → Create** をクリックして、新しい関数を作成します。
4. **Label** フィールドに、新しい関数の名前 (例: *CaptureData*) を入力します。
5. **Parameters** セクションで、次の 2 つの入力パラメーターを指定します。
| **Name** | **Java type** |
| --------------- | ------------- |
| *FileName* | *String* |
| *Base64Content* | *String* |
6. **Library** フィールドに、手順 1 で作成したライブラリの名前を入力し、**Create and open** をクリックします。
7. 開いたウィンドウの **Parameters** タブで、**Java data type** フィールドのデータ型として *String* を指定します。
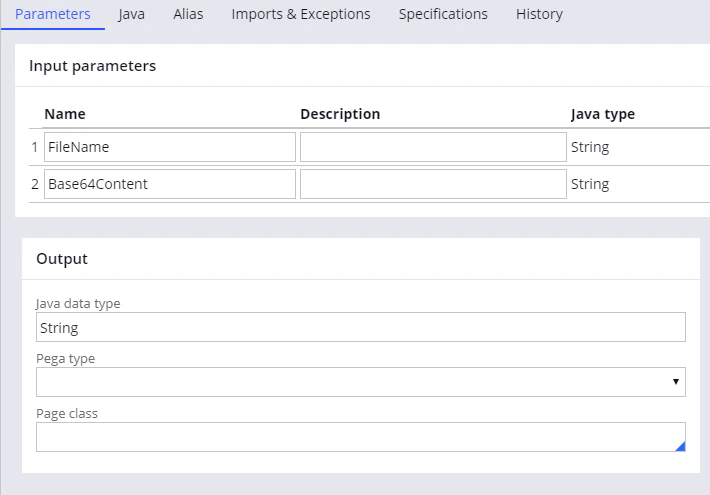 8. **CodeExample.java** ファイルからコードをコピーします。このファイルは *%Installation Path%\Connector for FlexiCapture as a Service\Samples\Pega Function* にあります (便宜上、コードは以下にも再掲しています)。同じウィンドウで **Java** タブをクリックし、コピーしたコードを貼り付けます。このコード例では、ファイルを FC に送信し、抽出された fields の名前とその値を含む JSON 文字列形式で処理結果を取得します。黄色で強調表示されているコード断片は、FC Application Server への接続に必要な有効な接続情報に置き換える必要があります。その後、プロジェクトを FC Application Server にアップロードし、[Configure します](/ja/flexi-capture/connectors/pega/pega-configuring-fc)。
```
// FlexiCapture Web Services APIクライアントを作成します。FlexiCapture Application Serverのアドレスをここにしてください。
try (FlexiCaptureWebServiceClient client = new FlexiCaptureWebServiceClient("https://FlexiCaptureApplicationServer")) {
// FlexiCapture CloudまたはテナントとやりとりするためのCompany名を指定し、以下の行のコメントを解除してください。
// client.setTenant("Company");
// 有効なFlexiCaptureユーザーの認証情報を指定してください。
client.setCredentials(new Credentials("Username", "Password"));
// FlexiCaptureプロジェクトを取得します。プロジェクト名をここに指定してください。
try (FlexiCaptureProject project = client.getProject("InvoiceDemoProject")) {
// FlexiCaptureにアップロードするファイルを準備します。'FileName'と'Base64Content'はPegaの関数パラメーターです。
List files = new ArrayList();
files.add(new File(FileName, Base64.getDecoder().decode(Base64Content.replace("\n", "").replace("\r", ""))));
// FlexiCaptureのバッチ処理用ジョブを準備します。
BatchCreationJob job = new BatchCreationJob(files);
job.setName("Pega_" + System.currentTimeMillis()); // FlexiCaptureのバッチ名を設定します。
job.setType("Default"); // FlexiCaptureのバッチタイプ名を設定します。
// FlexiCaptureのバッチを作成して実行します。
int batchId = project.create(job);
// バッチの処理が完了するまで待機し、処理結果を取得します。
Result result = project.getResult(batchId);
// バッチのステージが処理完了かどうかを確認します。
if (result.getStage() == com.abbyy.connectors.models.Stage.Processed) {
// 抽出されたfieldsをJSON文字列として返します。
return result.getFields();
} else {
// その他のステージに対して例外をスローします。
// スローする代わりに、これらのステージの処理をここで設定することもできます。
throw new FlexiCaptureConnectorException(String.format("Unsupported FlexiCapture stage type '%s'.", result.getStage()));
}
}
} catch (Exception ex) {
// エラーメッセージを連結します。
Throwable cause = ex.getCause();
String message = ex.getMessage();
while (cause != null) {
message += " " + cause.getMessage();
cause = cause.getCause();
}
// 連結されたメッセージをスローします。
throw new FlexiCaptureConnectorException(message);
}
```
9. **Imports & Exceptions** タブをクリックし、**Exceptions thrown** セクションに *Exception* と入力します。
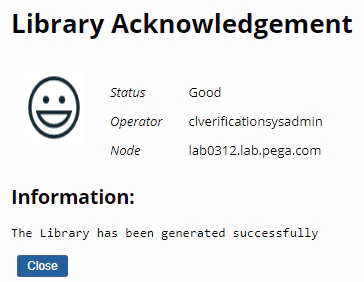
10. **Java** タブに戻って **Function ready to be compiled?** オプションを選択し、変更を保存して **Generate function** をクリックします。関数が正常に生成されると、次のメッセージが表示されます。
8. **CodeExample.java** ファイルからコードをコピーします。このファイルは *%Installation Path%\Connector for FlexiCapture as a Service\Samples\Pega Function* にあります (便宜上、コードは以下にも再掲しています)。同じウィンドウで **Java** タブをクリックし、コピーしたコードを貼り付けます。このコード例では、ファイルを FC に送信し、抽出された fields の名前とその値を含む JSON 文字列形式で処理結果を取得します。黄色で強調表示されているコード断片は、FC Application Server への接続に必要な有効な接続情報に置き換える必要があります。その後、プロジェクトを FC Application Server にアップロードし、[Configure します](/ja/flexi-capture/connectors/pega/pega-configuring-fc)。
```
// FlexiCapture Web Services APIクライアントを作成します。FlexiCapture Application Serverのアドレスをここにしてください。
try (FlexiCaptureWebServiceClient client = new FlexiCaptureWebServiceClient("https://FlexiCaptureApplicationServer")) {
// FlexiCapture CloudまたはテナントとやりとりするためのCompany名を指定し、以下の行のコメントを解除してください。
// client.setTenant("Company");
// 有効なFlexiCaptureユーザーの認証情報を指定してください。
client.setCredentials(new Credentials("Username", "Password"));
// FlexiCaptureプロジェクトを取得します。プロジェクト名をここに指定してください。
try (FlexiCaptureProject project = client.getProject("InvoiceDemoProject")) {
// FlexiCaptureにアップロードするファイルを準備します。'FileName'と'Base64Content'はPegaの関数パラメーターです。
List files = new ArrayList();
files.add(new File(FileName, Base64.getDecoder().decode(Base64Content.replace("\n", "").replace("\r", ""))));
// FlexiCaptureのバッチ処理用ジョブを準備します。
BatchCreationJob job = new BatchCreationJob(files);
job.setName("Pega_" + System.currentTimeMillis()); // FlexiCaptureのバッチ名を設定します。
job.setType("Default"); // FlexiCaptureのバッチタイプ名を設定します。
// FlexiCaptureのバッチを作成して実行します。
int batchId = project.create(job);
// バッチの処理が完了するまで待機し、処理結果を取得します。
Result result = project.getResult(batchId);
// バッチのステージが処理完了かどうかを確認します。
if (result.getStage() == com.abbyy.connectors.models.Stage.Processed) {
// 抽出されたfieldsをJSON文字列として返します。
return result.getFields();
} else {
// その他のステージに対して例外をスローします。
// スローする代わりに、これらのステージの処理をここで設定することもできます。
throw new FlexiCaptureConnectorException(String.format("Unsupported FlexiCapture stage type '%s'.", result.getStage()));
}
}
} catch (Exception ex) {
// エラーメッセージを連結します。
Throwable cause = ex.getCause();
String message = ex.getMessage();
while (cause != null) {
message += " " + cause.getMessage();
cause = cause.getCause();
}
// 連結されたメッセージをスローします。
throw new FlexiCaptureConnectorException(message);
}
```
9. **Imports & Exceptions** タブをクリックし、**Exceptions thrown** セクションに *Exception* と入力します。
10. **Java** タブに戻って **Function ready to be compiled?** オプションを選択し、変更を保存して **Generate function** をクリックします。関数が正常に生成されると、次のメッセージが表示されます。