> ## Documentation Index
> Fetch the complete documentation index at: https://docs.abbyy.com/llms.txt
> Use this file to discover all available pages before exploring further.
# インストール
> PegaサーバーにABBYY FlexiCaptureコネクタをインストールします。JARをインポートし、パッケージと静的変数を含むライブラリを作成して、関数を定義します。
PEGAをインストールするには、次の手順を実行します。
[Pegaサーバーにコネクタをインポートする](#import)
[ライブラリを作成する](#lib)
[必要な関数を作成する](#func)
## Pegaサーバーへのコネクタのインポート
コネクタをサーバーにインポートするには、次の手順を実行します。
1. **Dev Studio**を開き、**Configure → Application → Distribution → Import**をクリックします。
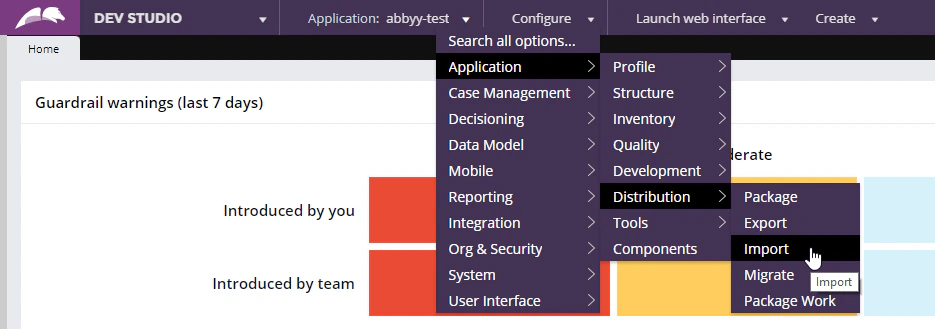 2. **abbyy.flexicapture.webapi.client.jar**ファイルをサーバーにロードします。
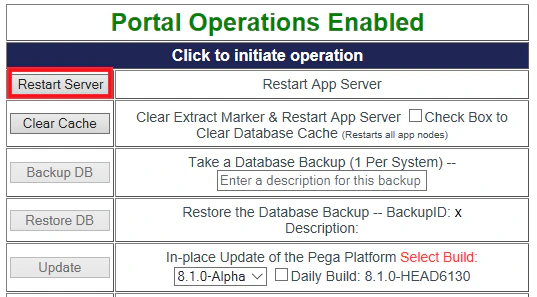
3. **Pega Self-Service Portal**を開き、**Restart Server**をクリックします。
2. **abbyy.flexicapture.webapi.client.jar**ファイルをサーバーにロードします。
3. **Pega Self-Service Portal**を開き、**Restart Server**をクリックします。
 ## ライブラリの作成
ライブラリを作成するには、次の手順を実行します。
1. **Records → Technical → Library → Create** をクリックします。
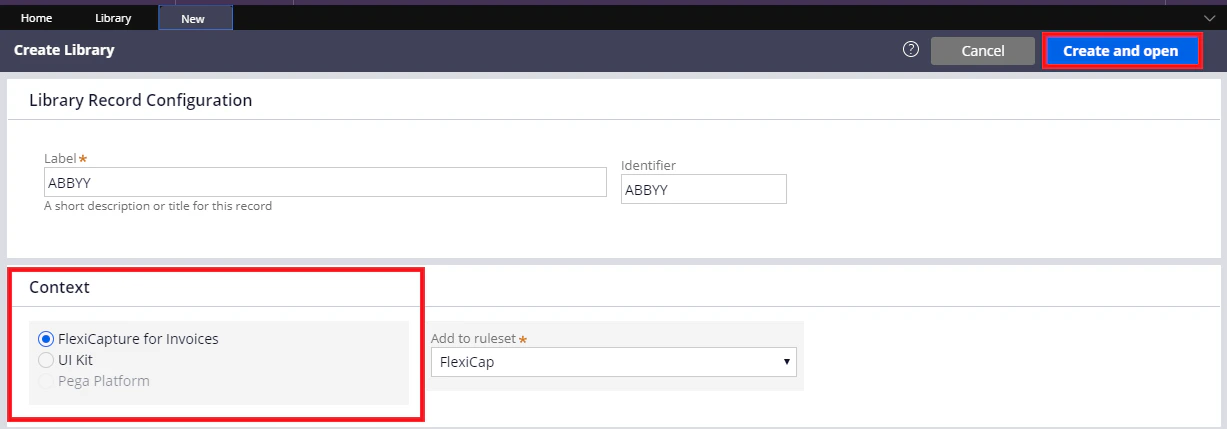
2. **Create Library** タブの **Label** フィールドにライブラリ名 (例: *ABBYY*) を指定し、**Identifier** フィールドに入力します。ライブラリがアプリケーションのコンテキスト内に作成されることを確認し、**Create and open** をクリックします。
## ライブラリの作成
ライブラリを作成するには、次の手順を実行します。
1. **Records → Technical → Library → Create** をクリックします。
2. **Create Library** タブの **Label** フィールドにライブラリ名 (例: *ABBYY*) を指定し、**Identifier** フィールドに入力します。ライブラリがアプリケーションのコンテキスト内に作成されることを確認し、**Create and open** をクリックします。
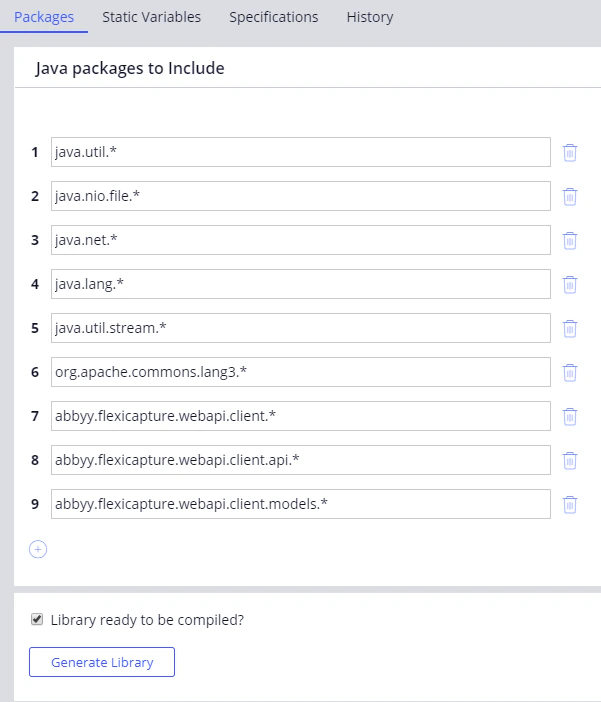
 3. **パッケージ** タブで、次のパッケージを追加します。
* *java.util.*\*
* *java.nio.file.*\*
* *java.net.*\*
* *java.lang.*\*
* *java.util.stream.*\*
* *org.apache.commons.lang3.*\*
* *abbyy.flexicapture.webapi.client.*\*
* *abbyy.flexicapture.webapi.client.api.*\*
* *abbyy.flexicapture.webapi.client.models.*\*
3. **パッケージ** タブで、次のパッケージを追加します。
* *java.util.*\*
* *java.nio.file.*\*
* *java.net.*\*
* *java.lang.*\*
* *java.util.stream.*\*
* *org.apache.commons.lang3.*\*
* *abbyy.flexicapture.webapi.client.*\*
* *abbyy.flexicapture.webapi.client.api.*\*
* *abbyy.flexicapture.webapi.client.models.*\*
 4. **静的変数** タブで、次の string 変数を作成します。
* *baseUri*
* *tenantName*
* *userName*
* *Password*
* *multiFileProjectName*
* *singleFileProjectName*
4. **静的変数** タブで、次の string 変数を作成します。
* *baseUri*
* *tenantName*
* *userName*
* *Password*
* *multiFileProjectName*
* *singleFileProjectName*
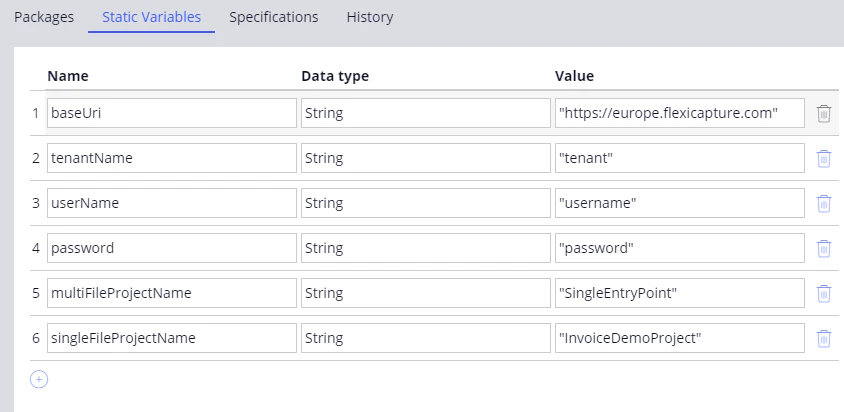 5. **Save** をクリックし、続けて **Generate Library** をクリックします。
## 関数の作成
関数には Java コードが含まれており、その関数が他の Pega オブジェクトから呼び出されると実行されます。関数の入出力パラメーターは **Parameters** タブで指定し、例外は **Imports & Exceptions** タブで指定します。
関数を作成するには、次の手順に従います。
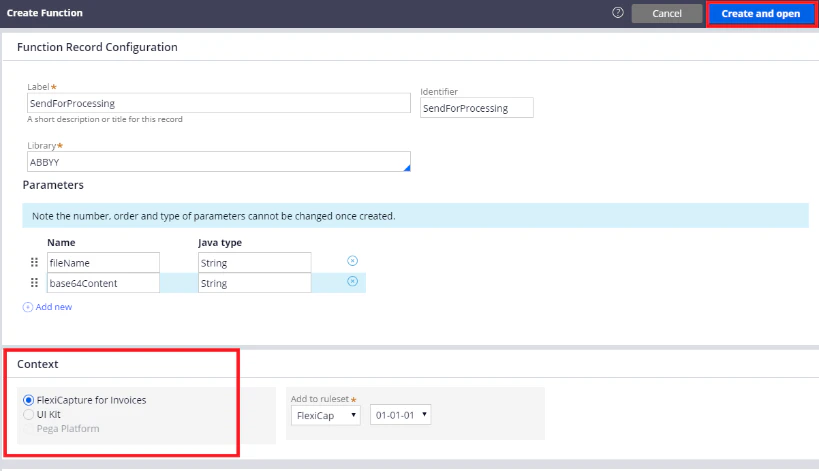
1. **Records → Technical → Function → Create** をクリックし、**Label** フィールドと **Identifier** フィールドに必要事項を入力します。
2. **Library** フィールドで、先ほど作成したライブラリの名前を指定します。
3. **Parameters** セクションで、次の 2 つの入力パラメーターを指定します。
| **Name** | **Java type** |
| --------------- | ------------- |
| *FileName* | *String* |
| *Base64Content* | *String* |
4. 関数がアプリケーションのコンテキスト内で作成されていることを確認し、**Create and open** をクリックします。
5. **Save** をクリックし、続けて **Generate Library** をクリックします。
## 関数の作成
関数には Java コードが含まれており、その関数が他の Pega オブジェクトから呼び出されると実行されます。関数の入出力パラメーターは **Parameters** タブで指定し、例外は **Imports & Exceptions** タブで指定します。
関数を作成するには、次の手順に従います。
1. **Records → Technical → Function → Create** をクリックし、**Label** フィールドと **Identifier** フィールドに必要事項を入力します。
2. **Library** フィールドで、先ほど作成したライブラリの名前を指定します。
3. **Parameters** セクションで、次の 2 つの入力パラメーターを指定します。
| **Name** | **Java type** |
| --------------- | ------------- |
| *FileName* | *String* |
| *Base64Content* | *String* |
4. 関数がアプリケーションのコンテキスト内で作成されていることを確認し、**Create and open** をクリックします。
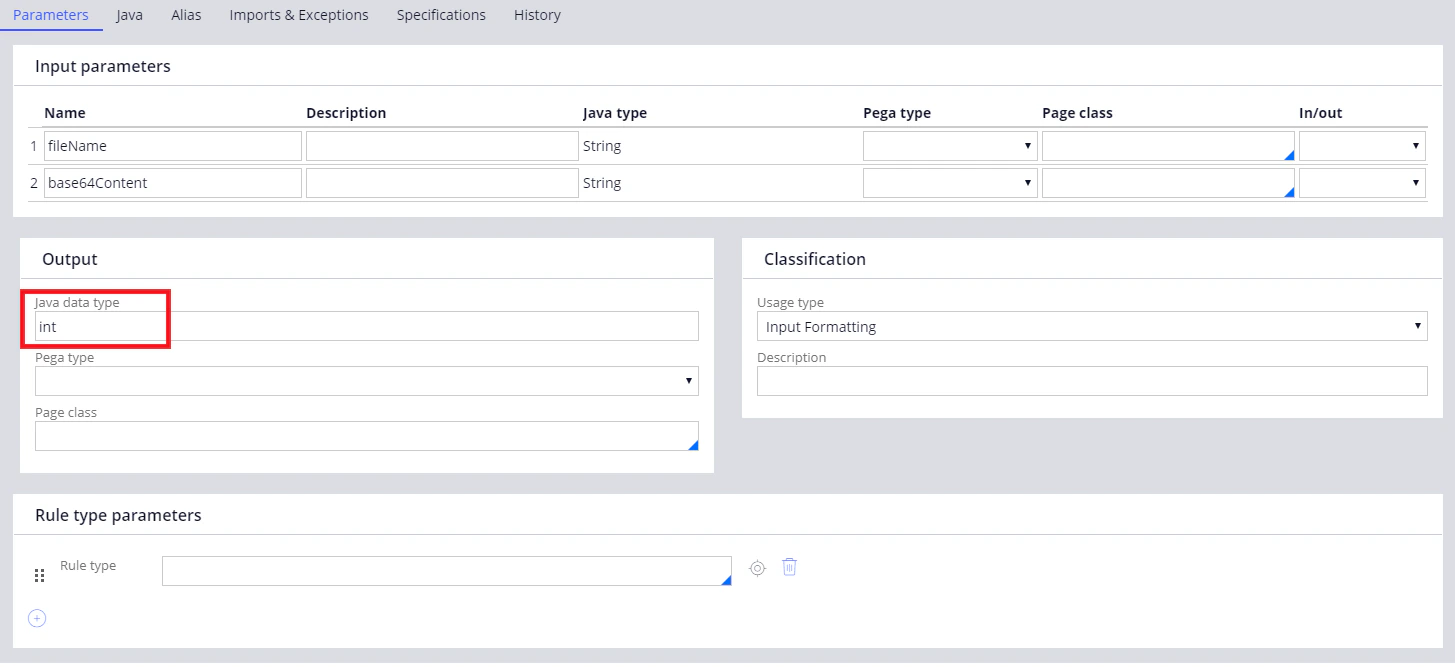
 5. 開いたウィンドウの **Parameters** タブで、**Java data type** フィールドにデータ型として *int*、*string*、または *boolean* を指定します。
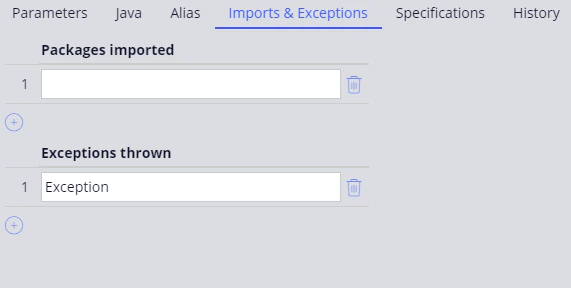
 6. **Imports & Exceptions** タブをクリックし、**Exceptions thrown** セクションに *Exception* と入力します。
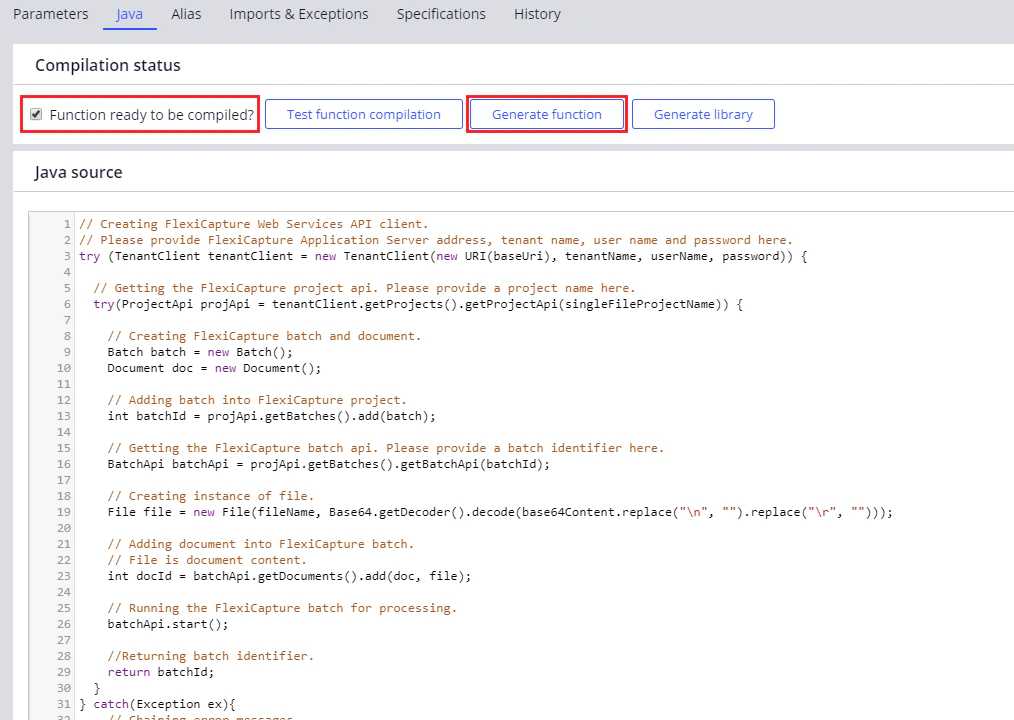
 7. **Java** タブに戻り、**Java source** フィールドに関数のコードを入力し、**Function ready to be compiled?** オプションを選択して変更を保存し、**Generate function** をクリックします。
関数のコードは、*%Installation Path%\Connector for FlexiCapture as a Service with verification\Samples\Code examples\Pega Functions* にある java ファイルからコピーできます。
7. **Java** タブに戻り、**Java source** フィールドに関数のコードを入力し、**Function ready to be compiled?** オプションを選択して変更を保存し、**Generate function** をクリックします。
関数のコードは、*%Installation Path%\Connector for FlexiCapture as a Service with verification\Samples\Code examples\Pega Functions* にある java ファイルからコピーできます。
 単一文書処理のシナリオを実装するには、次の作業が必要です。
1. [単一文書の処理に使用する一連の関数を作成する](/ja/flexi-capture/connectors/pega/pega-func-one-doc)。
2. [共通関数を作成する](/ja/flexi-capture/connectors/pega/pega-func-other)。
3. [単一文書処理のケースを作成する](/ja/flexi-capture/connectors/pega/pega-one-doc-case)。
4. [ユーザーインターフェースを構成する](/ja/flexi-capture/connectors/pega/pega-config-ui-1)。
5. [単一文書処理のケース用の一連の activities を作成する](/ja/flexi-capture/connectors/pega/pega-activities-one-doc)。
6. [単一文書処理のケース用の一連の data transforms を作成する](/ja/flexi-capture/connectors/pega/pega-dt-one-doc)。
7. [フローアクションを作成する](/ja/flexi-capture/connectors/pega/pega-flow-action)。
8. [単一文書処理のケース用のデータ型を作成する](/ja/flexi-capture/connectors/pega/pega-one-doc-data-type)。
複数文書処理のシナリオを実装するには、次の作業が必要です。
1. [複数文書の処理に使用する一連の関数を作成する](/ja/flexi-capture/connectors/pega/pega-func-multiple-docs)。
2. [共通関数を作成する](/ja/flexi-capture/connectors/pega/pega-func-other)。
3. [複数文書処理のケースを作成する](/ja/flexi-capture/connectors/pega/pega-many-docs-case)。
4. [HTML フラグメントを作成する](/ja/flexi-capture/connectors/pega/pega-html)。
5. [複数文書処理のケース用の一連の activities を作成する](/ja/flexi-capture/connectors/pega/pega-activities-many-docs)。
6. [複数文書処理のケース用の一連の data transforms を作成する](/ja/flexi-capture/connectors/pega/pega-dt-many-docs)。
7. [フローアクションを作成する](/ja/flexi-capture/connectors/pega/pega-flow-action)。
8. [複数文書処理のケース用のデータ型を作成する](/ja/flexi-capture/connectors/pega/pega-many-docs-data-types)。
単一文書処理のシナリオを実装するには、次の作業が必要です。
1. [単一文書の処理に使用する一連の関数を作成する](/ja/flexi-capture/connectors/pega/pega-func-one-doc)。
2. [共通関数を作成する](/ja/flexi-capture/connectors/pega/pega-func-other)。
3. [単一文書処理のケースを作成する](/ja/flexi-capture/connectors/pega/pega-one-doc-case)。
4. [ユーザーインターフェースを構成する](/ja/flexi-capture/connectors/pega/pega-config-ui-1)。
5. [単一文書処理のケース用の一連の activities を作成する](/ja/flexi-capture/connectors/pega/pega-activities-one-doc)。
6. [単一文書処理のケース用の一連の data transforms を作成する](/ja/flexi-capture/connectors/pega/pega-dt-one-doc)。
7. [フローアクションを作成する](/ja/flexi-capture/connectors/pega/pega-flow-action)。
8. [単一文書処理のケース用のデータ型を作成する](/ja/flexi-capture/connectors/pega/pega-one-doc-data-type)。
複数文書処理のシナリオを実装するには、次の作業が必要です。
1. [複数文書の処理に使用する一連の関数を作成する](/ja/flexi-capture/connectors/pega/pega-func-multiple-docs)。
2. [共通関数を作成する](/ja/flexi-capture/connectors/pega/pega-func-other)。
3. [複数文書処理のケースを作成する](/ja/flexi-capture/connectors/pega/pega-many-docs-case)。
4. [HTML フラグメントを作成する](/ja/flexi-capture/connectors/pega/pega-html)。
5. [複数文書処理のケース用の一連の activities を作成する](/ja/flexi-capture/connectors/pega/pega-activities-many-docs)。
6. [複数文書処理のケース用の一連の data transforms を作成する](/ja/flexi-capture/connectors/pega/pega-dt-many-docs)。
7. [フローアクションを作成する](/ja/flexi-capture/connectors/pega/pega-flow-action)。
8. [複数文書処理のケース用のデータ型を作成する](/ja/flexi-capture/connectors/pega/pega-many-docs-data-types)。