> ## Documentation Index
> Fetch the complete documentation index at: https://docs.abbyy.com/llms.txt
> Use this file to discover all available pages before exploring further.
# アセット名と認証情報名のカスタマイズ
> UiPath Studio の変数を編集して、Batch Sender、Monitor、Verifier、Fetcher の各プロセスで既定以外の Orchestrator アセット名と認証情報名を作成します。
既定では、Orchestrator アセットには次の名前が使用されます。
* FlexiCapture Server Address
* FlexiCapture Company
* FlexiCapture Project Name
* FlexiCapture Credentials
必要に応じて、既定以外の名前のアセットを作成できます。これを行うには、UiPath Studio ですべてのプロセス (Batch Sender、Batch Monitor、Batch Verifier、Batch Fetcher) を開き、それぞれのアセット名を変更します。
## Batch Sender プロセス
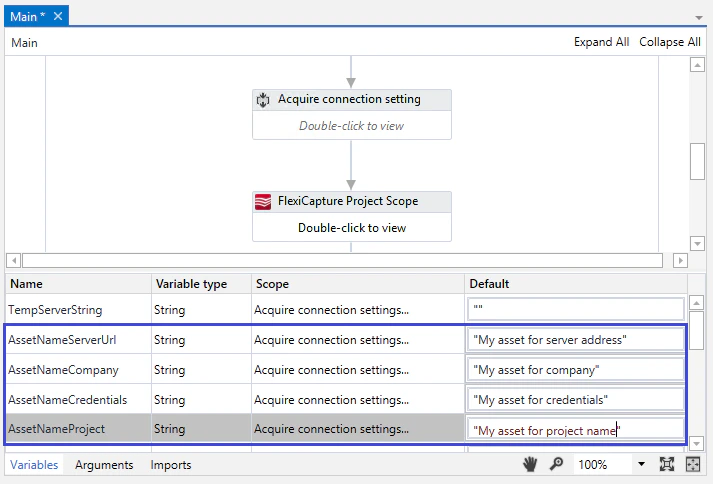
1. UiPath Studio でこのプロセスを開き、**Acquire connection settings from Orchestrator** セクションに移動します。
2. **Variables** ペインを展開します。
3. 次の各変数について、**Default** 列に新しいアセット名を入力します: **AssetNameServerUrl**、**AssetNameCompany**、**AssetNameCredentials**、**AssetNameProject**。
## Batch Monitor プロセス
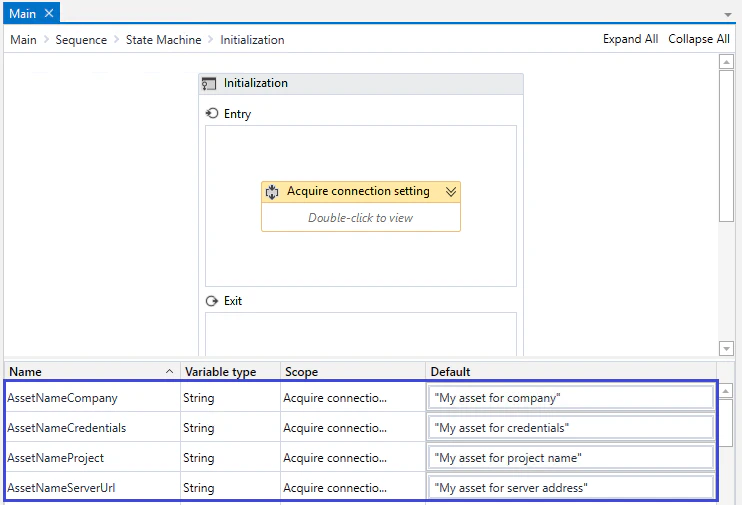
1. UiPath Studio でプロセスを開き、**State Machine** エリアに移動します。**Initialization → Acquire connection settings from Orchestrator** を選択します。
2. **Variables** タブを展開します。
3. 次の各変数の **Default** 列に、新しいアセット名を入力します: **AssetNameServerUrl**、**AssetNameCompany**、**AssetNameCredentials**、**AssetNameProject**。
## Batch Verifier プロセス
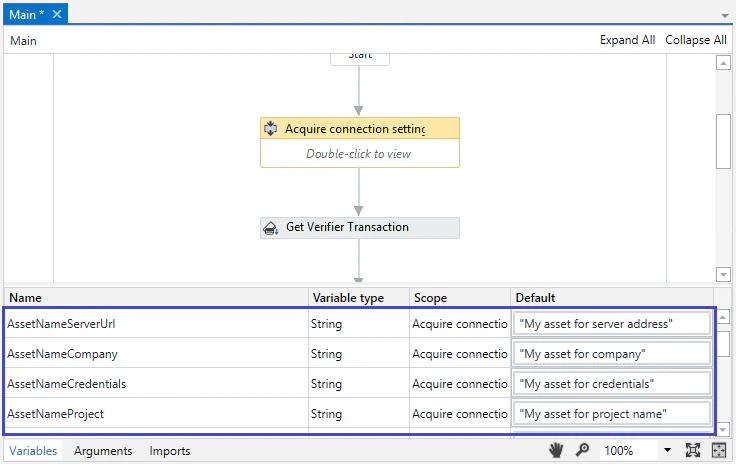
1. UiPath Studio でプロセスを開き、**Acquire connection settings from Orchestrator** セクションに移動します。
2. **Variables** タブを展開します。
3. **AssetNameServerUrl**、**AssetNameCompany**、**AssetNameCredentials**、**AssetNameProject** の各変数について、**Default** 列に新しいアセット名を入力します。
## Batch Fetcher プロセス
1. UiPath Studio でプロセスを開き、**Acquire connection settings from Orchestrator** セクションに移動します。
2. **Variables** タブを展開します。
3. 次の各変数について、**Default** 列に新しいアセット名を入力します:**AssetNameServerUrl**、**AssetNameCompany**、**AssetNameCredentials**、**AssetNameProject**。
変更後、修正したすべてのプロセスを再度 Orchestrator に公開します。