> ## Documentation Index
> Fetch the complete documentation index at: https://docs.abbyy.com/llms.txt
> Use this file to discover all available pages before exploring further.
# コンポーネントの設定と起動
> UiPath で ABBYY FlexiCapture Multi-Task Package を設定します。Orchestrator キューと接続アセットを作成し、Batch Sender と Batch Monitor を起動します。
## UiPath Orchestrator キューの作成
UiPath Orchestrator キューを作成するには、次の手順に従います。
1. Orchestrator で **Queues** タブを開きます。
2. **Monitor Queue**、**Verifier Queue**、**Fetcher Queue** という名前で 3 つのキューを作成します。作成時に、次のオプションを選択します。**Unique Reference**: **Yes**、**Auto Retry**: **No**。
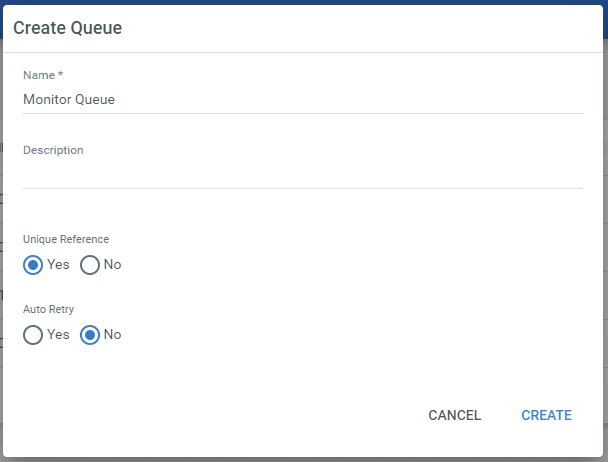 キュー名を変更する場合は、[キュー名のカスタマイズ](/ja/flexi-capture/connectors/ui-path/up-queues-customization) の手順に従ってください。
## UiPath アセットの作成
UiPath Orchestrator のアセットと認証情報は、FC 12 に接続するための設定を保存するために、UiPath のプロセスで使用されます。
UiPath アセットを作成するには、次の手順に従います。
1. 管理者として Orchestrator にログインします。
2. **Assets** タブに移動します。
3. 次の **Text** 型アセットを作成します。
* **FlexiCapture Server Address**。このアセットの **Value** には、FC Application Server のアドレスを指定します。
キュー名を変更する場合は、[キュー名のカスタマイズ](/ja/flexi-capture/connectors/ui-path/up-queues-customization) の手順に従ってください。
## UiPath アセットの作成
UiPath Orchestrator のアセットと認証情報は、FC 12 に接続するための設定を保存するために、UiPath のプロセスで使用されます。
UiPath アセットを作成するには、次の手順に従います。
1. 管理者として Orchestrator にログインします。
2. **Assets** タブに移動します。
3. 次の **Text** 型アセットを作成します。
* **FlexiCapture Server Address**。このアセットの **Value** には、FC Application Server のアドレスを指定します。
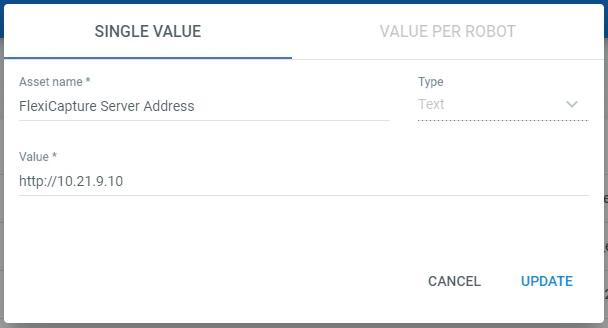 * **FlexiCapture Company** (任意) – FC Application Server 上のテナント (company) 名です。FlexiCapture Cloud またはローカルのマルチテナントシステムを使用している場合は、このアセットを作成してください。
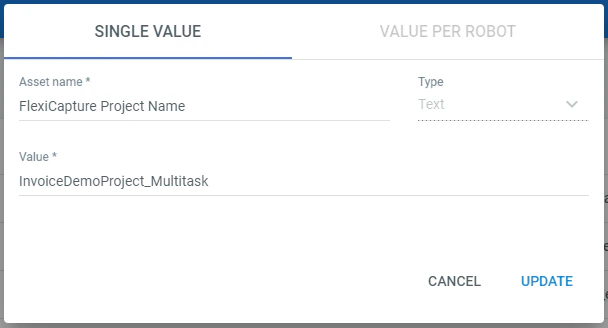
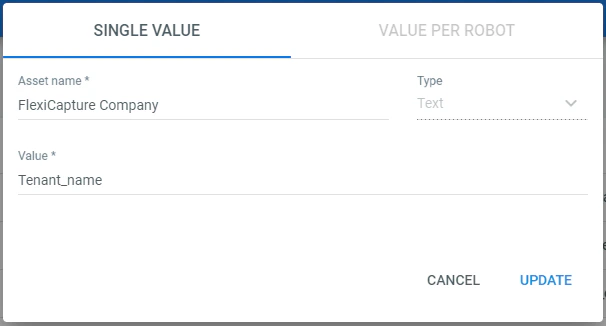 * **FlexiCapture Project Name**。このアセットの **Value** には、文書の処理に使用するプロジェクト名を指定します。プロジェクトの設定およびサーバーへのアップロードの詳細については、[FlexiCapture project の設定](/ja/flexi-capture/connectors/ui-path/up-configuring-fc)を参照してください。
 4. 認証情報を作成します。これを行うには、**Credential** 型アセットを作成し、**FlexiCapture Credentials** という名前を付けます。**Username** フィールドと **Password** フィールドに、FC のユーザー名とパスワードを入力します。
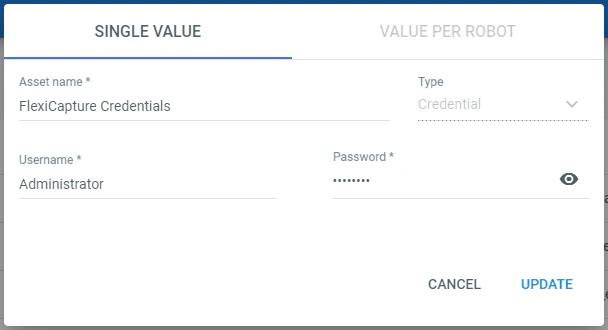 FC 用のアセットで指定するユーザーには、Scanning Operator と 検証 Operator の両方の役割、または Administrator の役割が必要です。アクセス権は、FC 管理者が管理および監視コンソールを使用して設定する必要があります。アクセス権の設定の詳細については、[ユーザーアカウントの管理](/ja/flexi-capture/web-stations/monitoring-console/users)を参照してください。
## Batch Sender、Batch Monitor、Batch Verifier、Batch Fetcher プロセスの起動
プロセスを起動する前に、適切な [キュー](#queues) と [アセット](#assets) が Orchestrator に作成されていること、および [FlexiCapture プロジェクトが ABBYY FlexiCapture Application Server にアップロードされ、正しく設定されていること](/ja/flexi-capture/connectors/ui-path/up-configuring-fc) を確認してください。
プロセスを起動するには、少なくとも 2 台の UiPath Robot も必要です。ロボットのうち 1 台は常に **Batch Monitor** プロセスを実行している必要があり、もう 1 台のロボット (または複数のロボット) は **Batch Sender**、**Batch Verifier**、**Batch Fetcher** プロセスの起動に使用します。
ロボットは異なるマシン上に作成できます。あるいは、Windows Server オペレーティング システムを搭載した 1 台のマシン上に [ロボットを作成](https://robot.uipath.com/docs/setting-up-windows-server-for-high-density-robots) することもできます。
1. [作成](https://orchestrator.uipath.com/docs/managing-robots) する標準ロボットは 2 台で、そのうち 1 台は **Unattended** 型にします。
2. **Batch Monitor**、**Batch Sender**、**Batch Verifier**、**Batch Fetcher** の各プロセスを Orchestrator に [公開](https://studio.uipath.com/docs/about-publishing-automation-projects) します。
3. 公開した各パッケージについて、作成したロボットが属する同じ環境に [プロセスをデプロイ](https://orchestrator.uipath.com/docs/managing-processes) します。
FC 用のアセットで指定するユーザーには、Scanning Operator と 検証 Operator の両方の役割、または Administrator の役割が必要です。アクセス権は、FC 管理者が管理および監視コンソールを使用して設定する必要があります。アクセス権の設定の詳細については、[ユーザーアカウントの管理](/ja/flexi-capture/web-stations/monitoring-console/users)を参照してください。
## Batch Sender、Batch Monitor、Batch Verifier、Batch Fetcher プロセスの起動
プロセスを起動する前に、適切な [キュー](#queues) と [アセット](#assets) が Orchestrator に作成されていること、および [FlexiCapture プロジェクトが ABBYY FlexiCapture Application Server にアップロードされ、正しく設定されていること](/ja/flexi-capture/connectors/ui-path/up-configuring-fc) を確認してください。
プロセスを起動するには、少なくとも 2 台の UiPath Robot も必要です。ロボットのうち 1 台は常に **Batch Monitor** プロセスを実行している必要があり、もう 1 台のロボット (または複数のロボット) は **Batch Sender**、**Batch Verifier**、**Batch Fetcher** プロセスの起動に使用します。
ロボットは異なるマシン上に作成できます。あるいは、Windows Server オペレーティング システムを搭載した 1 台のマシン上に [ロボットを作成](https://robot.uipath.com/docs/setting-up-windows-server-for-high-density-robots) することもできます。
1. [作成](https://orchestrator.uipath.com/docs/managing-robots) する標準ロボットは 2 台で、そのうち 1 台は **Unattended** 型にします。
2. **Batch Monitor**、**Batch Sender**、**Batch Verifier**、**Batch Fetcher** の各プロセスを Orchestrator に [公開](https://studio.uipath.com/docs/about-publishing-automation-projects) します。
3. 公開した各パッケージについて、作成したロボットが属する同じ環境に [プロセスをデプロイ](https://orchestrator.uipath.com/docs/managing-processes) します。
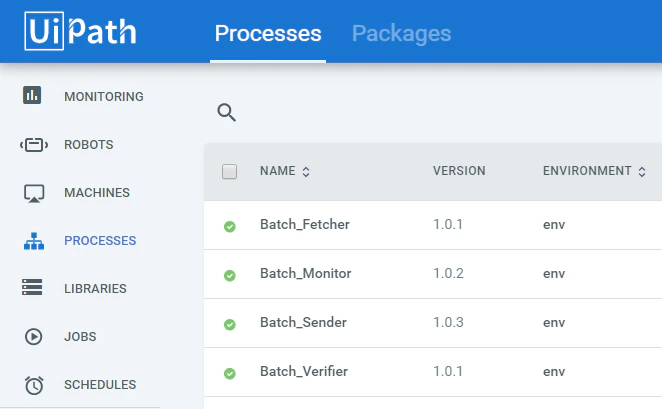 4. Orchestrator の **Jobs** タブに移動します。**Batch Monitor** プロセス用の新しい Job を作成し、Unattended 型のロボットで実行するよう設定します。
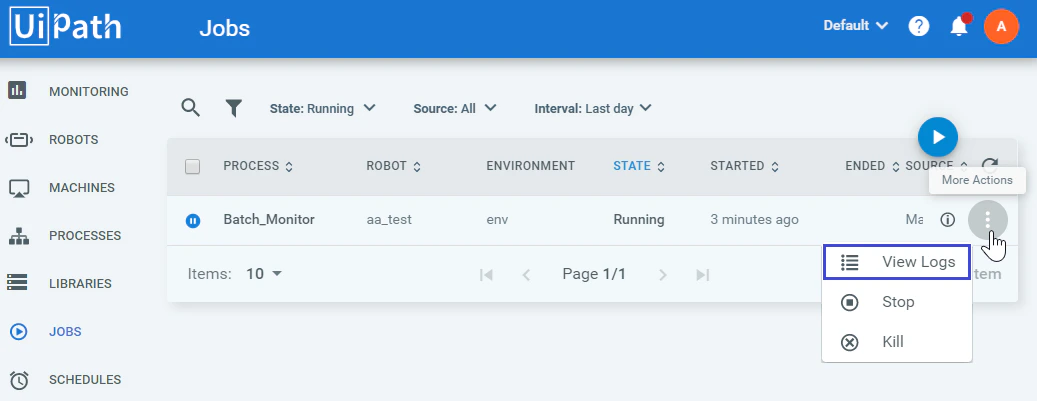
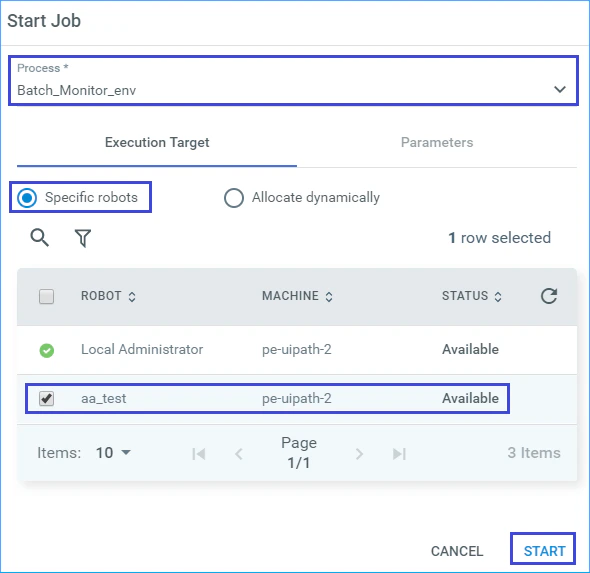 **Batch Monitor** プロセスは指定したロボットを使用して起動され、Job のステータスは **Running** になります。プロセス ログを確認するには、**More Actions → View Logs** に移動します。
 5. 次に、別のロボットで **Batch Sender** を起動します。このプロセスは、選択したフォルダーから FC にファイルを送信して処理させます。**Batch Sender** は、Orchestrator の **Jobs** タブ、UiPath Studio、または [ロボットのマシンのシステム トレイ](https://robot.uipath.com/docs/the-user-interface) から起動することもできます。
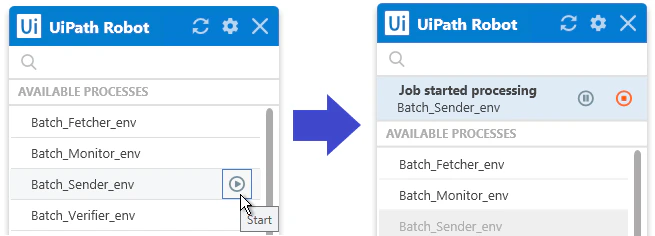 6. 文書処理が完了するまで待ちます。バッチ が正常に処理されると、**Monitor Queue** 内のトランザクションのステータスが **Successful** に変わり、新しいトランザクションが **Batch Fetcher** キューに表示されます。
7. **Batch Fetcher** プロセスを起動して、バッチ の処理結果をダウンロードします。**Fetcher Queue** 内のトランザクションのステータスは **Successful** に変わります。
8. 送信した バッチ が FC の 検証 ステージに達すると、**Batch Monitor** プロセスは バッチ の ID を使用して **Verifier Queue** にトランザクションを作成します。このキューに *New* ステータスのトランザクションが存在する場合は、**Batch Verifier** プロセスを起動して バッチ の検証 URL を取得します。その後、文書データを検証し、検証タスクを完了します。
その後、バッチ はエクスポートされ、*Processed* ステージに移動します。**Batch Monitor** は **Monitor Queue** 内の該当するトランザクションのステータスを *Successful* に変更し、新しいトランザクションを **Fetcher Queue** に追加します。
検証済み バッチ の処理結果をダウンロードするには、**Fetcher Queue** の各トランザクションに対して **Batch Fetcher** プロセスを起動します。
## Batch Processor – 単一プロセス の起動
プロセスを起動する前に、[FlexiCapture プロジェクトが ABBYY FlexiCapture Application Server にアップロードされ、正しく設定されていること](/ja/flexi-capture/connectors/ui-path/up-configuring-fc)を確認してください。**InvoiceDemoProject\_Multitask** テストプロジェクトは、コネクタのインストール ディレクトリ内の **\Multi-task package\Samples\FlexiCapture Projects** からサーバーにアップロードすることもできます。
1. UiPath Studio で **Batch Processor – 単一プロセス** を開きます。
2. **Variables** タブを開きます。
3. 次の変数を使用して、FC への接続設定を指定します。
*FlexiCaptureServerUrl*, *FlexiCaptureCompany*, *FlexiCaptureUsername*, *FlexiCapturePassword*, *FlexiCaptureProject,* および *FlexiCaptureBatchType*。
**InvoiceDemoProject\_Multitask** プロジェクトでは、*FlexiCaptureBatchType* 変数に次の値を指定できます。
* **Unattended service** の値 — 検証なしの処理シナリオを示す場合。
* **Attended service** の値 — 検証ありの処理シナリオを示す場合。
4. ローカル マシンに新しいフォルダーを作成し、FC プロジェクトの **Images** フォルダーから複数の画像をそのフォルダーにコピーします。
5. UiPath Studio の **Design** タブに移動し、**Run** をクリックします。
6. プロセスが起動したら、画像サンプルを配置したフォルダーを指定します。そのフォルダー内のファイルが処理のために FC に送信されます。
7. ファイルの認識が完了するまで待ちます。次に、次の操作を行います (選択したシナリオに応じて) 。
* 処理結果の保存先フォルダーを選択します。
or
* 検証を完了してから、処理結果の保存先フォルダーを選択します。
6. 文書処理が完了するまで待ちます。バッチ が正常に処理されると、**Monitor Queue** 内のトランザクションのステータスが **Successful** に変わり、新しいトランザクションが **Batch Fetcher** キューに表示されます。
7. **Batch Fetcher** プロセスを起動して、バッチ の処理結果をダウンロードします。**Fetcher Queue** 内のトランザクションのステータスは **Successful** に変わります。
8. 送信した バッチ が FC の 検証 ステージに達すると、**Batch Monitor** プロセスは バッチ の ID を使用して **Verifier Queue** にトランザクションを作成します。このキューに *New* ステータスのトランザクションが存在する場合は、**Batch Verifier** プロセスを起動して バッチ の検証 URL を取得します。その後、文書データを検証し、検証タスクを完了します。
その後、バッチ はエクスポートされ、*Processed* ステージに移動します。**Batch Monitor** は **Monitor Queue** 内の該当するトランザクションのステータスを *Successful* に変更し、新しいトランザクションを **Fetcher Queue** に追加します。
検証済み バッチ の処理結果をダウンロードするには、**Fetcher Queue** の各トランザクションに対して **Batch Fetcher** プロセスを起動します。
## Batch Processor – 単一プロセス の起動
プロセスを起動する前に、[FlexiCapture プロジェクトが ABBYY FlexiCapture Application Server にアップロードされ、正しく設定されていること](/ja/flexi-capture/connectors/ui-path/up-configuring-fc)を確認してください。**InvoiceDemoProject\_Multitask** テストプロジェクトは、コネクタのインストール ディレクトリ内の **\Multi-task package\Samples\FlexiCapture Projects** からサーバーにアップロードすることもできます。
1. UiPath Studio で **Batch Processor – 単一プロセス** を開きます。
2. **Variables** タブを開きます。
3. 次の変数を使用して、FC への接続設定を指定します。
*FlexiCaptureServerUrl*, *FlexiCaptureCompany*, *FlexiCaptureUsername*, *FlexiCapturePassword*, *FlexiCaptureProject,* および *FlexiCaptureBatchType*。
**InvoiceDemoProject\_Multitask** プロジェクトでは、*FlexiCaptureBatchType* 変数に次の値を指定できます。
* **Unattended service** の値 — 検証なしの処理シナリオを示す場合。
* **Attended service** の値 — 検証ありの処理シナリオを示す場合。
4. ローカル マシンに新しいフォルダーを作成し、FC プロジェクトの **Images** フォルダーから複数の画像をそのフォルダーにコピーします。
5. UiPath Studio の **Design** タブに移動し、**Run** をクリックします。
6. プロセスが起動したら、画像サンプルを配置したフォルダーを指定します。そのフォルダー内のファイルが処理のために FC に送信されます。
7. ファイルの認識が完了するまで待ちます。次に、次の操作を行います (選択したシナリオに応じて) 。
* 処理結果の保存先フォルダーを選択します。
or
* 検証を完了してから、処理結果の保存先フォルダーを選択します。