> ## Documentation Index
> Fetch the complete documentation index at: https://docs.abbyy.com/llms.txt
> Use this file to discover all available pages before exploring further.

# エクスポート プロファイルの作成

> FlexiCapture Project Setup Station のエクスポート プロファイル ウィザードを使用して、UiPath 用の Export to data files プロファイルを Document Definition に追加します。

エクスポート プロファイルを設定するには、次の手順を実行します。

1. FC Project Setup Station で **Project → Document Definitions...** をクリックし、プロジェクトで使用可能な Document Definitions の一覧を開きます。新しいエクスポート設定を指定する Document Definition を選択し、**Edit...** をクリックします。

2. **Document Definition → Export Settings...** をクリックします。

3. **Add...** ボタンをクリックして、エクスポート プロファイル作成ウィザードを開始します。

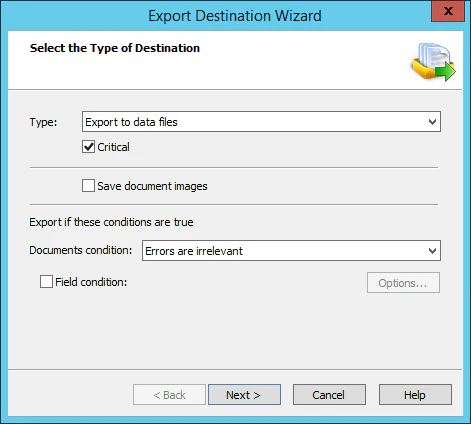
4. **Select the Type of Destination** ステップで、**Type** ドロップダウンリストから **Export to data files** を選択し、その下の **Critical** オプションを選択します。次に、**Document condition** ドロップダウンリストから **Errors are irrelevant** アイテムを選択し、**Next** をクリックします。
   <Frame>
     <img src="https://mintcdn.com/abbyy/M5jnw37NmJ-asKkj/images/flexi-capture/connectors/BP27.png?fit=max&auto=format&n=M5jnw37NmJ-asKkj&q=85&s=03f1c8d286a498f4a76d115cf7e55ccd" alt="ABBYY FlexiCapture Project Setup Station の Export Destination Wizard の Select the Type of Destination ステップのスクリーンショット。Type が Export to data files に設定され、Critical チェック ボックスがオンになっており、Documents condition が Errors are irrelevant に設定されています。" width="471" height="424" data-path="images/flexi-capture/connectors/BP27.png" />
   </Frame>

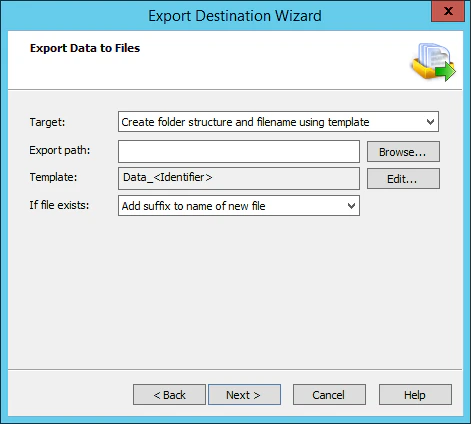
5. **Export Data to Files** ステップで、**Export path** field が空になっていることを確認し、ファイル名テンプレートを指定します。**Next** をクリックします。
   <Frame>
     <img src="https://mintcdn.com/abbyy/M5jnw37NmJ-asKkj/images/flexi-capture/connectors/BP28.png?fit=max&auto=format&n=M5jnw37NmJ-asKkj&q=85&s=622a03cd2c06af50066232dcd30c1ca3" alt="ABBYY FlexiCapture Project Setup Station の Export Destination Wizard の Export Data to Files ステップのスクリーンショット。Export path field が空で、Data_<Identifier> のファイル名テンプレートが表示されています。" data-og-width="471" width="471" data-og-height="424" height="424" data-path="images/flexi-capture/connectors/BP28.png" data-optimize="true" data-opv="3" srcset="https://mintcdn.com/abbyy/M5jnw37NmJ-asKkj/images/flexi-capture/connectors/BP28.png?w=280&fit=max&auto=format&n=M5jnw37NmJ-asKkj&q=85&s=a143e06c52fb38a011b4e0e2d104adbe 280w, https://mintcdn.com/abbyy/M5jnw37NmJ-asKkj/images/flexi-capture/connectors/BP28.png?w=560&fit=max&auto=format&n=M5jnw37NmJ-asKkj&q=85&s=62390b11f5d41400144c40b7b42087d2 560w, https://mintcdn.com/abbyy/M5jnw37NmJ-asKkj/images/flexi-capture/connectors/BP28.png?w=840&fit=max&auto=format&n=M5jnw37NmJ-asKkj&q=85&s=256fd08da32099a0c947ea1b20920a96 840w, https://mintcdn.com/abbyy/M5jnw37NmJ-asKkj/images/flexi-capture/connectors/BP28.png?w=1100&fit=max&auto=format&n=M5jnw37NmJ-asKkj&q=85&s=517987af965048b26ef92389d26d09c8 1100w, https://mintcdn.com/abbyy/M5jnw37NmJ-asKkj/images/flexi-capture/connectors/BP28.png?w=1650&fit=max&auto=format&n=M5jnw37NmJ-asKkj&q=85&s=dbca86364f4891437f888e73603f640d 1650w, https://mintcdn.com/abbyy/M5jnw37NmJ-asKkj/images/flexi-capture/connectors/BP28.png?w=2500&fit=max&auto=format&n=M5jnw37NmJ-asKkj&q=85&s=19602abb18cfdcd769f43bcdfa0993f0 2500w" />
   </Frame>

6. **Data File Format** ステップで、**File type** field で必要な出力形式を選択し、**Next** をクリックします。

7. 新しく作成したエクスポート プロファイルの名前を入力し、**Finish** をクリックします。

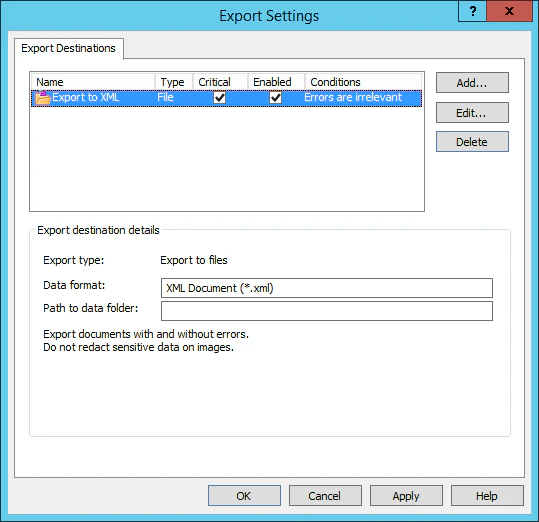
8. **Export Settings** ダイアログで、新しく作成したエクスポート プロファイルの **Enabled** ボックスをオンにします。**Apply** をクリックし、その後 **OK** をクリックします。
   <Frame>
     <img src="https://mintcdn.com/abbyy/M5jnw37NmJ-asKkj/images/flexi-capture/connectors/BP29.png?fit=max&auto=format&n=M5jnw37NmJ-asKkj&q=85&s=7e74291681a958696570d5036ffad4fa" alt="ABBYY FlexiCapture Project Setup Station の Export Settings ダイアログのスクリーンショット。Export to XML プロファイルが有効になっており、XML Document データ形式と空のデータ フォルダーへのパスが表示されています。" width="539" height="522" data-path="images/flexi-capture/connectors/BP29.png" />
   </Frame>

9. Document Definition エディターを保存して閉じます。次に、**Publish** ボタンをクリックして Document Definition を公開します。
