> ## Documentation Index
> Fetch the complete documentation index at: https://docs.abbyy.com/llms.txt
> Use this file to discover all available pages before exploring further.

# キュー名のカスタマイズ

> UiPath Studio の変数を編集して、バッチ送信、Monitor、Verifier、Fetcher の各プロセスで、デフォルト以外の Orchestrator キュー名を設定します。

デフォルトでは、キュー名は次のとおりにする必要があります。

* Monitor Queue
* Verifier Queue
* Fetcher Queue

必要に応じて、プロセス変数で適切な名前を指定することで、デフォルト以外の名前のキューを作成できます。

<div id="the-batch-sender-process">
  ## バッチ送信 プロセス
</div>

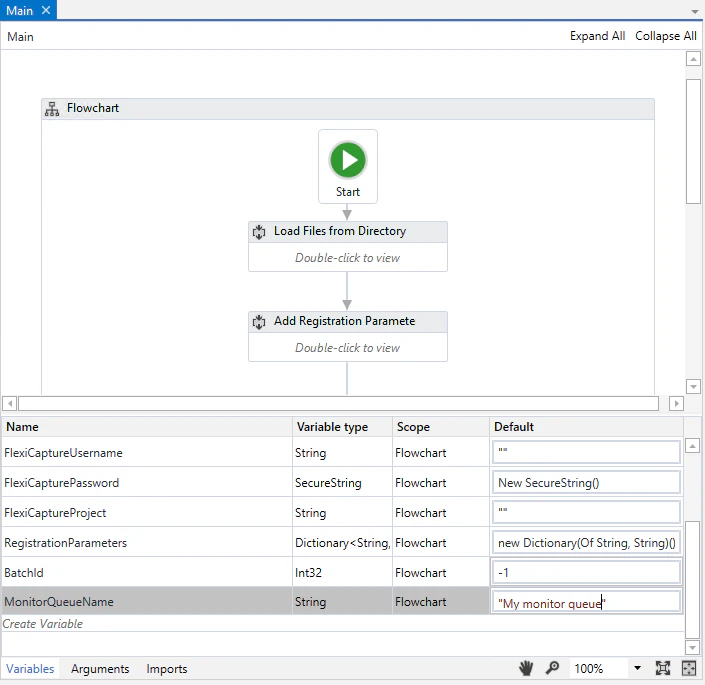
このプロセスでは、作成されたBatchesの識別子を追加するキューの名前を指定します。

1. UiPath Studio でプロセスを開き、**Variables** tab を展開します。
2. **Flowchart** 領域に移動し、**MonitorQueueName** 変数の **Default** column に新しいキュー名を入力します。
   <Frame>
     <img src="https://mintcdn.com/abbyy/jk6a9TGm7KRcVxRI/images/flexi-capture/connectors/UiCon_43.png?fit=max&auto=format&n=jk6a9TGm7KRcVxRI&q=85&s=d062700a6c1c1633763c481807962116" alt="Variables tab を開いた UiPath Studio の バッチ送信 プロセスの Flowchart のスクリーンショット。MonitorQueueName 変数の Default column にカスタム キュー名が入力されています。" width="705" height="685" data-path="images/flexi-capture/connectors/UiCon_43.png" />
   </Frame>

<div id="the-batch-monitor-process">
  ## バッチモニター プロセス
</div>

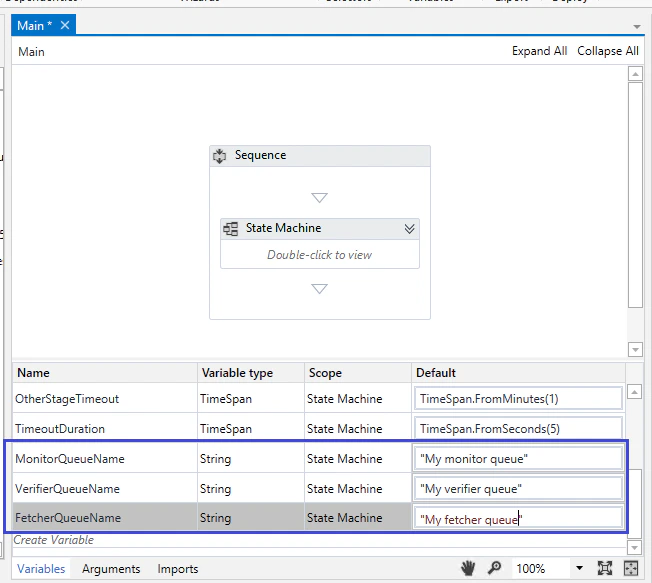
このプロセスでは、使用する 3 つのキューすべての名前を指定します。

1. UiPath Studio でプロセスを開き、**State Machine** エリアに移動します。
2. **Variables** ペインを展開します。
3. **MonitorQueueName**、**VerifierQueueName**、**FetcherQueueName** 変数の **Default** 列に、新しいキュー名を入力します。
   <Frame>
     <img src="https://mintcdn.com/abbyy/jk6a9TGm7KRcVxRI/images/flexi-capture/connectors/UiCon_44.png?fit=max&auto=format&n=jk6a9TGm7KRcVxRI&q=85&s=5bb7979d3d7bc81285ab9bae74e48f2c" alt="Variables タブを開いた状態の UiPath Studio の バッチモニター プロセスの State Machine を示すスクリーンショット。MonitorQueueName、VerifierQueueName、FetcherQueueName 変数の Default 列にカスタムキュー名が入力されています。" width="652" height="583" data-path="images/flexi-capture/connectors/UiCon_44.png" />
   </Frame>

<div id="the-batch-verifier-process">
  ## バッチ検証 プロセス
</div>

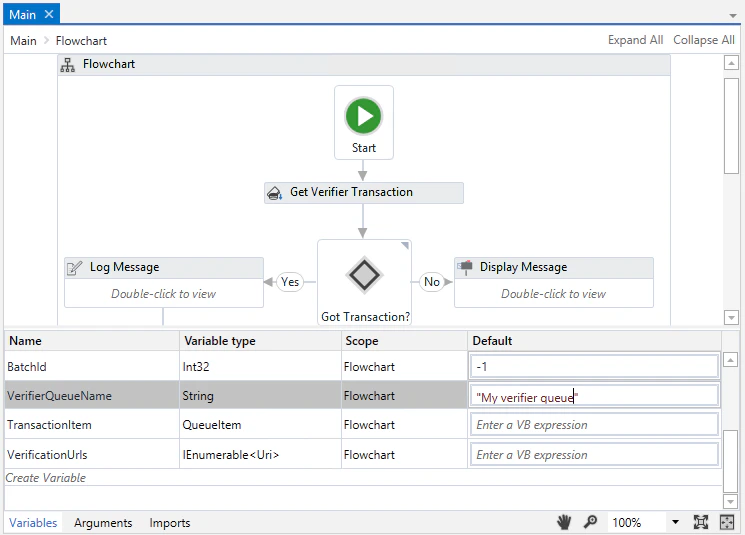
このプロセスでは、検証待ちのBatchesの識別子を保存するキュー名を指定します。

1. UiPath Studio でプロセスを開き、**Flowchart** 領域に移動します。
2. **Variables** ペインを展開します。
3. **VerifierQueueName** 変数の **Default** 列に、新しいキュー名を入力します。
   <Frame>
     <img src="https://mintcdn.com/abbyy/jk6a9TGm7KRcVxRI/images/flexi-capture/connectors/UiCon_45.png?fit=max&auto=format&n=jk6a9TGm7KRcVxRI&q=85&s=e7d20a501f4f3575bed531aec9cb9527" alt="Variables タブを開いた状態の UiPath Studio の バッチ検証 プロセスの Flowchart のスクリーンショット。VerifierQueueName 変数の Default 列にカスタム キュー名が入力されています。" width="745" height="535" data-path="images/flexi-capture/connectors/UiCon_45.png" />
   </Frame>

<div id="the-batch-fetcher-process">
  ## バッチフェッチャー プロセス
</div>

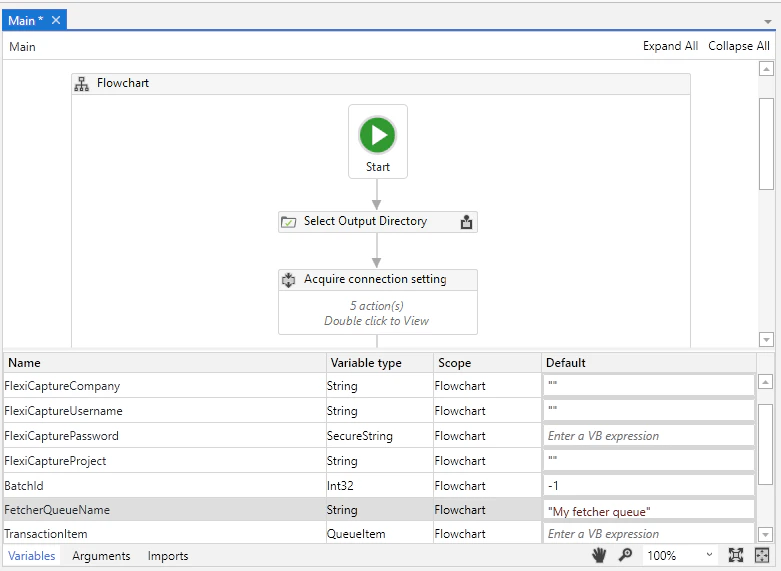
このプロセスでは、正常に処理されたBatchesの識別子を保存するキュー名を指定します。すると、**バッチフェッチャー** プロセスによるバッチ処理結果のダウンロードが開始されます。

1. UiPath Studio でプロセスを開き、**Variables** ペインを展開します。
2. **FetcherQueueName** 変数の **Default** 列に、新しいキュー名を入力します。
   <Frame>
     <img src="https://mintcdn.com/abbyy/jk6a9TGm7KRcVxRI/images/flexi-capture/connectors/UiCon_49.png?fit=max&auto=format&n=jk6a9TGm7KRcVxRI&q=85&s=00780542a6b9a8f19e70e2a1b962c7de" alt="UiPath Studio で バッチフェッチャー プロセスのFlowchartを表示し、Variables ペインを開いたスクリーンショット。FetcherQueueName 変数の Default 列にカスタムキュー名が入力されています。" width="781" height="571" data-path="images/flexi-capture/connectors/UiCon_49.png" />
   </Frame>

変更を加えたら、修正したすべてのプロセスを再度 Orchestrator に公開します。
