> ## Documentation Index
> Fetch the complete documentation index at: https://docs.abbyy.com/llms.txt
> Use this file to discover all available pages before exploring further.

# サンプルのPegaアプリケーションを設定する

> ABBYY VantageのサンプルPegaアプリケーションをインポートし、built-on applicationとして追加したうえで、ABBYY Vantageでドキュメントを処理するケースタイプを設定します。

サンプルアプリケーションをインポートし、それを独自のアプリケーションにbuilt-on applicationとして追加して、ドキュメントを処理するケースタイプを設定することで、ABBYY Vantage Connector for Pegaをセットアップします。

[ABBYY Marketplace](https://www.abbyy.com/marketplace/assets/host/abbyy/connector/pega/)からABBYY Vantage Connector for Pegaをダウンロードします。ダウンロードされるのはZIPアーカイブで、ABBYY Vantageで動作するように設定されたPegaアプリケーションに加え、サンプル画像とコネクタガイドが含まれています。

サンプルアプリケーションには`AbbyyVantageComponent`が含まれており、次のものが含まれます。

* 一連のConnect RESTルール
* 認証プロファイル
* コネクタで使用するDynamic System Settings
* コネクタの動作を示す**Process documents**ケースタイプ
* データページ、データトランスフォーム、アクティビティ、フロー、フローアクション、その他のルール

アプリケーションをインポートした後、これらのルールを確認できます。

<div id="import-the-application">
  ## アプリケーションをインポートする
</div>

<Steps>
  <Step title="インポートウィザードを開く">
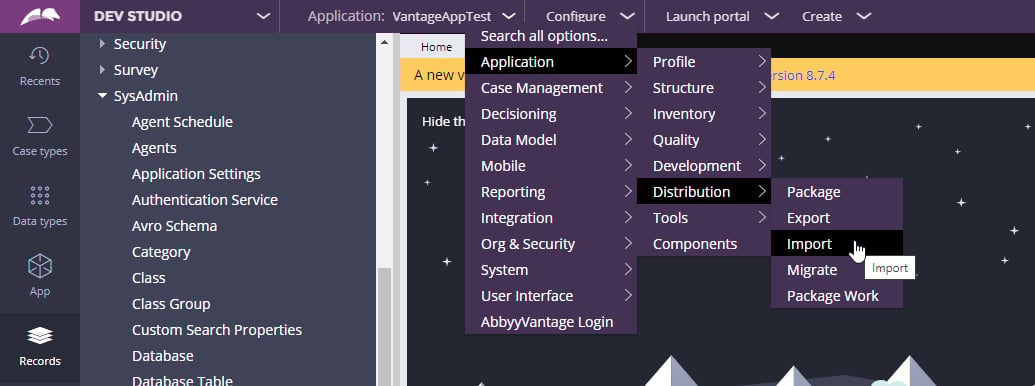
    Pega Dev Studioを開きます。ウィンドウ上部で **Configure > Application > Distribution > Import** を選択し、インポートウィザードを起動します。

    <Frame>
      <img src="https://mintcdn.com/abbyy/sAK9EyrYIxrZ9f2p/images/vantage/developer/connectors/pega/import-wizard.png?fit=max&auto=format&n=sAK9EyrYIxrZ9f2p&q=85&s=f19f6c798711c84c9b5978a2dca05d7d" alt="Configure、Application、Distribution、Import から起動した Pega Dev Studio のインポートウィザード" width="1035" height="386" data-path="images/vantage/developer/connectors/pega/import-wizard.png" />
    </Frame>
  </Step>

  <Step title="アプリケーションファイルをインポートする">
    `Abbyy_Vantage_Sample_App_v1.4.jar` ファイルをサーバーにインポートします。
  </Step>
</Steps>

<div id="grant-access-to-the-application">
  ### アプリケーションへのアクセス権を付与する
</div>

<Steps>
  <Step title="オペレーターメニューを開く">
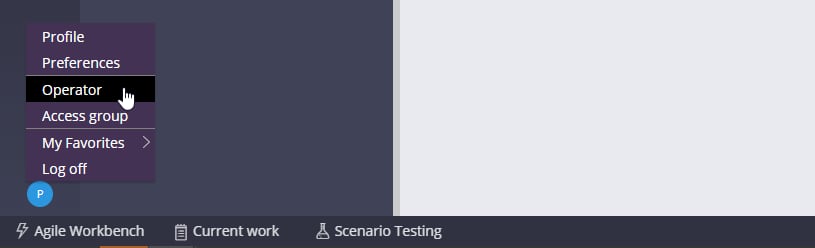
    対象のオペレーターのメニューを開きます。現在のオペレーターを選択するには、ウィンドウ左下のアイコンをクリックし、**Operator** を選択します。**Edit Operator ID** ウィンドウが開きます。

    <Frame>
      <img src="https://mintcdn.com/abbyy/sAK9EyrYIxrZ9f2p/images/vantage/developer/connectors/pega/edit-operator-id.png?fit=max&auto=format&n=sAK9EyrYIxrZ9f2p&q=85&s=c263abdb340cd425737856cf4da81df8" alt="Pega の Edit Operator ID ウィンドウ" width="815" height="248" data-path="images/vantage/developer/connectors/pega/edit-operator-id.png" />
    </Frame>
  </Step>

  <Step title="アクセスグループを追加する">
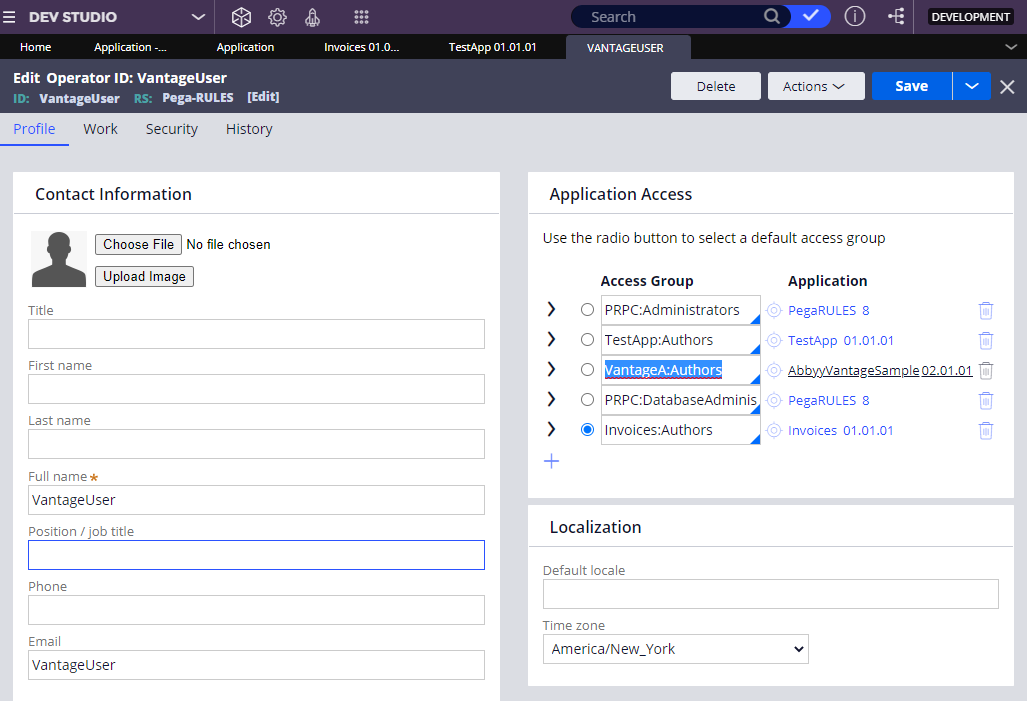
    **Edit Operator ID** ウィンドウの **Application Access** セクションで、`VantageA:Authors` アクセスグループを追加します。

    <Frame>
      <img src="https://mintcdn.com/abbyy/sAK9EyrYIxrZ9f2p/images/vantage/developer/connectors/pega/operator-application-access.png?fit=max&auto=format&n=sAK9EyrYIxrZ9f2p&q=85&s=9c55632aca82c1f6a9de9369556466e6" alt="VantageA:Authors アクセスグループが追加された Application Access セクション" width="1027" height="701" data-path="images/vantage/developer/connectors/pega/operator-application-access.png" />
    </Frame>
  </Step>

  <Step title="ログアウトして再度ログインする">
    ログアウトして再度ログインします。すると、アプリケーションが **Application > Switch Application** メニューに表示されます。
  </Step>
</Steps>

<div id="add-abbyyvantagesample-to-built-on-applications">
  ## built-on application に AbbyyVantageSample を追加する
</div>

既存の Pega アプリケーションがある場合は、このセクションに進んでください。ない場合は、[`AbbyyVantageSample` アプリケーションを使用してセットアップを直接続行するために、ABBYY Vantage への接続を設定する](/ja/vantage/connectors/pega/configure-connection)に進んでください。

`AbbyyVantageSample` をインポートしたら、それを自身のアプリケーションの built-on application として追加します。これにより、サンプルアプリケーションの要素を自身のアプリケーションで再利用できます。

<Note>
  このサンプルアプリケーションは Theme Cosmos UI をベースに構築されています。アプリケーションで別の UI を使用している場合は、Theme Cosmos UI で新しいアプリケーションを作成し、このセクションに従って設定してください。Pega プロジェクトで別の UI 構成またはヘッドレス実装を使用している場合は、ABBYY Vantage component の process flow と Data model を呼び出し、ビジネスシナリオに応じてセクションを設定できます。
</Note>

<Steps>
  <Step title="アプリケーション定義を開く">
    **Records > Application Definition > Application** に移動し、アプリケーションを開きます。
  </Step>

  <Step title="built-on application を追加する">
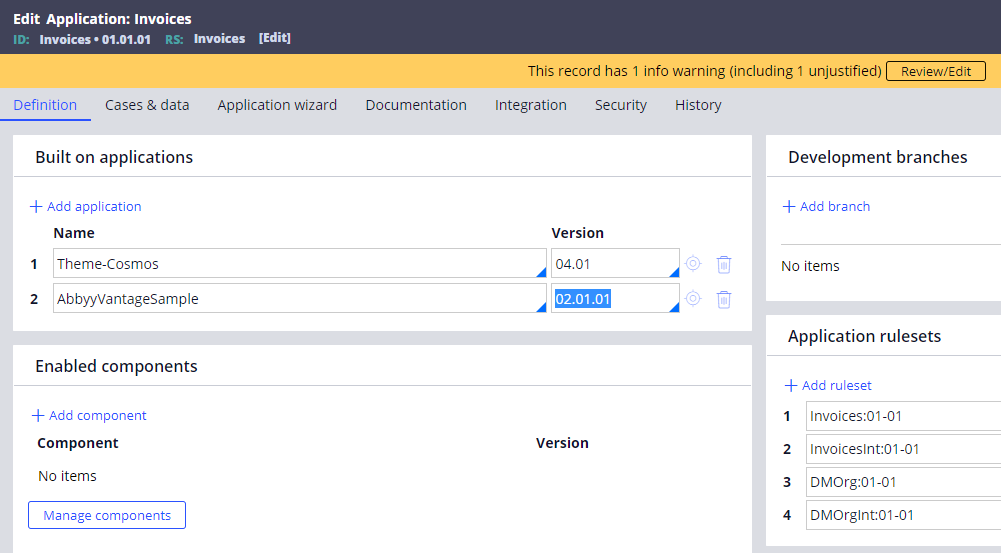
    **Definition** tab の **Built on applications** セクションで、**+Add application** をクリックします。**Name** field に `AbbyyVantageSample` を入力し、**Version** field で `02.01.01` を選択します。

    <Frame>
      <img src="https://mintcdn.com/abbyy/sAK9EyrYIxrZ9f2p/images/vantage/developer/connectors/pega/add-built-on-application.png?fit=max&auto=format&n=sAK9EyrYIxrZ9f2p&q=85&s=423d219c9680dceab7c75586d9936a35" alt="AbbyyVantageSample バージョン 02.01.01 が追加された Built on applications セクション" width="1001" height="553" data-path="images/vantage/developer/connectors/pega/add-built-on-application.png" />
    </Frame>
  </Step>

  <Step title="アプリケーションを保存する">
    アプリケーションを保存します。これで `AbbyyVantageSample` の要素を再利用できます。
  </Step>
</Steps>

<div id="inspect-the-component-rules">
  ### コンポーネントのルールを確認する
</div>

<Steps>
  <Step title="Components を開く">
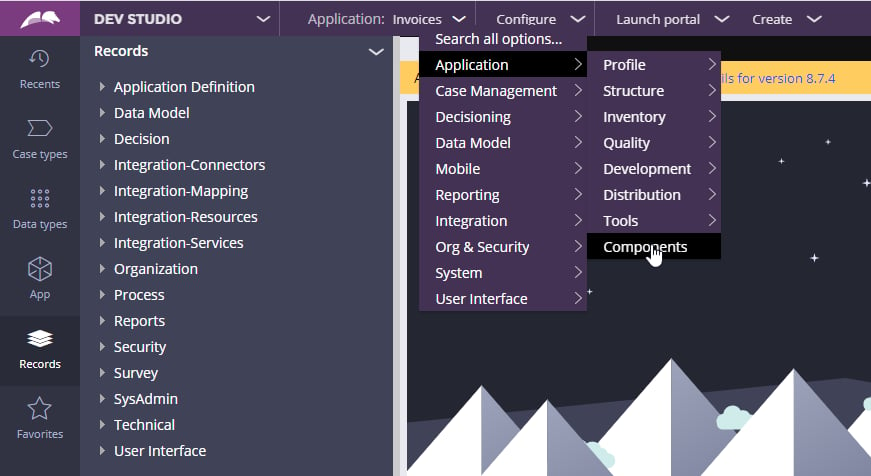
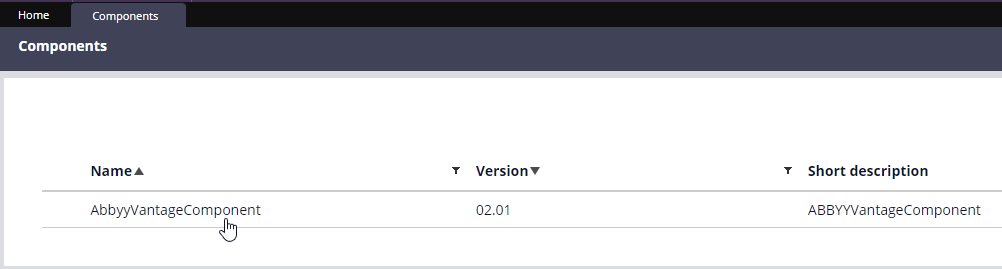
    **Configure > Application > Components** を開きます。

    <Frame>
      <img src="https://mintcdn.com/abbyy/sAK9EyrYIxrZ9f2p/images/vantage/developer/connectors/pega/application-components.png?fit=max&auto=format&n=sAK9EyrYIxrZ9f2p&q=85&s=2eca8209bd96750a3a3f05d716720e42" alt="Configure > Application > Components 配下の Pega Components ページ" data-og-width="871" width="871" data-og-height="476" height="476" data-path="images/vantage/developer/connectors/pega/application-components.png" data-optimize="true" data-opv="3" srcset="https://mintcdn.com/abbyy/sAK9EyrYIxrZ9f2p/images/vantage/developer/connectors/pega/application-components.png?w=280&fit=max&auto=format&n=sAK9EyrYIxrZ9f2p&q=85&s=8188454cef3637496ff76d86679c46e3 280w, https://mintcdn.com/abbyy/sAK9EyrYIxrZ9f2p/images/vantage/developer/connectors/pega/application-components.png?w=560&fit=max&auto=format&n=sAK9EyrYIxrZ9f2p&q=85&s=dfc7407794175c9f25923840cfa764c8 560w, https://mintcdn.com/abbyy/sAK9EyrYIxrZ9f2p/images/vantage/developer/connectors/pega/application-components.png?w=840&fit=max&auto=format&n=sAK9EyrYIxrZ9f2p&q=85&s=07e2eccaf80d4f9567a4c80a571f9ae2 840w, https://mintcdn.com/abbyy/sAK9EyrYIxrZ9f2p/images/vantage/developer/connectors/pega/application-components.png?w=1100&fit=max&auto=format&n=sAK9EyrYIxrZ9f2p&q=85&s=7c01f53e26e209794848486a51330754 1100w, https://mintcdn.com/abbyy/sAK9EyrYIxrZ9f2p/images/vantage/developer/connectors/pega/application-components.png?w=1650&fit=max&auto=format&n=sAK9EyrYIxrZ9f2p&q=85&s=e024590f7e0bde46ab814c31412b76ff 1650w, https://mintcdn.com/abbyy/sAK9EyrYIxrZ9f2p/images/vantage/developer/connectors/pega/application-components.png?w=2500&fit=max&auto=format&n=sAK9EyrYIxrZ9f2p&q=85&s=1d99a7eda032191053679685380ff419 2500w" />
    </Frame>
  </Step>

  <Step title="コンポーネントのルールセットを開く">
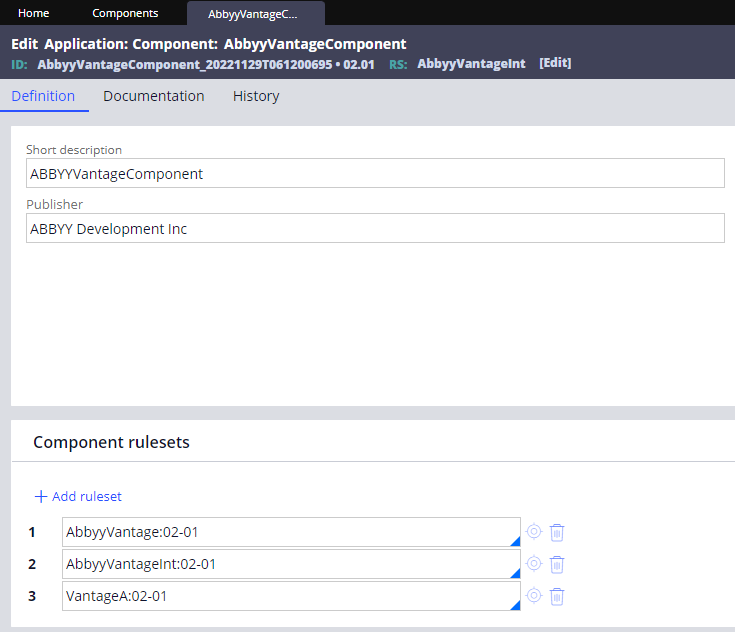
    `AbbyyVantageComponent` を開き、**Component rulesets** セクションでルールセットを開いてルールを確認します。

    <Frame>
      <img src="https://mintcdn.com/abbyy/sAK9EyrYIxrZ9f2p/images/vantage/developer/connectors/pega/component-rulesets.png?fit=max&auto=format&n=sAK9EyrYIxrZ9f2p&q=85&s=2b3bd7ea42464f683b94e204084d32aa" alt="Component rulesets セクション内の AbbyyVantageComponent のルールセット" width="1002" height="269" data-path="images/vantage/developer/connectors/pega/component-rulesets.png" />
    </Frame>
  </Step>
</Steps>

<div id="create-and-configure-case-types">
  ## ケースタイプの作成と設定
</div>

`AbbyyVantageSample` をアプリケーションの built-on applications に追加したら、ABBYY Vantage でドキュメントを処理するためのケースタイプを作成します。

<div id="create-a-case-type-and-set-inheritance">
  ### ケースタイプを作成し、継承を設定する
</div>

<Steps>
  <Step title="ケースタイプを作成する">
    すでに `AbbyyVantageSample` が built-on application として追加されているアプリケーションに切り替えます。**Case types** メニューに移動し、ケースタイプ (たとえば Invoice processing) を作成します。

    <Frame>
      <img src="https://mintcdn.com/abbyy/sAK9EyrYIxrZ9f2p/images/vantage/developer/connectors/pega/create-case-type.png?fit=max&auto=format&n=sAK9EyrYIxrZ9f2p&q=85&s=52bcd895644f8798d78b29659e3028a0" alt="Pega の Case types メニューで新しいケースタイプを作成している画面" width="735" height="632" data-path="images/vantage/developer/connectors/pega/create-case-type.png" />
    </Frame>
  </Step>

  <Step title="クラス定義を開く">
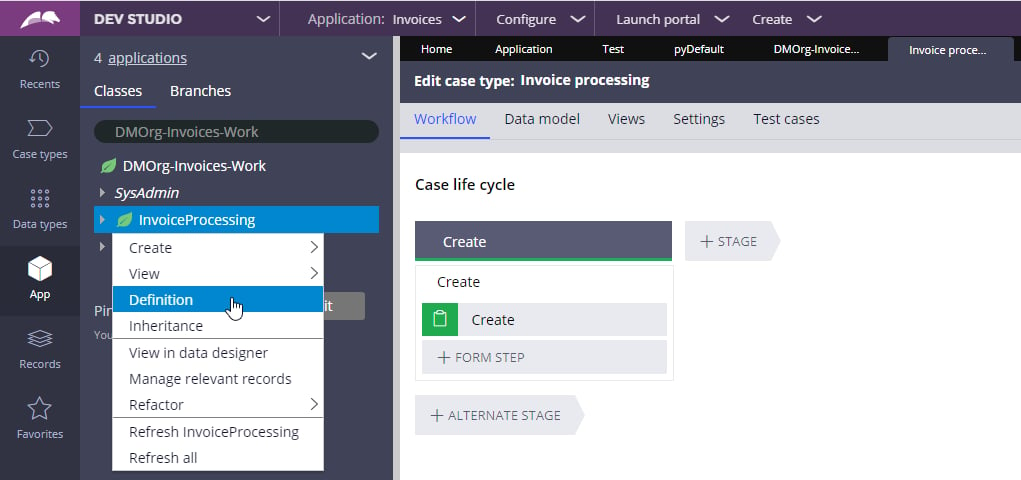
    **App** メニューに移動します。**Classes** タブで、作成したケースタイプのクラスを右クリックし、**Definition** を選択します。

    <Frame>
      <img src="https://mintcdn.com/abbyy/sAK9EyrYIxrZ9f2p/images/vantage/developer/connectors/pega/case-type-class-definition.png?fit=max&auto=format&n=sAK9EyrYIxrZ9f2p&q=85&s=6d463c7e47d8aaac4df8bab88d2fd64e" alt="ケースタイプのクラスで Definition オプションが選択されている Classes タブ" width="1021" height="480" data-path="images/vantage/developer/connectors/pega/case-type-class-definition.png" />
    </Frame>
  </Step>

  <Step title="クラス継承を変更する">
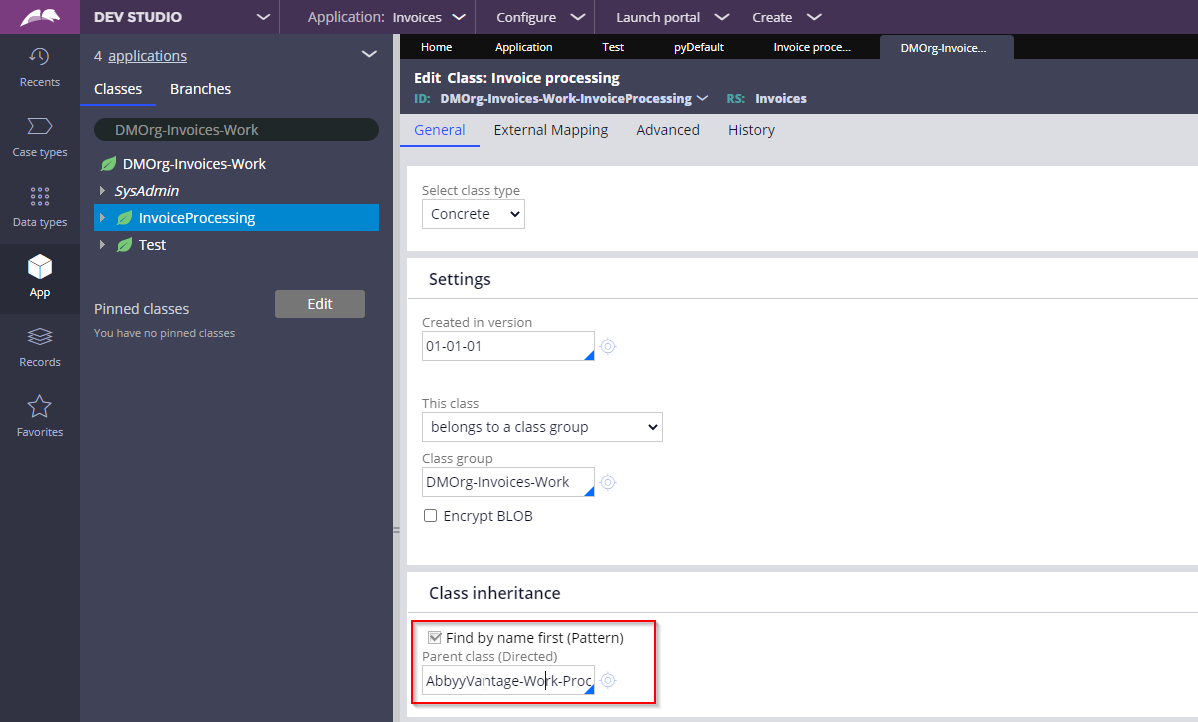
    **Class inheritance** セクションで、継承を `AbbyyVantage-Work-ProcessDocuments` に変更し、定義を保存します。

    <Frame>
      <img src="https://mintcdn.com/abbyy/sAK9EyrYIxrZ9f2p/images/vantage/developer/connectors/pega/class-inheritance.png?fit=max&auto=format&n=sAK9EyrYIxrZ9f2p&q=85&s=2109bb5ef8898f08cbc7b79cffb72a94" alt="Class inheritance セクションが AbbyyVantage-Work-ProcessDocuments に設定されている画面" width="1198" height="722" data-path="images/vantage/developer/connectors/pega/class-inheritance.png" />
    </Frame>
  </Step>
</Steps>

<div id="add-steps-to-the-case-workflow">
  ### ケースワークフローにステップを追加する
</div>

<Steps>
  <Step title="ケースタイプのステージを開く">
    **Case types** メニューを開き、作成したケースタイプを右クリックして **Open** を選択します。次に、**Stages** タブを開きます。
  </Step>

  <Step title="既定の Create プロセスを置き換える">
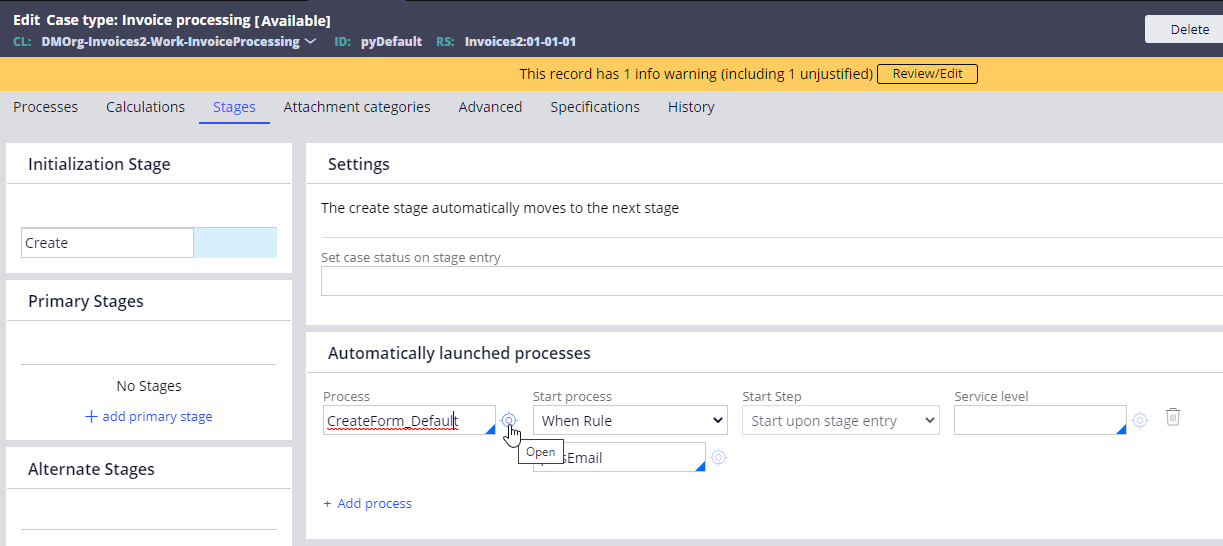
    **Initialization Stage** セクションで **Create** を選択します。**Automatically launched processes** セクションで既定の `CreateForm_Default` プロセスを開いて削除します。次に、**Create** 初期化ステージに `CreateForm_Default (AbbyyVantage-Work-ProcessDocuments)` を選択します。

    <Frame>
      <img src="https://mintcdn.com/abbyy/sAK9EyrYIxrZ9f2p/images/vantage/developer/connectors/pega/initialization-stage.png?fit=max&auto=format&n=sAK9EyrYIxrZ9f2p&q=85&s=0c6eee89768ab41abbc3e2cfbf1590c6" alt="Create プロセスと Automatically launched processes の一覧が表示された Initialization Stage" width="1223" height="546" data-path="images/vantage/developer/connectors/pega/initialization-stage.png" />
    </Frame>
  </Step>

  <Step title="Get Status ステージを追加する">
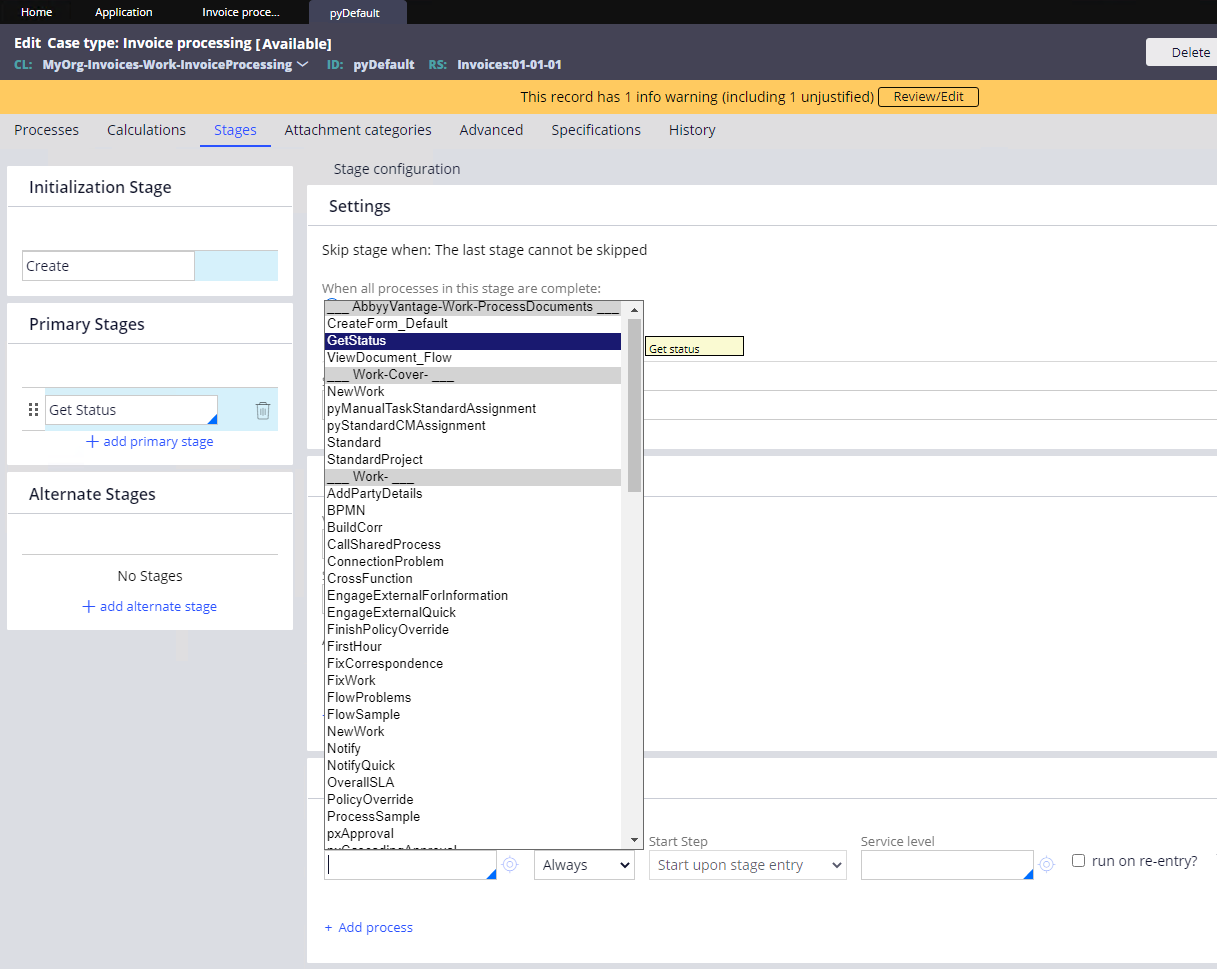
    プライマリステージを追加し、名前を付けます (たとえば Get Status) 。このステージを選択した状態で、**Automatically launched processes** セクションの `GetStatus (AbbyyVantage-Work-ProcessDocuments)` を選択します。

    <Frame>
      <img src="https://mintcdn.com/abbyy/sAK9EyrYIxrZ9f2p/images/vantage/developer/connectors/pega/get-status-stage.png?fit=max&auto=format&n=sAK9EyrYIxrZ9f2p&q=85&s=2554cb4e63e30e473e09d95ab65a709c" alt="Automatically launched processes で GetStatus が選択された Get Status プライマリステージ" width="1217" height="969" data-path="images/vantage/developer/connectors/pega/get-status-stage.png" />
    </Frame>
  </Step>

  <Step title="Get Processing Results ステージを追加する">
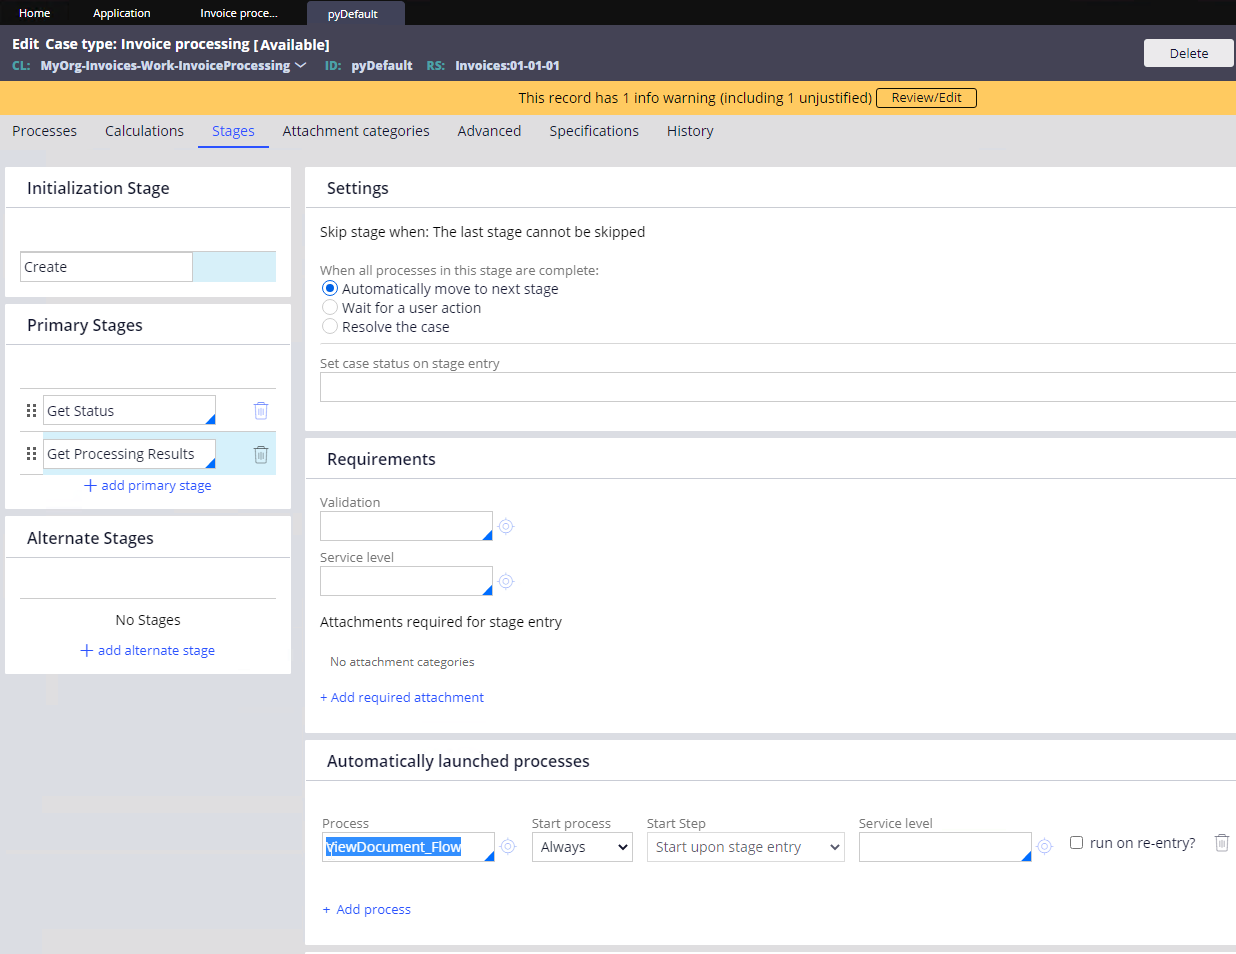
    別のプライマリステージを追加し、名前を付けます (たとえば Get Processing Results) 。このステージを選択した状態で、**Automatically launched processes** セクションの `ViewDocument_Flow (AbbyyVantage-Work-ProcessDocuments)` を選択し、ケースタイプを保存します。

    <Frame>
      <img src="https://mintcdn.com/abbyy/sAK9EyrYIxrZ9f2p/images/vantage/developer/connectors/pega/get-processing-results-stage.png?fit=max&auto=format&n=sAK9EyrYIxrZ9f2p&q=85&s=137400b60661bed35ee39c1a96394b4d" alt="ViewDocument_Flow が選択された Get Processing Results プライマリステージ" width="1236" height="954" data-path="images/vantage/developer/connectors/pega/get-processing-results-stage.png" />
    </Frame>
  </Step>
</Steps>

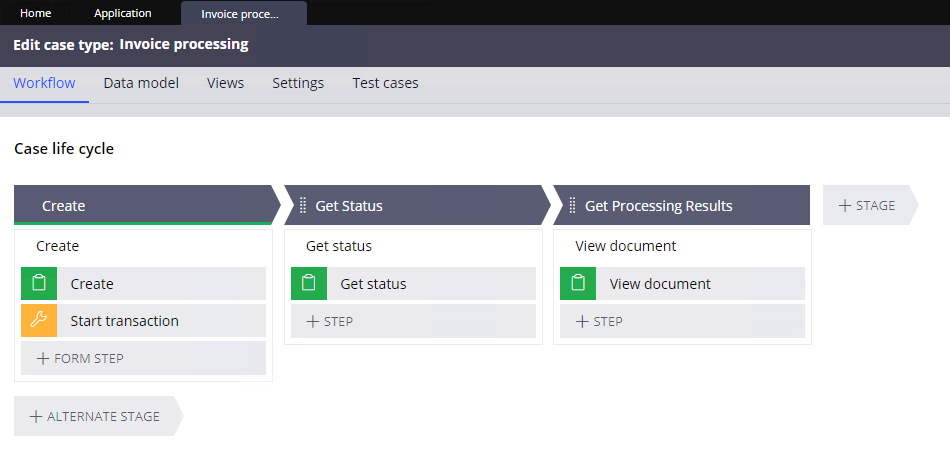
すべてのステージを追加すると、ケースタイプのワークフローは次のようになります。

<Frame>
  <img src="https://mintcdn.com/abbyy/sAK9EyrYIxrZ9f2p/images/vantage/developer/connectors/pega/case-workflow.png?fit=max&auto=format&n=sAK9EyrYIxrZ9f2p&q=85&s=675d4eeca8a0b941fb08bea8f50f3d2c" alt="Create、Get Status、Get Processing Results の各ステージを含む完成したケースタイプのワークフロー" width="950" height="459" data-path="images/vantage/developer/connectors/pega/case-workflow.png" />
</Frame>

<div id="add-a-section-to-the-application-context">
  ### アプリケーションコンテキストにセクションを追加する
</div>

<Steps>
  <Step title="Create セクションを開く">
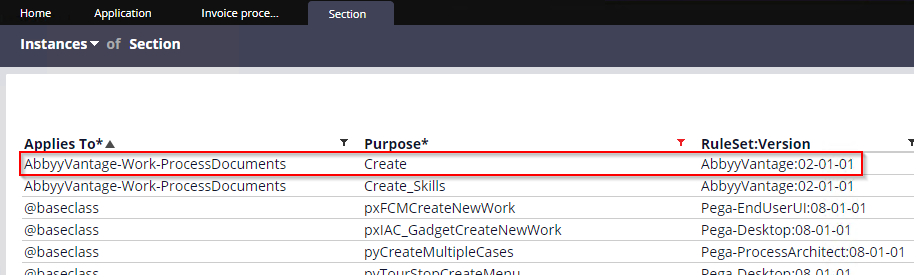
    **Records > User Interface > Section** に移動します。`AbbyyVantage:02-01-01` ルールセットの **Create** セクションを見つけて開きます。

    <Frame>
      <img src="https://mintcdn.com/abbyy/sAK9EyrYIxrZ9f2p/images/vantage/developer/connectors/pega/create-section.png?fit=max&auto=format&n=sAK9EyrYIxrZ9f2p&q=85&s=47a79ed30fbdd4417fedc204c3ee5e09" alt="AbbyyVantage 02-01-01 ルールセットの Create セクション" width="914" height="275" data-path="images/vantage/developer/connectors/pega/create-section.png" />
    </Frame>
  </Step>

  <Step title="セクションをコンテキストに保存する">
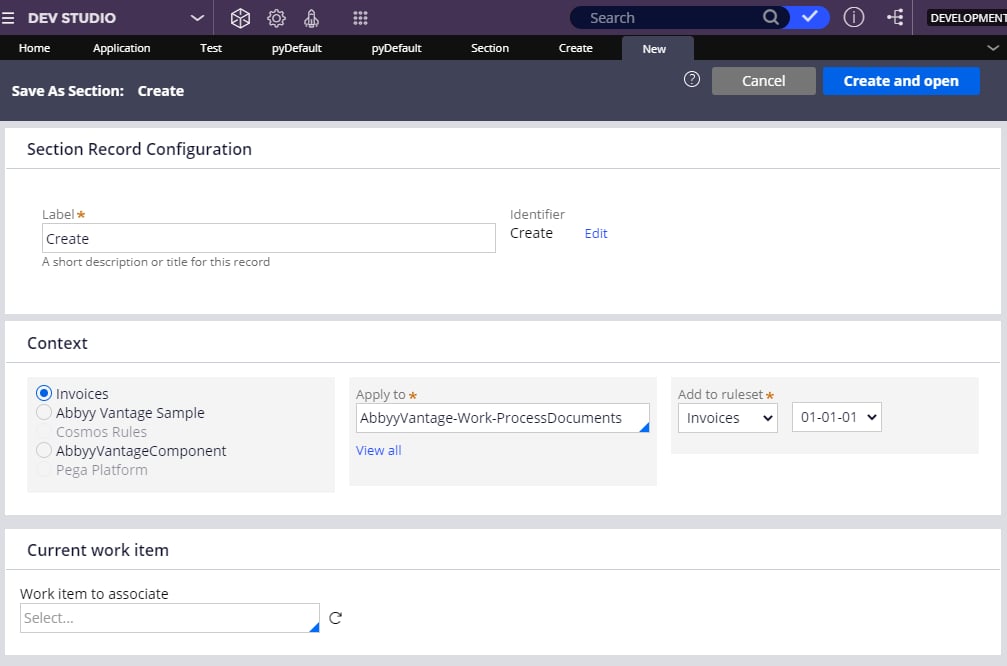
    **Save As** をクリックします。開いたウィンドウで、**Context** セクションにおいてアプリケーションとそのルールセットが選択されていることを確認します。**Create and open** をクリックし、**Create** セクションを保存します。

    <Frame>
      <img src="https://mintcdn.com/abbyy/sAK9EyrYIxrZ9f2p/images/vantage/developer/connectors/pega/section-save-as.png?fit=max&auto=format&n=sAK9EyrYIxrZ9f2p&q=85&s=4bfe8efdab1780a04927d6ab53e672e5" alt="Context セクションでアプリケーションとルールセットが選択された Save As ウィンドウ" width="1007" height="666" data-path="images/vantage/developer/connectors/pega/section-save-as.png" />
    </Frame>
  </Step>
</Steps>

<div id="next-steps">
  ## 次のステップ
</div>

次に、[ABBYY Vantage への接続を Configure する](/ja/vantage/connectors/pega/configure-connection)に進んでください。