> ## Documentation Index
> Fetch the complete documentation index at: https://docs.abbyy.com/llms.txt
> Use this file to discover all available pages before exploring further.
# 公開 API クライアントの作成、設定、削除
> ABBYY Vantage UI で公開 API クライアントを作成、設定、削除できます。クライアントシークレット、リダイレクト URI、OAuth 2.0 フロー、トークンの有効期間を管理します。
連携アプリケーションが Vantage API への認証に使用する公開 API クライアントは、Vantage UI で作成、設定、削除できます。
公開 API クライアントを作成または管理できるのは、**Tenant Administrator** のみです。
## 公開 API クライアントの作成
Vantage で、左ペインの **Configuration** をクリックします。
**Tenant Administration** ダイアログで、次のいずれかを行います。
* **このテナントで最初のクライアントの場合:** **Create API Client** をクリックします。
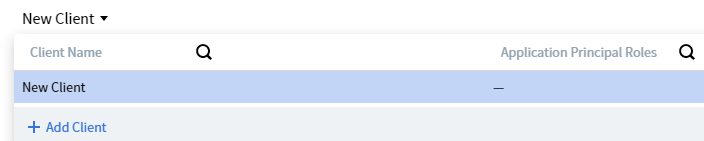
* **2 つ目以降のクライアントの場合:** **公開 API クライアント** をクリックし、**公開 API クライアント** ページで **New Client** ドロップダウンリストを開いて **Add Client** をクリックします。
 **Client Created** ダイアログで、各値の **copy** アイコンをクリックしてコピーします。または、**Save to File** をクリックして、両方の値が含まれる TXT ファイルをダウンロードします。
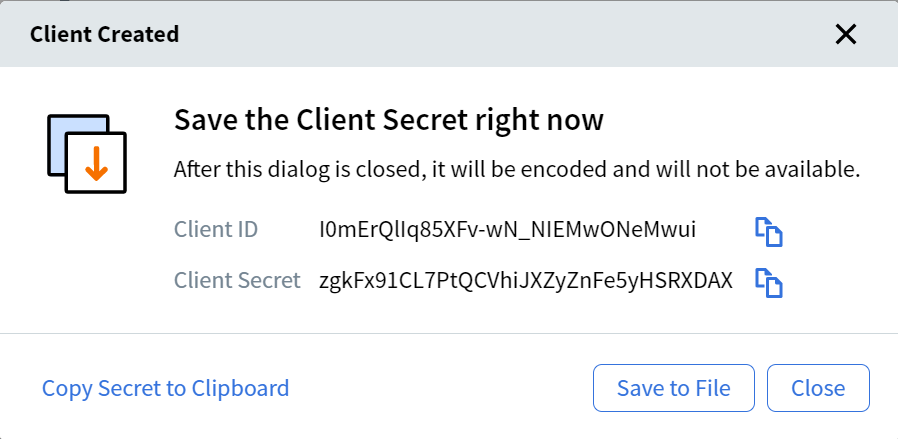 Client Secret は作成時に一度だけ表示されます。すぐに保存してください。後で完全な値を再度表示することはできません。
**Close** をクリックします。**公開 API クライアント** ページが開き、新しいクライアントを設定できます。
Client Secret は作成時に一度だけ表示されます。すぐに保存してください。後で完全な値を再度表示することはできません。
**Close** をクリックします。**公開 API クライアント** ページが開き、新しいクライアントを設定できます。
## 公開 API クライアント の設定
公開 API クライアント を作成したら、その設定を行います。
クライアントの設定を開くには、**公開 API クライアント** ページでクライアント名をクリックするか、クライアント名またはアプリケーション プリンシパル ロールで検索します。
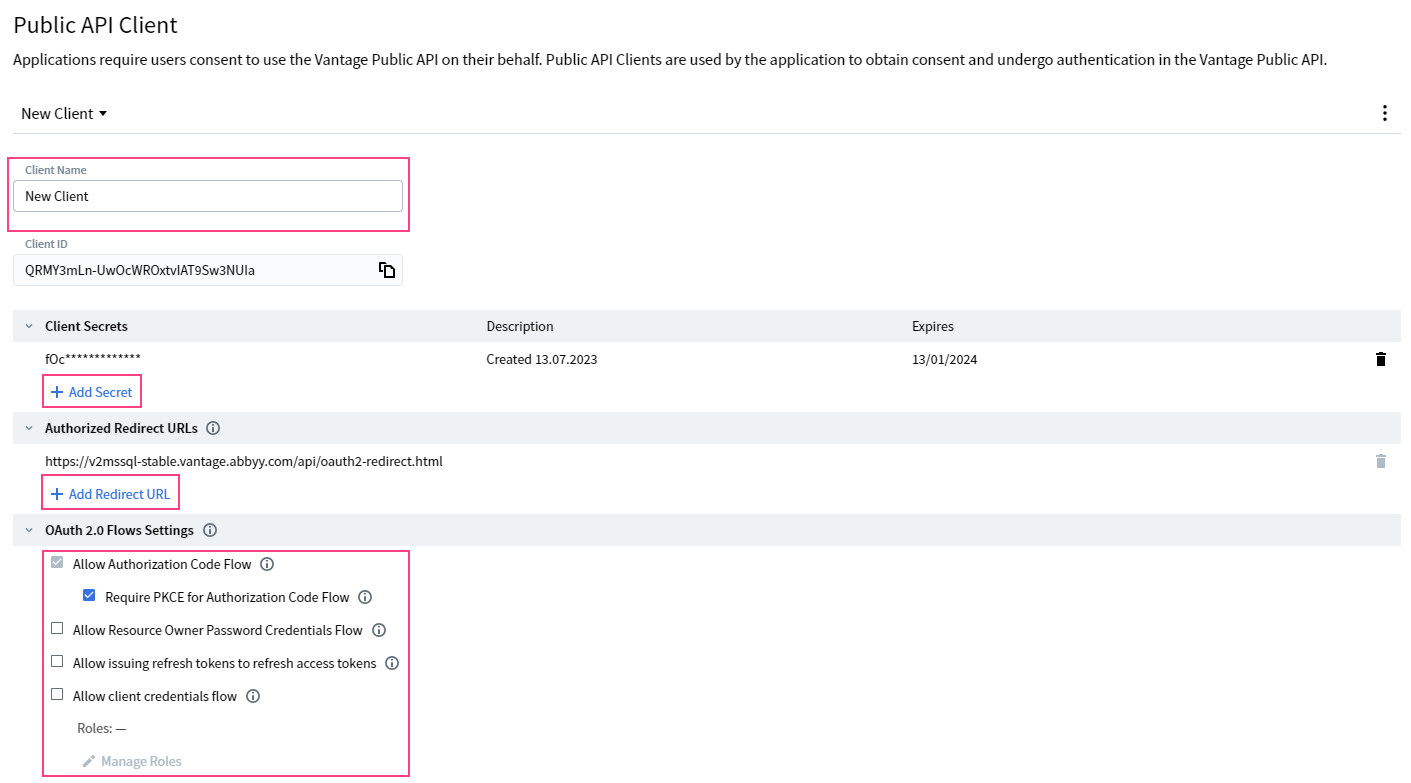 **Client Name** field に、このクライアントを識別する名前を入力します。
**Add Secret** をクリックして、新しいクライアント シークレットを作成します。既定では、新しいシークレットの有効期限は 6 か月です。有効期限は 1 日から 36 か月まで設定できます。
**Add Redirect URL** をクリックし、認可のリダイレクト先として許可する各 URL を入力します。
**OAuth 2.0 Flows Settings** セクションで、クライアントが使用できるフローを 1 つ以上選択します。
* **Allow Authorization Code Flow** — アプリケーションが認証リクエストを Vantage の認可サーバーに直接送信する、安全な認証方式です。サーバーは資格情報を検証し、認可コードを返します。このフローは、すべての Vantage API クライアントで有効になっています。
* **Require PKCE for Authorization Code Flow** — アクセス トークンを要求するアプリケーションが、認証を開始したアプリケーションと同一であることを Vantage が検証できるようにすることで、パブリック クライアントのセキュリティを強化します。
* **Allow Resource Owner Password Credentials Flow** — ユーザー名とパスワードを使用したユーザー認証を可能にします。アプリケーションはユーザーのパスワードに直接アクセスできるため、ユーザーが完全に信頼しているアプリケーションでのみ使用してください。
* **Allow issuing refresh tokens to refresh access tokens** — ユーザーに再度入力を求めることなくアクセス トークンを更新できるように、クライアントがリフレッシュ トークンを発行できるようにします。アプリケーションはリフレッシュ トークンを安全に保存する必要があります。
* **Allow client credentials flow** — OAuth 2.0 Client Credentials flow を通じて、アプリケーションに Vantage API へのアクセスを許可します。ロールは、このオプションの下にある **Manage Roles** 設定によって決まります。
External Identity Provider が設定されている場合、Resource Owner Password Credentials flow は使用できません。[Authentication](/ja/vantage/documentation/tenant-admin/tenant-management/authentication) を参照してください。
**Token Lifetime Settings** セクションで、次を設定します。
* **Access Token** — 発行されたアクセス トークンで Vantage へのアクセスが許可される期間。既定値: 24 時間。
* **Refresh Token** — 最初のアクセス トークンの発行時点から始まる絶対期間。この期間中、リフレッシュ トークンを使用してアクセス トークンを更新できます。既定値: 30 日。
認証フローの詳細については、[Authentication](/ja/vantage/documentation/tenant-admin/tenant-management/authentication) を参照してください。
**Client Name** field に、このクライアントを識別する名前を入力します。
**Add Secret** をクリックして、新しいクライアント シークレットを作成します。既定では、新しいシークレットの有効期限は 6 か月です。有効期限は 1 日から 36 か月まで設定できます。
**Add Redirect URL** をクリックし、認可のリダイレクト先として許可する各 URL を入力します。
**OAuth 2.0 Flows Settings** セクションで、クライアントが使用できるフローを 1 つ以上選択します。
* **Allow Authorization Code Flow** — アプリケーションが認証リクエストを Vantage の認可サーバーに直接送信する、安全な認証方式です。サーバーは資格情報を検証し、認可コードを返します。このフローは、すべての Vantage API クライアントで有効になっています。
* **Require PKCE for Authorization Code Flow** — アクセス トークンを要求するアプリケーションが、認証を開始したアプリケーションと同一であることを Vantage が検証できるようにすることで、パブリック クライアントのセキュリティを強化します。
* **Allow Resource Owner Password Credentials Flow** — ユーザー名とパスワードを使用したユーザー認証を可能にします。アプリケーションはユーザーのパスワードに直接アクセスできるため、ユーザーが完全に信頼しているアプリケーションでのみ使用してください。
* **Allow issuing refresh tokens to refresh access tokens** — ユーザーに再度入力を求めることなくアクセス トークンを更新できるように、クライアントがリフレッシュ トークンを発行できるようにします。アプリケーションはリフレッシュ トークンを安全に保存する必要があります。
* **Allow client credentials flow** — OAuth 2.0 Client Credentials flow を通じて、アプリケーションに Vantage API へのアクセスを許可します。ロールは、このオプションの下にある **Manage Roles** 設定によって決まります。
External Identity Provider が設定されている場合、Resource Owner Password Credentials flow は使用できません。[Authentication](/ja/vantage/documentation/tenant-admin/tenant-management/authentication) を参照してください。
**Token Lifetime Settings** セクションで、次を設定します。
* **Access Token** — 発行されたアクセス トークンで Vantage へのアクセスが許可される期間。既定値: 24 時間。
* **Refresh Token** — 最初のアクセス トークンの発行時点から始まる絶対期間。この期間中、リフレッシュ トークンを使用してアクセス トークンを更新できます。既定値: 30 日。
認証フローの詳細については、[Authentication](/ja/vantage/documentation/tenant-admin/tenant-management/authentication) を参照してください。
## 公開 API クライアントの削除
クライアントを削除するには、**公開 API クライアント** ページでアイコンをクリックしてから **Delete Client** をクリックします。

## 関連トピック
* [Vantage APIクライアントの管理](/ja/vantage/documentation/tenant-admin/tenant-management/manage-api-clients)
* [Authentication](/ja/vantage/documentation/tenant-admin/tenant-management/authentication)