> ## Documentation Index
> Fetch the complete documentation index at: https://docs.abbyy.com/llms.txt
> Use this file to discover all available pages before exploring further.
# Set up ABBYY Timeline for the KYC Agent
> Create a Timeline project that matches the KYC event log schema, generate a Personal Access Token, and configure the Timeline key-value entries in IBM watsonx Orchestrate.
The KYC Agent logs every step in ABBYY Timeline (Process AI) for visibility, monitoring, and compliance. Set up ABBYY Timeline by creating a project that matches the KYC event log schema, generating a Personal Access Token, and configuring the Timeline key-value entries in IBM watsonx Orchestrate.
## Create or select a Timeline project
Create a new ABBYY Timeline project, or use an existing project dedicated to KYC process monitoring and analytics.
Configure the Timeline project using the event log schema that the KYC Agent generates. The column names and structure must match the schema exactly, or data ingestion, process analysis, and dashboard reporting will fail.
For the required columns, see [Timeline event log schema](/vantage/connectors/ibm-watsonx-orchestrate/timeline-event-log-schema).
## Generate a Personal Access Token
A Personal Access Token (PAT) authenticates API requests between IBM watsonx Orchestrate and ABBYY Timeline.
The user who generates the token must have the **Administrator** role in ABBYY Timeline. Administrator permissions are required to create and manage Personal Access Tokens and to grant the API access the integration needs.
Log in to your ABBYY Timeline environment.
Go to your **User Profile** and select **Personal Access Tokens**.
Click **Create Personal Access Token**.
Configure the token:
1. Enter a **Token name**.
2. Optionally set a **Token expiration** date.
3. Select the required permissions.
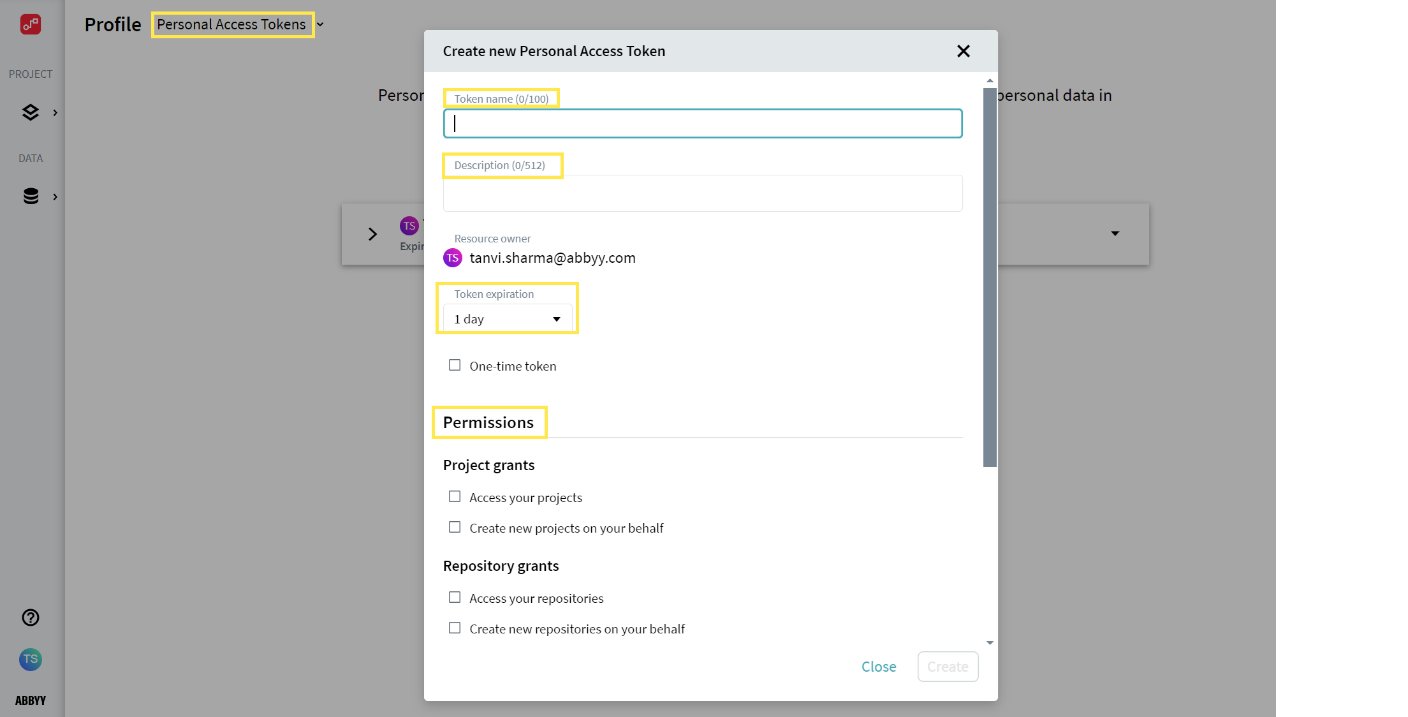 Grant the permissions the integration needs:
* Project permissions
* Repository permissions
* Profile permissions (if required)
Create the token, and then copy the generated value.
The Personal Access Token is displayed only once, during creation. Store it securely, because you cannot view it again after you close the dialog.
## Obtain the Timeline project ID
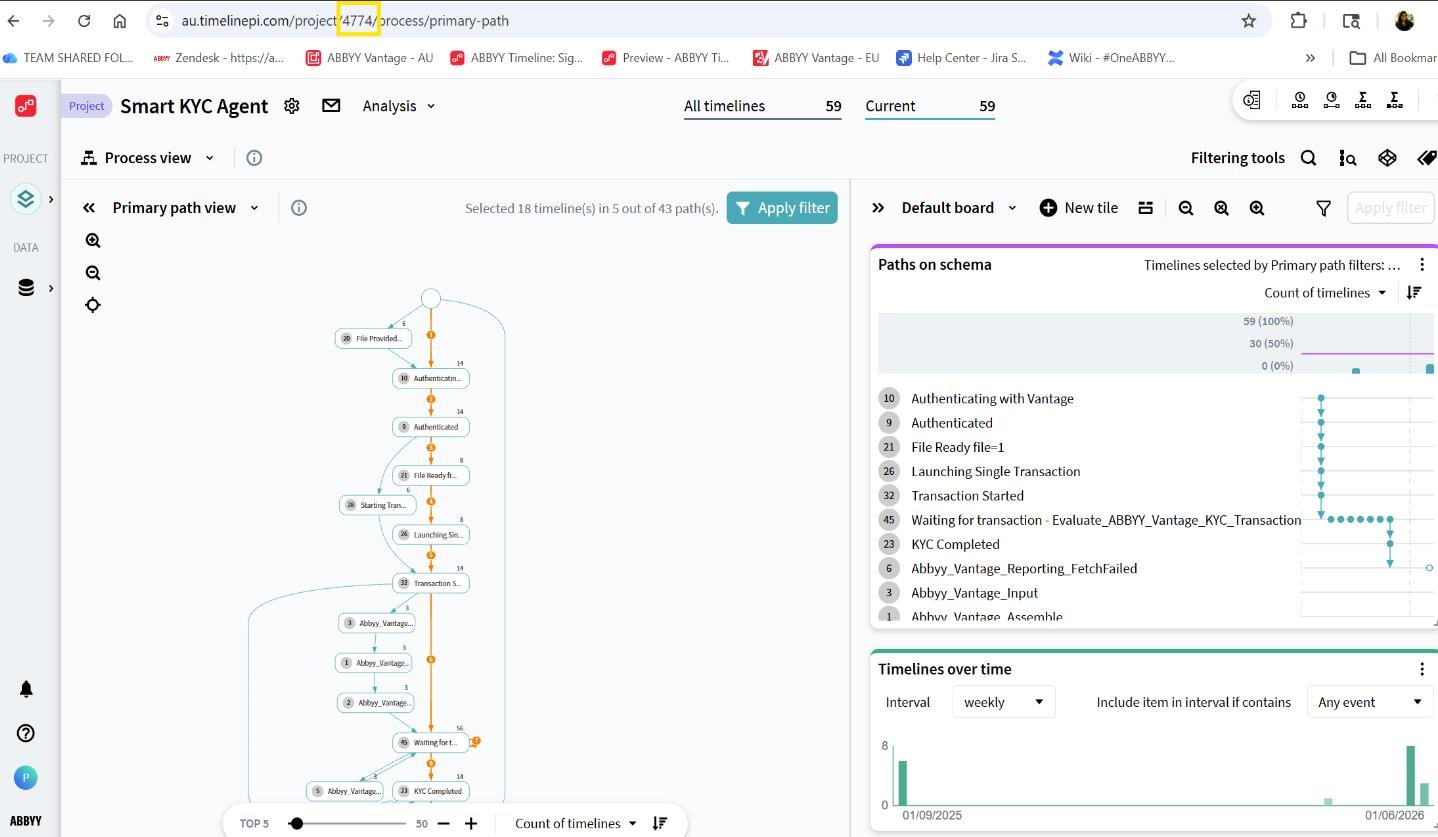
The Timeline project ID identifies the project where process events and analytics data are stored. Find it in the URL of your Timeline project.
```text theme={null}
https:///projects/
```
Copy the project ID and save it for the IBM watsonx Orchestrate configuration.
Grant the permissions the integration needs:
* Project permissions
* Repository permissions
* Profile permissions (if required)
Create the token, and then copy the generated value.
The Personal Access Token is displayed only once, during creation. Store it securely, because you cannot view it again after you close the dialog.
## Obtain the Timeline project ID
The Timeline project ID identifies the project where process events and analytics data are stored. Find it in the URL of your Timeline project.
```text theme={null}
https:///projects/
```
Copy the project ID and save it for the IBM watsonx Orchestrate configuration.
 ## Configure the Timeline connection in IBM watsonx Orchestrate
Populate the `abbyy_key_value_abbyy_e073d849` connection (type **Key-Value pair**) with your ABBYY Timeline details.
| Key | Description |
| ----------------------- | -------------------------------------------------------------------------------------------------------------- |
| `timeline_base_url` | Base API URL of the ABBYY Timeline environment. Example: `https://abbyy-au.timelinepi.com/api/ext/1.0/project` |
| `timeline_access_token` | Personal Access Token (PAT) generated in the previous step |
| `timeline_project_id` | Numeric Project ID for the Timeline project where KYC log data is ingested |
## Configure monitoring and analytics dashboards
Create or customize ABBYY Timeline dashboards to monitor key business and operational metrics, such as:
* Total KYC cases received
* Approved KYC cases
* Rejected KYC cases
* Cases pending review
* Average processing time
* Process bottlenecks
* Failed transactions and exceptions
* End-to-end workflow performance trends
After you finish, ABBYY Timeline provides process visibility, monitoring, and analytics for the KYC Agent.
## Next steps
Continue to [Set up IBM watsonx Orchestrate](/vantage/connectors/ibm-watsonx-orchestrate/set-up-watsonx-orchestrate).
## Configure the Timeline connection in IBM watsonx Orchestrate
Populate the `abbyy_key_value_abbyy_e073d849` connection (type **Key-Value pair**) with your ABBYY Timeline details.
| Key | Description |
| ----------------------- | -------------------------------------------------------------------------------------------------------------- |
| `timeline_base_url` | Base API URL of the ABBYY Timeline environment. Example: `https://abbyy-au.timelinepi.com/api/ext/1.0/project` |
| `timeline_access_token` | Personal Access Token (PAT) generated in the previous step |
| `timeline_project_id` | Numeric Project ID for the Timeline project where KYC log data is ingested |
## Configure monitoring and analytics dashboards
Create or customize ABBYY Timeline dashboards to monitor key business and operational metrics, such as:
* Total KYC cases received
* Approved KYC cases
* Rejected KYC cases
* Cases pending review
* Average processing time
* Process bottlenecks
* Failed transactions and exceptions
* End-to-end workflow performance trends
After you finish, ABBYY Timeline provides process visibility, monitoring, and analytics for the KYC Agent.
## Next steps
Continue to [Set up IBM watsonx Orchestrate](/vantage/connectors/ibm-watsonx-orchestrate/set-up-watsonx-orchestrate).