> ## Documentation Index
> Fetch the complete documentation index at: https://docs.abbyy.com/llms.txt
> Use this file to discover all available pages before exploring further.
# Step 7. Configure the Sick Note DE activity
> Configure the Extraction Rules activity for German sick notes using search elements like Static Text, Separator, Paragraph, Object Collection, and Region.
Continuing with the German documents, configure their Extraction Rules activity. Fast Learning has handled some fields already; this activity covers the rest.
## Before you begin
1. Open the "Sick Note DE" activity in the **Activity Editor**.
2. Select one of the documents from the document set.
Make sure that the advanced mode for the element properties is enabled. To toggle this mode on or off, click the icon on the **Properties** pane.
All uploaded documents have undergone pre-recognition. Click the icon (or click the more icon and select **Recognized Words** if the icon doesn't fit on your screen) to highlight detected objects on the document image. You can switch between object types at any time — for example, **Recognized Lines** helps when looking for paragraphs, and **Separators** facilitates Separator search element configuration.
If a search element lies outside the search area, it will not be found. Enable the **Show search area** option in the document image context menu. The search area for each element will be highlighted in green when you evaluate the matching results.
Keep in mind that it may be helpful to experiment with advanced properties of the search elements to improve extraction accuracy.
We also encourage you to often click **Match** to check how your extraction rules work and to compare extraction results on different documents in the set. You can test a single element without relations to other elements by clicking **Match Element** in its context menu. In this case hypothesis quality for previous elements won't affect matching results.
## Extracting the patient's data
Extract the missing patient data by creating several search elements.
Group elements that relate to one entity. Search elements are matched one after another — if a top element fails, hypothesis quality drops for the rest of its chain. Groups, however, are processed independently with their own hypothesis, so grouping gives you control over how elements influence each other and lets you evaluate matching results at a glance. Grouping can also reduce matching time.
1. Click **Create Element** and select the **Group** element from the drop-down list. Change its name to "PatientDataArea".
2. In the **Under what conditions** section, change the **Element is** value to **Optional**.
A new group search element is set to be required by default. If a required element is not found, the Activity Editor runs into an error and matching is aborted. This scenario lets activities be skipped if they are not suitable for a certain document. However, in this tutorial we are creating an activity to extract data from all incoming documents, so we want the group to be optional.
In German documents, the paragraph containing the patient's name and address is always located in the field with the label "Name, Vorname ...". We need to find this text on the document and use it as a reference to search for the data we want to extract.
1. Click **Create Element** and select the **Static Text** element from the drop-down list. Change its name to "kwPatientTitle".
2. Enter the text "Name, Vorname" in the **Text to find** field on the **Properties** pane.
3. Click **Match**. When processing is finished, you will see the **Tree of Hypotheses** below the document. Make sure that Advanced Designer has successfully found the desired static text — a green dot next to the element name indicates a successful match. Click the element name in the **Tree of Hypotheses** to see a violet frame around the corresponding region on the document.
If an element wasn't found, you will see an orange dot next to its name and an orange frame around the document image. Keep in mind that the hypothesis quality of an element affects the state of subsequent elements in the chain and the overall quality of a chain. You can find detailed information about hypothesis quality in the documentation.
Find the lower boundary of the cell that contains the patient's name and address using a **Separator** element.
1. Add a **Separator** element to the group and call it "SeparatorBottom". Set its minimum length to 200.
2. Right-click the element and select **Match Element** in the context menu. The **Tree of Hypotheses** contains many green dots — they correspond to different separators that fit the search criteria. Click each dot to see the corresponding object on the image.
3. To narrow down the search criteria, specify the search area for the separator. Click **Match** to find the "kwPatientTitle" element that will be used as an anchor element. In the **Where to search** section of the **Properties** pane, click **Draw on Image**. Select the "kwPatientTitle" element on the document and click the down arrow icon to specify the search area below the keyword and the nearest icon to look for the separator nearest to the keyword.
4. Click **Match** and check that Advanced Designer has found the separator below the "kwPatientTitle" element.
A label and a separator are reliable reference elements for the patient's data. However, if the print quality is too low, the label text might not be recognized or the separator might not be found. To ensure good extraction results, search for a paragraph that lies between the label and the separator — a paragraph is a uniform block of text and can successfully be found even if some of the boundary elements were not found.
1. Create a **Paragraph** search element and call it "NameAddressParagraph".
2. Change **Text alignment** to **Left**.
3. The patient's data occupies from two to five lines, so specify the **Line count** from 2 to 5.
4. Specify the search area for the paragraph using the **Add** menu in the **Where to search** section. The element should be located below the "kwPatientTitle" element and above the "SeparatorBottom" element.
5. Click **Match**.
Create a new group element called "PatientGroup" to hold the search elements that extract the patient's data.
The patient's name can occupy one or two lines. To capture several instances of an element, use a repeating group.
1. Create a **Repeating Group** search element and call it "NameGroup". Specify 2 as the maximum number of repetitions. Make the element optional.
2. To restrict the search area to the lines that are part of the "NameAddressParagraph" paragraph, click the code editor icon below the document image and paste the following script in the **Search Conditions** section of the **Code Editor**:
```text theme={null}
RSA:PatientDataArea.NameAddressParagraph.Rect;
```
3. Inside the repeating group, create a **Character String** element designed to capture a line of characters. Call it "NameLine".
4. The text we are looking for may contain upper- and lower-case letters and a set of punctuation marks. Configure two separate character sets:
* The first set contains all Latin upper- and lower-case letters. To add characters with diacritical marks, change the Unicode subrange or paste the characters directly into the **Selected characters** field.
* The second set contains the punctuation marks: ,-.()'. To prevent the string from containing only punctuation marks, set the **Portion in text, %** for the second set to 40%.
5. Disable the **Search for parts of words** option.
6. Specify the search area for the "NameLine" element: below the "kwPatientTitle" element and nearest to it.
7. Click **Match** and review the **Tree of Hypotheses**. Two character strings are found, but the second string contains the patient's address.
8. To exclude the address from the search results, add a script search condition. Select the "NameLine" search element and open the **Search Conditions** code editor. Paste the following script — it assumes that the first line contains a full name if it contains a comma and a whitespace, and if a full name is found, the repeating group stops searching for a second instance:
```text theme={null}
if (NameGroup.HasInstances and LastFound.NameLine.Value.Find(", ") > 0) then DontFind;
```
9. Click **Match** and make sure that the name is found correctly.
The default settings allow the string to contain up to 30% of characters not included in any set. This helps find strings even when some characters are recognized incorrectly or are not included in the set (such as characters with diacritical marks). You can adjust this setting by changing the **Allowed errors** value on the **Properties** pane.
You can't map a field to an element that has repeating instances, so create an auxiliary **Region** element that contains all regions of the "NameGroup" instances.
1. Create a **Region** search element in the "PatientGroup" group and rename it to "NameRegion".
2. Open the **Code Editor** and paste the following script in the **Search Conditions** section:
```text theme={null}
RSA: NameGroup.AllInstances.NameLine.Rects;
```
We have found the patient's name, and the rest of the "NameAddressParagraph" paragraph is the address. To specify the region containing the address, exclude the "NameGroup" rectangles from the "NameAddressParagraph" region.
Create another **Region** element in the "PatientGroup" group, rename it to "AddressRegion", and paste the following script in the **Search Conditions** section of the **Code Editor**:
```text theme={null}
RSA: PatientDataArea.NameAddressParagraph.Rects;
Exclude: NameGroup.AllInstances.NameLine.Rects;
```
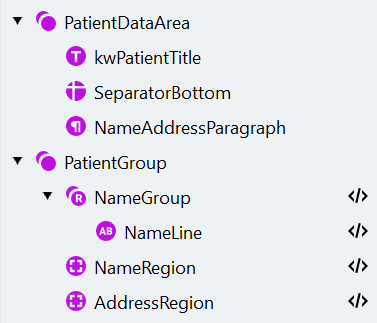
The search element structure should look like this:
 Open the **Manage Fields** dialog, create the corresponding fields, and map them to search elements as follows:
| Name | Type | Search element |
| :-------- | :-------------------------------- | :------------- |
| Full Name | Text field in the "Patient" group | NameRegion |
| Address | Text field in the "Patient" group | AddressRegion |
Delete the search elements that were automatically created for the new fields.
## Extracting the type of sick note
The type of sick note field has two checkboxes. They are labeled as "Erstbescheinigung" and "Folgebescheinigung". The task is to find the labels and then to check whether there are filled checkmarks next to them.
Create a "TypeOfSickNoteGroup" group. Inside it, create a "PrimaryGroup" group. Make both groups optional.
1. Inside the "PrimaryGroup" group, create a **Static Text** element called "kwCheckmark" (text to find: "Erstbescheinigung").
2. This element is not related to the elements we searched for previously. Instead of matching the whole element tree, match only the new element by clicking **Match Element** in the "kwCheckmark" element context menu. Make sure that the keyword has been found successfully.
3. Now find the checkmark using an **Object Collection** element, which is used to find various graphic objects such as checkmarks, barcodes, and images.
* Add an **Object Collection** element called "Checkmark".
* In the **Type** drop-down list on the **Properties** pane, deselect all options except **Checkmark**.
* Set the minimum width and height of the object to 30, and the maximum width and height of the object to 130.
* Specify the search area for the checkmark to the left of the "kwCheckmark" element.
* The checkmark should be located roughly on the same line as the keyword. Specify where the top and bottom borders of the element should be located with respect to the keyword by pasting the following code to the **Search Conditions** section of the **Code Editor**:
```text theme={null}
RSA: TopBound > kwCheckmark.Top - 50dot;
RSA: BottomBound < kwCheckmark.Bottom + 50dot;
```
* Click **Match**.
1. Copy the "PrimaryGroup" group and rename the copy to "SecondaryGroup".
2. When copying a group, you also copy all its elements with their properties. Select the "kwCheckmark" element in the "SecondaryGroup" group and change the text to find to "Folgebescheinigung".
3. The **Object Collection** search element finds a collection of all suitable objects within the search area. If the checkmarks are located on the same line, the "Checkmark" element of the "SecondaryGroup" may also find the Primary checkmark. To avoid this, exclude the primary checkmark ("Checkmark" element of the "PrimaryGroup") from the search area for the "Checkmark" element from the "SecondaryGroup".
4. Click **Match**.
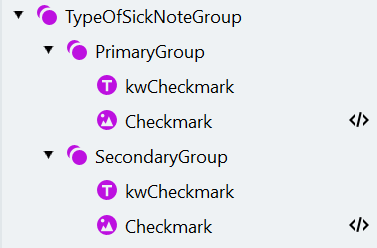
The search element structure should look like this:
Open the **Manage Fields** dialog, create the corresponding fields, and map them to search elements as follows:
| Name | Type | Search element |
| :-------- | :-------------------------------- | :------------- |
| Full Name | Text field in the "Patient" group | NameRegion |
| Address | Text field in the "Patient" group | AddressRegion |
Delete the search elements that were automatically created for the new fields.
## Extracting the type of sick note
The type of sick note field has two checkboxes. They are labeled as "Erstbescheinigung" and "Folgebescheinigung". The task is to find the labels and then to check whether there are filled checkmarks next to them.
Create a "TypeOfSickNoteGroup" group. Inside it, create a "PrimaryGroup" group. Make both groups optional.
1. Inside the "PrimaryGroup" group, create a **Static Text** element called "kwCheckmark" (text to find: "Erstbescheinigung").
2. This element is not related to the elements we searched for previously. Instead of matching the whole element tree, match only the new element by clicking **Match Element** in the "kwCheckmark" element context menu. Make sure that the keyword has been found successfully.
3. Now find the checkmark using an **Object Collection** element, which is used to find various graphic objects such as checkmarks, barcodes, and images.
* Add an **Object Collection** element called "Checkmark".
* In the **Type** drop-down list on the **Properties** pane, deselect all options except **Checkmark**.
* Set the minimum width and height of the object to 30, and the maximum width and height of the object to 130.
* Specify the search area for the checkmark to the left of the "kwCheckmark" element.
* The checkmark should be located roughly on the same line as the keyword. Specify where the top and bottom borders of the element should be located with respect to the keyword by pasting the following code to the **Search Conditions** section of the **Code Editor**:
```text theme={null}
RSA: TopBound > kwCheckmark.Top - 50dot;
RSA: BottomBound < kwCheckmark.Bottom + 50dot;
```
* Click **Match**.
1. Copy the "PrimaryGroup" group and rename the copy to "SecondaryGroup".
2. When copying a group, you also copy all its elements with their properties. Select the "kwCheckmark" element in the "SecondaryGroup" group and change the text to find to "Folgebescheinigung".
3. The **Object Collection** search element finds a collection of all suitable objects within the search area. If the checkmarks are located on the same line, the "Checkmark" element of the "SecondaryGroup" may also find the Primary checkmark. To avoid this, exclude the primary checkmark ("Checkmark" element of the "PrimaryGroup") from the search area for the "Checkmark" element from the "SecondaryGroup".
4. Click **Match**.
The search element structure should look like this:
 Open the **Manage Fields** window, create the corresponding fields, and map them to search elements as follows:
| Name | Type | Search element |
| :---------------- | :--------------------------------------------------- | :-------------------------- |
| Type of Sick Note | Checkmark group | |
| Primary | Checkmark in the "Type of Sick Note" checkmark group | PrimaryGroup -> Checkmark |
| Secondary | Checkmark in the "Type of Sick Note" checkmark group | SecondaryGroup -> Checkmark |
Delete the search elements that were automatically created for the new fields.
## Extracting the doctor's data
We now have to process the last block of data on these documents. It contains the doctor's data and signature. We'll first find the box which holds the data and then extract a paragraph with the doctor's information and an image region containing the signature.
1. Create a **Group** element called "DoctorAreaGroup" and make the element optional.
2. To find the box label, create a **Static Text** element called "kwDoctorTitle" (text to find: "Unterschrift des Arztes").
3. Inside the "DoctorAreaGroup" group, create another group called "DataArea".
The box that contains the doctor's information and signature is a combination of four separators located around the "kwDoctorTitle" element. Configure the elements so the program can find them even if "kwDoctorTitle" wasn't found.
In the "DataArea" group, create four **Separator** search elements with the following properties:
| Name | Orientation | Minimum length | Search area |
| :---------------- | :---------- | :------------- | :---------------------------------------------------------------------------------------------------------------------------------------------------------------------------------------------------------------------------------------------------------------- |
| `SeparatorRight` | Vertical | 180 | Right of "kwDoctorTitle", Nearest to the right page edge |
| `SeparatorLeft` | Vertical | 180 | Left of "kwDoctorTitle", Left of "SeparatorRight" (in case "kwDoctorTitle" wasn't found), Nearest to "SeparatorRight", Below "SeparatorRight" (click the icon to the right of the separator name and select **Top Boundary of Region**), Exclude "SeparatorRight" |
| `SeparatorBottom` | Horizontal | 200 | Below "kwDoctorTitle" (with adjustment of -10 points), Right of "SeparatorLeft", Left of "SeparatorRight", Nearest to the bottom page edge (this setting will be useful in case "kwDoctorTitle" wasn't found) |
| `SeparatorTop` | Horizontal | 200 | Above "kwDoctorTitle", Right of "SeparatorLeft", Nearest to "TypeOfSickNoteGroup", Exclude "SeparatorBottom" |
Disable the **Fits entirely within search area** option for all four elements.
Create a **Region** search element called "BoxRegion" and specify the search area: left of "SeparatorRight", right of "SeparatorLeft", above "SeparatorBottom", and below "SeparatorTop".
This region corresponds to the area bounded by the four separators — using it avoids having to specify search areas for the signature and doctor information manually.
Create a new group called "DoctorGroup" inside "DoctorAreaGroup" to hold the signature and information elements.
To locate the doctor's signature, create an **Object Collection** element inside the "DoctorGroup" with the following settings:
| Property | Value |
| :----------------------------------------------- | :------------------------------------------------------------------------------------------------------------------------------------------------------------------------------------------------------------- |
| Name | Signature |
| Type | Picture |
| Minimum width | 15 |
| Minimum height | 15 |
| Maximum width | 600 |
| Maximum height | 350 |
| **Search Conditions** section of the Code Editor | The signature may be partly located outside the box. To find the whole image, expand the search area by 100 dots in each direction: `RSA: DoctorAreaGroup.DataArea.BoxRegion.Rect.GetInflated(100dot,100dot);` |
To extract the text information in the box, create a **Paragraph** element with the following settings:
| Property | Value |
| :----------------------------------------------- | :---------------------------------------------- |
| Name | DoctorInformation |
| Maximum line count | 6 |
| Search area | Above "kwDoctorTitle", Exclude "Signature" |
| **Search Conditions** section of the Code Editor | `RSA: DoctorAreaGroup.DataArea.BoxRegion.Rect;` |
Click **Match** and make sure the elements are found correctly.
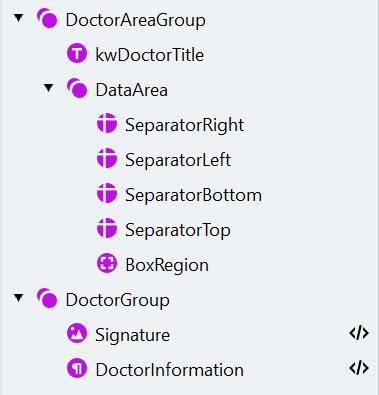
The search element structure should look like this:
Open the **Manage Fields** window, create the corresponding fields, and map them to search elements as follows:
| Name | Type | Search element |
| :---------------- | :--------------------------------------------------- | :-------------------------- |
| Type of Sick Note | Checkmark group | |
| Primary | Checkmark in the "Type of Sick Note" checkmark group | PrimaryGroup -> Checkmark |
| Secondary | Checkmark in the "Type of Sick Note" checkmark group | SecondaryGroup -> Checkmark |
Delete the search elements that were automatically created for the new fields.
## Extracting the doctor's data
We now have to process the last block of data on these documents. It contains the doctor's data and signature. We'll first find the box which holds the data and then extract a paragraph with the doctor's information and an image region containing the signature.
1. Create a **Group** element called "DoctorAreaGroup" and make the element optional.
2. To find the box label, create a **Static Text** element called "kwDoctorTitle" (text to find: "Unterschrift des Arztes").
3. Inside the "DoctorAreaGroup" group, create another group called "DataArea".
The box that contains the doctor's information and signature is a combination of four separators located around the "kwDoctorTitle" element. Configure the elements so the program can find them even if "kwDoctorTitle" wasn't found.
In the "DataArea" group, create four **Separator** search elements with the following properties:
| Name | Orientation | Minimum length | Search area |
| :---------------- | :---------- | :------------- | :---------------------------------------------------------------------------------------------------------------------------------------------------------------------------------------------------------------------------------------------------------------- |
| `SeparatorRight` | Vertical | 180 | Right of "kwDoctorTitle", Nearest to the right page edge |
| `SeparatorLeft` | Vertical | 180 | Left of "kwDoctorTitle", Left of "SeparatorRight" (in case "kwDoctorTitle" wasn't found), Nearest to "SeparatorRight", Below "SeparatorRight" (click the icon to the right of the separator name and select **Top Boundary of Region**), Exclude "SeparatorRight" |
| `SeparatorBottom` | Horizontal | 200 | Below "kwDoctorTitle" (with adjustment of -10 points), Right of "SeparatorLeft", Left of "SeparatorRight", Nearest to the bottom page edge (this setting will be useful in case "kwDoctorTitle" wasn't found) |
| `SeparatorTop` | Horizontal | 200 | Above "kwDoctorTitle", Right of "SeparatorLeft", Nearest to "TypeOfSickNoteGroup", Exclude "SeparatorBottom" |
Disable the **Fits entirely within search area** option for all four elements.
Create a **Region** search element called "BoxRegion" and specify the search area: left of "SeparatorRight", right of "SeparatorLeft", above "SeparatorBottom", and below "SeparatorTop".
This region corresponds to the area bounded by the four separators — using it avoids having to specify search areas for the signature and doctor information manually.
Create a new group called "DoctorGroup" inside "DoctorAreaGroup" to hold the signature and information elements.
To locate the doctor's signature, create an **Object Collection** element inside the "DoctorGroup" with the following settings:
| Property | Value |
| :----------------------------------------------- | :------------------------------------------------------------------------------------------------------------------------------------------------------------------------------------------------------------- |
| Name | Signature |
| Type | Picture |
| Minimum width | 15 |
| Minimum height | 15 |
| Maximum width | 600 |
| Maximum height | 350 |
| **Search Conditions** section of the Code Editor | The signature may be partly located outside the box. To find the whole image, expand the search area by 100 dots in each direction: `RSA: DoctorAreaGroup.DataArea.BoxRegion.Rect.GetInflated(100dot,100dot);` |
To extract the text information in the box, create a **Paragraph** element with the following settings:
| Property | Value |
| :----------------------------------------------- | :---------------------------------------------- |
| Name | DoctorInformation |
| Maximum line count | 6 |
| Search area | Above "kwDoctorTitle", Exclude "Signature" |
| **Search Conditions** section of the Code Editor | `RSA: DoctorAreaGroup.DataArea.BoxRegion.Rect;` |
Click **Match** and make sure the elements are found correctly.
The search element structure should look like this:
 Open the **Manage Fields** dialog, create the corresponding fields, and map them to search elements as follows:
| Name | Type | Search element |
| :----------------- | :-------------------------------- | :---------------- |
| Doctor Information | Text field in the "Doctor" group | DoctorInformation |
| Signature | Image field in the "Doctor" group | Signature |
Delete the search elements that were automatically created for the new fields.
## Testing the activity
We have configured all the necessary search elements and fields. Select all documents, click **Match**, and switch to the **Fields** tab to review the field regions on the document images. Keep in mind that a region will be passed to a field only if it belongs to the hypothesis from the best path.
Once you're satisfied with the results, click the copy icon above the document image to copy predicted labeling to reference labeling.
## What's next
Configure the Extraction Rules activity for Dutch and Belgian sick notes.
Back to the tutorial introduction.
Open the **Manage Fields** dialog, create the corresponding fields, and map them to search elements as follows:
| Name | Type | Search element |
| :----------------- | :-------------------------------- | :---------------- |
| Doctor Information | Text field in the "Doctor" group | DoctorInformation |
| Signature | Image field in the "Doctor" group | Signature |
Delete the search elements that were automatically created for the new fields.
## Testing the activity
We have configured all the necessary search elements and fields. Select all documents, click **Match**, and switch to the **Fields** tab to review the field regions on the document images. Keep in mind that a region will be passed to a field only if it belongs to the hypothesis from the best path.
Once you're satisfied with the results, click the copy icon above the document image to copy predicted labeling to reference labeling.
## What's next
Configure the Extraction Rules activity for Dutch and Belgian sick notes.
Back to the tutorial introduction.