> ## Documentation Index
> Fetch the complete documentation index at: https://docs.abbyy.com/llms.txt
> Use this file to discover all available pages before exploring further.
# Edit data form layout
> Rearrange, resize, and indent fields in the data form to customize how a Document skill's output is presented.
You can change the data form appearance by dragging fields, changing the set of fields in groups, or resizing fields.
## Enable layout editing
Click **Edit layout of fields** in the toolbar to enable the layout-editing tools.
While layout-editing tools are enabled, some features — including creating business rules and training the skill — are unavailable. Click **Edit layout of fields** in the toolbar to disable the tools.
## Rearrange fields
Drag fields in the data form to:
* Reorder them.
* Place them side by side in a row.
* Add an existing field to a non-repeating group.
* Move a field from one non-repeating group to another, or to the root of the data form.
* Reorder checkmarks in a Checkmark group.
Fields are arranged in a grid. When you drag a field, the insertion point is highlighted in blue.
You cannot add fields to a group or move a field out of a group in these cases:
* The group is repeating.
* The group or field was created in Advanced Designer.
* You're editing a copy of a built-in skill, and the group or field was inherited from the built-in skill.
You can still **reorder** the fields in all of these cases.
All instances of a repeating group share the same field order and layout.
## Resize fields
### Minimum and maximum width
**Text** and **Barcode** fields display at their minimum width in the data form and expand to fit the extracted value. Set a **maximum width** to prevent a field from expanding too far — if the value doesn't fit, a horizontal scrollbar appears so users can scan it.
You can set minimum and maximum widths for **Text**, **Barcode**, and **Image** fields from the **Actions** pane. To adjust only the minimum width, drag the right border of the field in the data form.
### Indentation
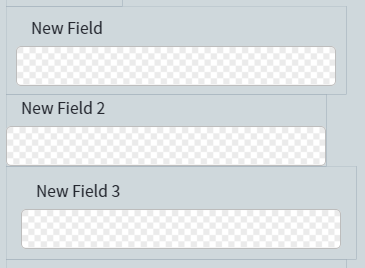
Indentation defines the width of the margins around a field. In the screenshot below, indentation is set to **Normal** for "New Field", **None** for "New Field 2", and **Large** for "New Field 3".
 To configure indentation:
Click the field in the data form.
In the **Actions** pane, open the **Indentation** dropdown.
Select a predefined value, or choose **Custom** to set each margin manually.
## Related topics
* [Add fields](/vantage/documentation/skill-designer/document/adding-fields/adding-fields)
* [Label documents in Skill Designer](/vantage/documentation/skill-designer/document/labeling-documents)
To configure indentation:
Click the field in the data form.
In the **Actions** pane, open the **Indentation** dropdown.
Select a predefined value, or choose **Custom** to set each margin manually.
## Related topics
* [Add fields](/vantage/documentation/skill-designer/document/adding-fields/adding-fields)
* [Label documents in Skill Designer](/vantage/documentation/skill-designer/document/labeling-documents)