> ## Documentation Index
> Fetch the complete documentation index at: https://docs.abbyy.com/llms.txt
> Use this file to discover all available pages before exploring further.
# Managing Tenants and Users
> Create, manage, and delete tenants and users in ABBYY Vantage Private Cloud, including system administrator scope, tenant scope, and subscription assignment.
ABBYY Vantage is a multitenant system that operates using two scopes:
* **System Administrator's Scope**. Covers system administration. Users have the System Administrator role and can manage tenants and users.
* **Tenant's Scope**. Covers tenant-specific operations.
System Administrators can:
* View, create, and delete tenants, and manage tenant subscriptions
* View, create, and delete users
To ensure different clients are logically isolated, users with permissions for one scope cannot access the other. Similarly, tenants cannot access data from other tenants.
## Creating a Tenant
1. Navigate to the **Tenants** tab in the left-hand pane.
2. Click **New Tenant**.
3. In the dialog, specify:
* Tenant name
* Description
* Email address of the tenant administrator
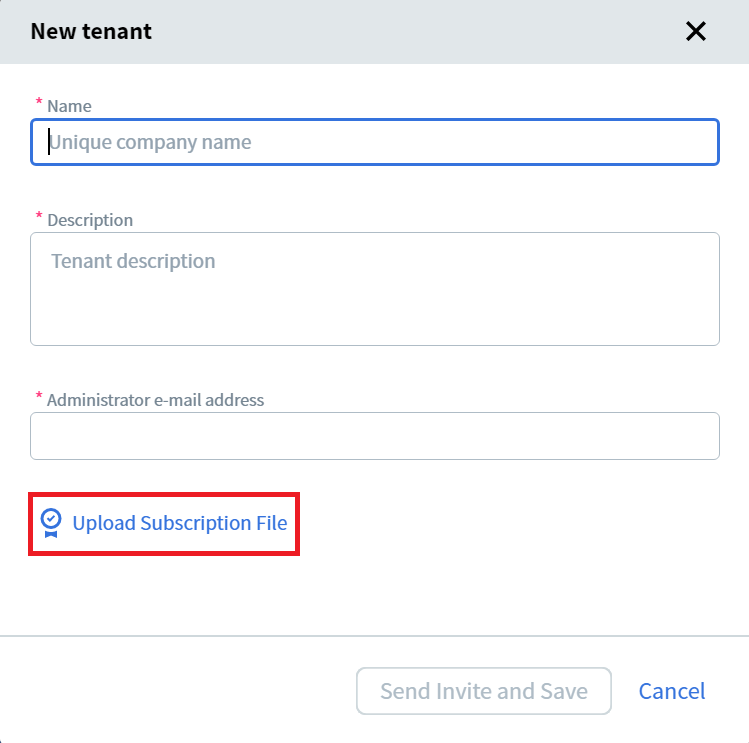 4. Click **Upload Subscription File** to upload the subscription provided to you. For more information about subscriptions, see [Subscriptions](/vantage/private-cloud/subscriptions).
Once completed, a new tenant is created and an invite with a registration link is sent to the specified email address.
A list of all tenants created in the system can be viewed on the **Tenants** tab. Tenants with invites that have not yet been accepted by the tenant administrator are denoted with an icon in front of their names. Hovering the mouse cursor over the icon displays the date when the invite was sent.
Invites remain valid for 14 days. If the user doesn't register within this period, the tenant will be deleted from the system.
### Resending an Invitation
1. Select the desired tenant in the tenant list.
2. Click **Resend Invite**.
3. Modify the email address if required, and click **Send**.
### Creating a Tenant via REST API
A System Administrator can assign the **Fulfillment Operator** role to a Tenant Administrator. A Tenant Administrator with the Fulfillment Operator role can add other tenants to the system via REST API requests and assign this role to other tenant users.
To assign the Fulfillment Operator role:
1. Navigate to the **Tenants** tab and click on the required tenant.
2. Navigate to the **General** tab and click **Allow Tenant Users to Create New Tenants**.
Once this role has been assigned to a tenant, it cannot be unassigned.
A Tenant Administrator that has been assigned this role will be able to create tenants via REST API requests, as well as assign this role to other users in the tenant.
## Deleting a Tenant
1. Select the desired tenant in the tenant list.
2. Click **Delete** and confirm the deletion.
The tenant will be removed from the list and access to its data will be blocked. According to ABBYY retention policy, tenants are permanently deleted 30 days after removal from the list. Before that period has elapsed, it is not possible to create a new tenant with the same name.
## Creating a User
1. Navigate to the **Users** tab in the left-hand pane.
2. Click **New User**.
3. Specify the email address and password for the user.
4. Confirm the password.
Once completed, a new user will be created in the system. You can click on the user and add a name for them. A list of all users created in the system can be viewed on the **Users** tab.
When you add a new user in the System Administrator's Scope, they automatically get the System Administrator role.
## Deleting a User
1. Select the desired user in the user list.
2. Click **Delete** and confirm the deletion.
Once completed, the user will be removed from the list and access to their data will be blocked.
## Resetting Password
If you cannot log in using your System Administrator credentials:
Ensure kubectl is installed and you're connected to the Kubernetes cluster before proceeding.
1. Access the system administrator's API:
```bash theme={null}
kubectl port-forward -n abbyy-vantage service/abbyy-vantage-au2-auth-adminapi2 8080:80
```
Then navigate to `http://localhost:8080/index.html`
2. Navigate to the **Users** section.
3. Find your user details with a GET request:
```
GET http://localhost:8080/api/v1/users
```
Use `email` or `name` parameters. The response will contain the user identifier.
4. Reset the password with a PUT request:
```
PUT http://localhost:8080/api/v1/users/{id}/password
```
With the request body:
```json theme={null}
{
"password": "newpassword"
}
```
## IP Restrictions
If the Tenant Administrator configures IP restrictions incorrectly and cannot access the tenant, the System Administrator can disable them:
1. On the **Tenants** tab, click the tenant name.
2. Navigate to the **IP Restrictions** tab.
3. Click **Disable**.
4. Click **Upload Subscription File** to upload the subscription provided to you. For more information about subscriptions, see [Subscriptions](/vantage/private-cloud/subscriptions).
Once completed, a new tenant is created and an invite with a registration link is sent to the specified email address.
A list of all tenants created in the system can be viewed on the **Tenants** tab. Tenants with invites that have not yet been accepted by the tenant administrator are denoted with an icon in front of their names. Hovering the mouse cursor over the icon displays the date when the invite was sent.
Invites remain valid for 14 days. If the user doesn't register within this period, the tenant will be deleted from the system.
### Resending an Invitation
1. Select the desired tenant in the tenant list.
2. Click **Resend Invite**.
3. Modify the email address if required, and click **Send**.
### Creating a Tenant via REST API
A System Administrator can assign the **Fulfillment Operator** role to a Tenant Administrator. A Tenant Administrator with the Fulfillment Operator role can add other tenants to the system via REST API requests and assign this role to other tenant users.
To assign the Fulfillment Operator role:
1. Navigate to the **Tenants** tab and click on the required tenant.
2. Navigate to the **General** tab and click **Allow Tenant Users to Create New Tenants**.
Once this role has been assigned to a tenant, it cannot be unassigned.
A Tenant Administrator that has been assigned this role will be able to create tenants via REST API requests, as well as assign this role to other users in the tenant.
## Deleting a Tenant
1. Select the desired tenant in the tenant list.
2. Click **Delete** and confirm the deletion.
The tenant will be removed from the list and access to its data will be blocked. According to ABBYY retention policy, tenants are permanently deleted 30 days after removal from the list. Before that period has elapsed, it is not possible to create a new tenant with the same name.
## Creating a User
1. Navigate to the **Users** tab in the left-hand pane.
2. Click **New User**.
3. Specify the email address and password for the user.
4. Confirm the password.
Once completed, a new user will be created in the system. You can click on the user and add a name for them. A list of all users created in the system can be viewed on the **Users** tab.
When you add a new user in the System Administrator's Scope, they automatically get the System Administrator role.
## Deleting a User
1. Select the desired user in the user list.
2. Click **Delete** and confirm the deletion.
Once completed, the user will be removed from the list and access to their data will be blocked.
## Resetting Password
If you cannot log in using your System Administrator credentials:
Ensure kubectl is installed and you're connected to the Kubernetes cluster before proceeding.
1. Access the system administrator's API:
```bash theme={null}
kubectl port-forward -n abbyy-vantage service/abbyy-vantage-au2-auth-adminapi2 8080:80
```
Then navigate to `http://localhost:8080/index.html`
2. Navigate to the **Users** section.
3. Find your user details with a GET request:
```
GET http://localhost:8080/api/v1/users
```
Use `email` or `name` parameters. The response will contain the user identifier.
4. Reset the password with a PUT request:
```
PUT http://localhost:8080/api/v1/users/{id}/password
```
With the request body:
```json theme={null}
{
"password": "newpassword"
}
```
## IP Restrictions
If the Tenant Administrator configures IP restrictions incorrectly and cannot access the tenant, the System Administrator can disable them:
1. On the **Tenants** tab, click the tenant name.
2. Navigate to the **IP Restrictions** tab.
3. Click **Disable**.