> ## Documentation Index
> Fetch the complete documentation index at: https://docs.abbyy.com/llms.txt
> Use this file to discover all available pages before exploring further.
# OAuth 2.0 for IMAP
> Set up OAuth 2.0 for IMAP email import in ABBYY Vantage Private Cloud by registering applications with Google Cloud and Azure and storing credentials in Consul.
By default, users setting up document import from an email service using an Input activity in a Process skill only have access to basic IMAP server authentication. To enable Google and Microsoft email services authentication via the OAuth 2.0 protocol, you need to:
1. Register applications on the Google Cloud Platform and/or the Azure portal.
2. Generate account credentials for these applications (Client ID and Client secret).
3. Pass the generated credentials to Consul.
These steps can be done both before and after installing Vantage.
## Registering the Application in Google
Creating an application requires a Google account.
### Creating a Project on the Google Cloud Platform
1. Navigate to the Google Cloud Platform New Project page.
2. Specify a name for your project and click **Create**.
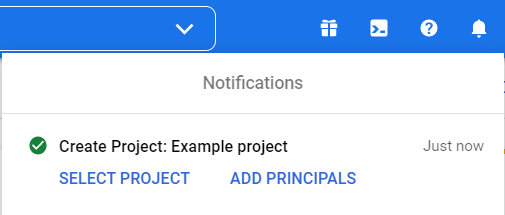
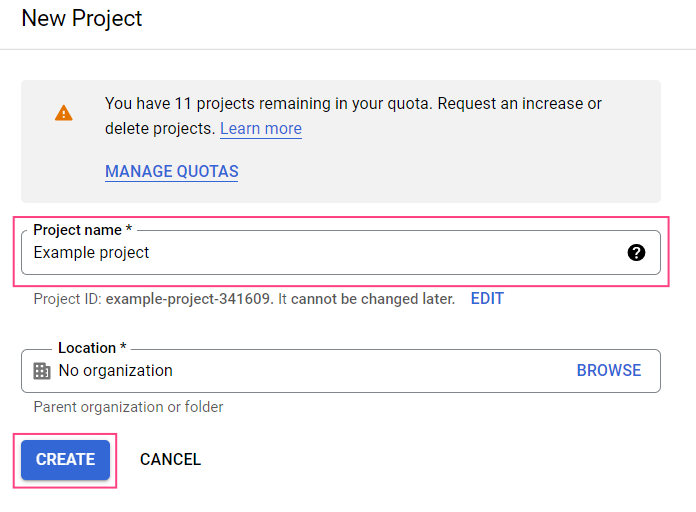 3. Wait for a notification saying that your project has been created.
 ### Setting Up the Application
1. Navigate to the Google Cloud Console and select the appropriate project.
### Setting Up the Application
1. Navigate to the Google Cloud Console and select the appropriate project.
 2. In the menu on the left side of the screen, select **APIs & Services > OAuth consent screen**.
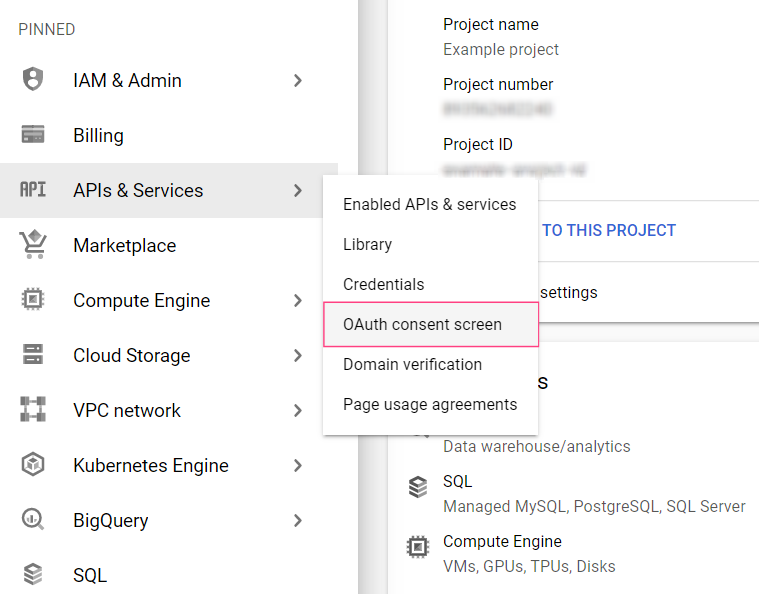 3. Select the **External** user type and click **Create**.
4. Specify a name for your application. In the **User support email** drop-down list field, select your Gmail address.
3. Select the **External** user type and click **Create**.
4. Specify a name for your application. In the **User support email** drop-down list field, select your Gmail address.
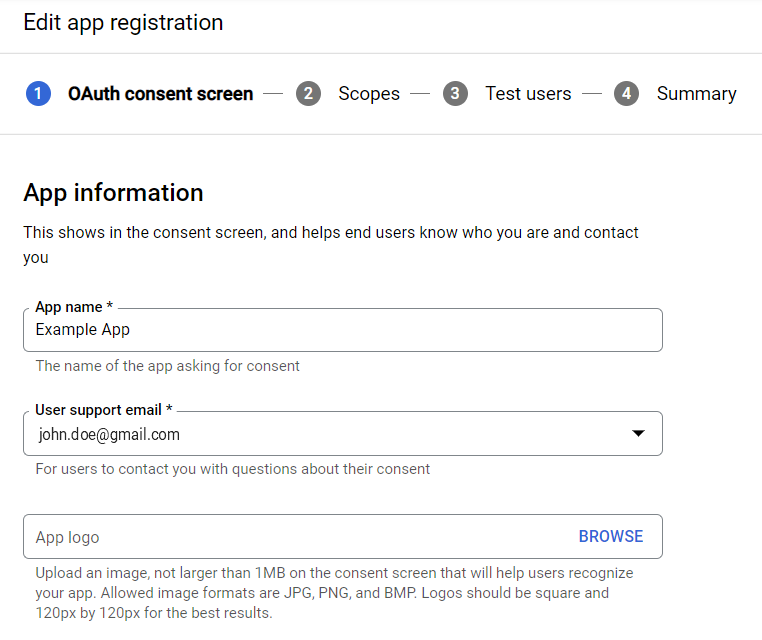 5. Specify the developer's email in the **Developer contact information** section at the bottom of the page and click **Save and continue**.
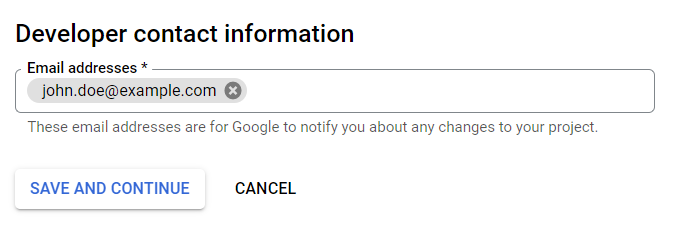 6. Click **Add or remove scopes**. This will open the **Update selected scopes** dialog on the right.
7. Copy and paste the following text into the **Manually add scopes** field in the bottom part of the dialog and click **Add to table**:
```
openid https://www.googleapis.com/auth2/userinfo.email https://www.googleapis.com/auth2/userinfo.profile https://mail.google.com/
```
You can also select scopes manually. The following scopes need to be selected:
* `openid`
* `https://mail.google.com/`
* `../auth2/userinfo.email`
* `../auth2/userinfo.profile`
8. Click **Update**. This will close the **Update selected scopes** dialog and display the selected scopes.
6. Click **Add or remove scopes**. This will open the **Update selected scopes** dialog on the right.
7. Copy and paste the following text into the **Manually add scopes** field in the bottom part of the dialog and click **Add to table**:
```
openid https://www.googleapis.com/auth2/userinfo.email https://www.googleapis.com/auth2/userinfo.profile https://mail.google.com/
```
You can also select scopes manually. The following scopes need to be selected:
* `openid`
* `https://mail.google.com/`
* `../auth2/userinfo.email`
* `../auth2/userinfo.profile`
8. Click **Update**. This will close the **Update selected scopes** dialog and display the selected scopes.
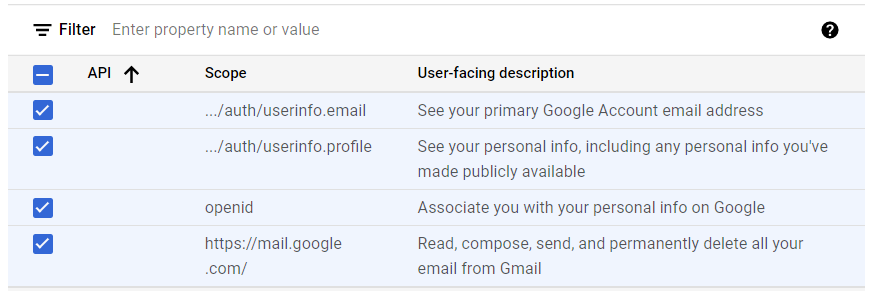 9. Click **Save and continue** at the bottom of the screen.
10. Click **Save and continue** to skip the **Test users** page settings and navigate to the **Summary** page.
On the Summary page, you'll see information about the application, email addresses, and permissions that have been set up.
### Creating Account Credentials
1. Select **Credentials** in the menu on the left side of the screen.
2. Click **+ Create credentials** and select **OAuth client ID**.
9. Click **Save and continue** at the bottom of the screen.
10. Click **Save and continue** to skip the **Test users** page settings and navigate to the **Summary** page.
On the Summary page, you'll see information about the application, email addresses, and permissions that have been set up.
### Creating Account Credentials
1. Select **Credentials** in the menu on the left side of the screen.
2. Click **+ Create credentials** and select **OAuth client ID**.
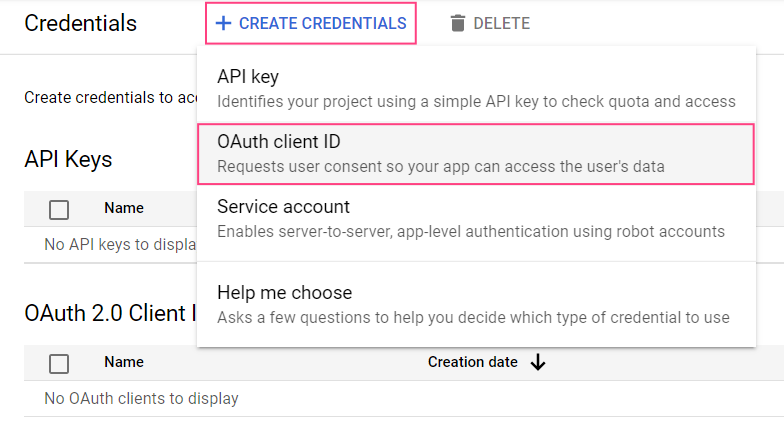 3. Select the **Web application** type.
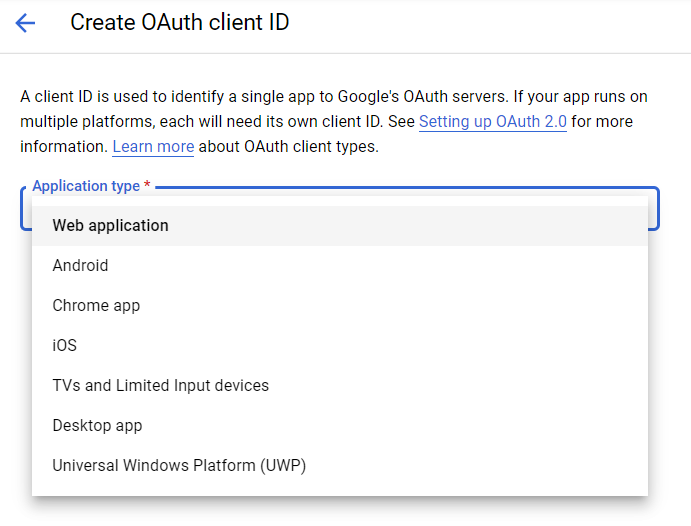 4. In the **Authorized redirect URIs** section, select **+ Add URI**.
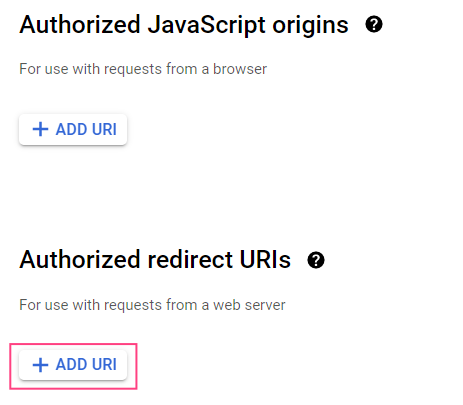 5. In the field that will appear, specify the redirect URI:
```
https:///connectors-tokens-callback.html
```
5. In the field that will appear, specify the redirect URI:
```
https:///connectors-tokens-callback.html
```
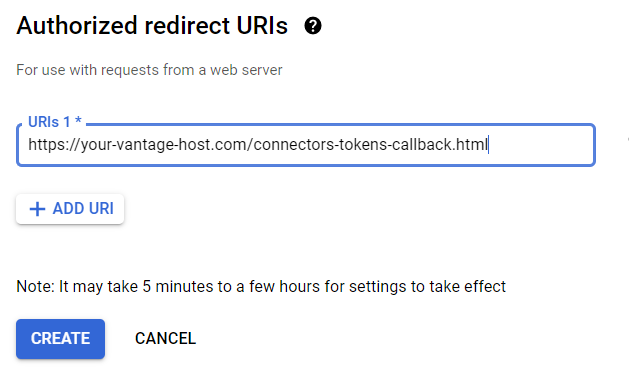 6. Click **Create**.
The pop-up dialog box that will appear will contain the **Client ID** and **Client secret** values.
6. Click **Create**.
The pop-up dialog box that will appear will contain the **Client ID** and **Client secret** values.
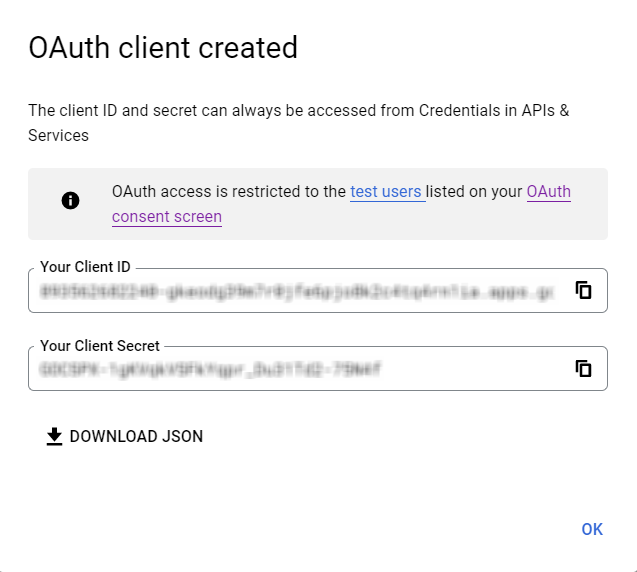 This data is required for setting up the tokenmanagement service in Vantage. You can save it immediately or copy it later by navigating to **APIs & Services > Credentials** and selecting the OAuth 2.0 client identifier you created.
### Publishing and Verification
The publishing status of the application is displayed in the **APIs & Services > OAuth consent screen** section.
This data is required for setting up the tokenmanagement service in Vantage. You can save it immediately or copy it later by navigating to **APIs & Services > Credentials** and selecting the OAuth 2.0 client identifier you created.
### Publishing and Verification
The publishing status of the application is displayed in the **APIs & Services > OAuth consent screen** section.
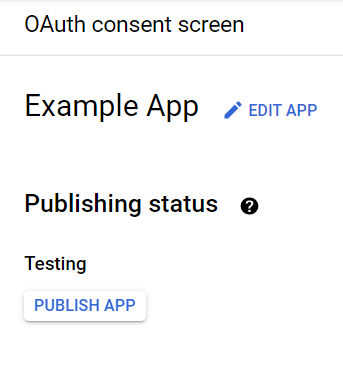 Applications with the **Testing** status are only available to users that have been added to the testers list. Only publishing an application makes it available to any user with a Google account.
Click **Publish app**. The `https://mail.google.com/` scope allows the application to access confidential user data, which is why a message saying that the application needs to be verified will be displayed.
To verify the application, you will need to provide:
* An official link to the application's Privacy policy
* A YouTube video demonstrating the stated purpose of obtaining Google user data using the application
* A text addressed to Google that contains a description of why you require access to confidential user data
* A full list of all your domains verified in the Google Search Console
Click **Confirm**. The status of your application will change to **In Production**.
The **Prepare for verification** button will also appear, letting you provide all required verification data.
Applications with the **Testing** status are only available to users that have been added to the testers list. Only publishing an application makes it available to any user with a Google account.
Click **Publish app**. The `https://mail.google.com/` scope allows the application to access confidential user data, which is why a message saying that the application needs to be verified will be displayed.
To verify the application, you will need to provide:
* An official link to the application's Privacy policy
* A YouTube video demonstrating the stated purpose of obtaining Google user data using the application
* A text addressed to Google that contains a description of why you require access to confidential user data
* A full list of all your domains verified in the Google Search Console
Click **Confirm**. The status of your application will change to **In Production**.
The **Prepare for verification** button will also appear, letting you provide all required verification data.
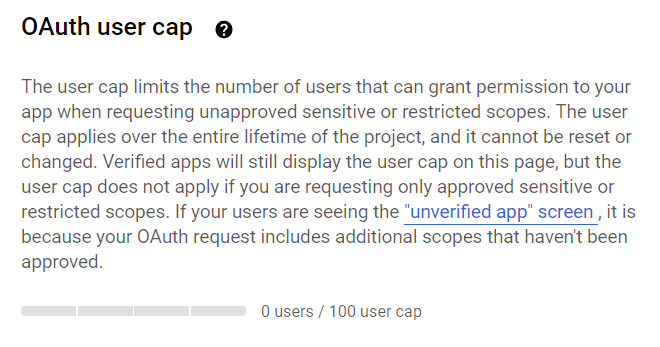
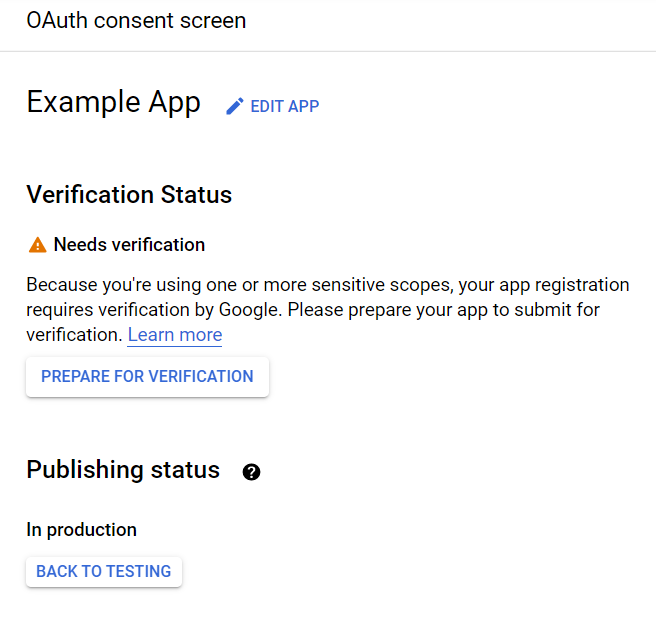 Before your application is verified, only 100 users will be able to use it. The user counter is located in the bottom part of the OAuth consent screen section and cannot be reset during the project's lifetime.
 ## Registering the Application in Microsoft Azure
To create an application, an Azure Active Directory tenant with application registration and editing permissions is required.
You can switch to the correct directory on the **Portal settings | Directories + subscriptions** page.
### Registering the Application
1. Navigate to the **App registrations** page.
2. Click **New registration**.
3. Specify a name for your application and select the supported account types.
## Registering the Application in Microsoft Azure
To create an application, an Azure Active Directory tenant with application registration and editing permissions is required.
You can switch to the correct directory on the **Portal settings | Directories + subscriptions** page.
### Registering the Application
1. Navigate to the **App registrations** page.
2. Click **New registration**.
3. Specify a name for your application and select the supported account types.
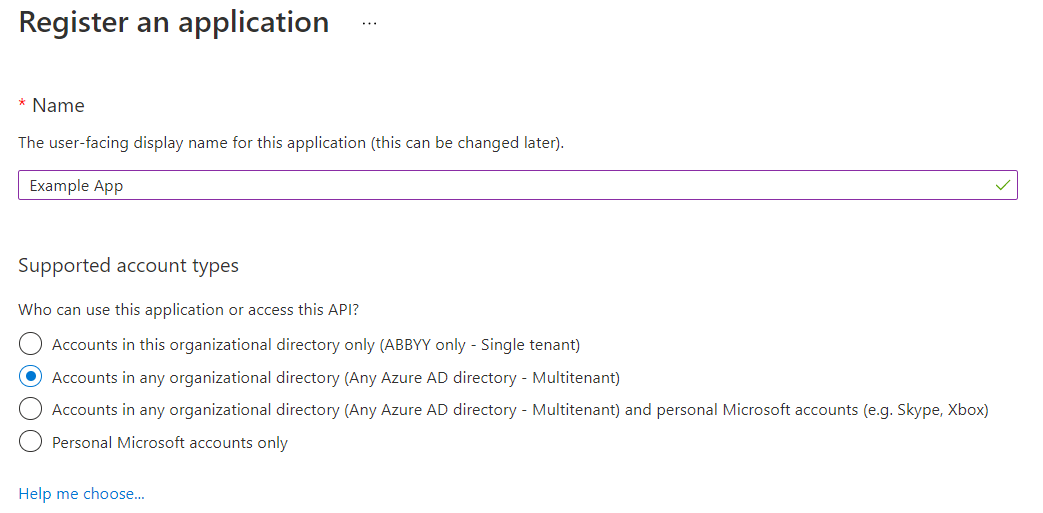 If the **Multitenant** type is selected for the application, it will be available for users in any Azure AD tenant. Such applications need to be verified, which is only available for Microsoft Partner Network participants. If you are not a participant, select **Single tenant**, which will only make your app available to users in your own Azure AD tenant.
4. In the **Redirect URI** section, select the **Web** platform and specify the redirect URI:
```
https:///connectors-tokens-callback.html
```
If the **Multitenant** type is selected for the application, it will be available for users in any Azure AD tenant. Such applications need to be verified, which is only available for Microsoft Partner Network participants. If you are not a participant, select **Single tenant**, which will only make your app available to users in your own Azure AD tenant.
4. In the **Redirect URI** section, select the **Web** platform and specify the redirect URI:
```
https:///connectors-tokens-callback.html
```
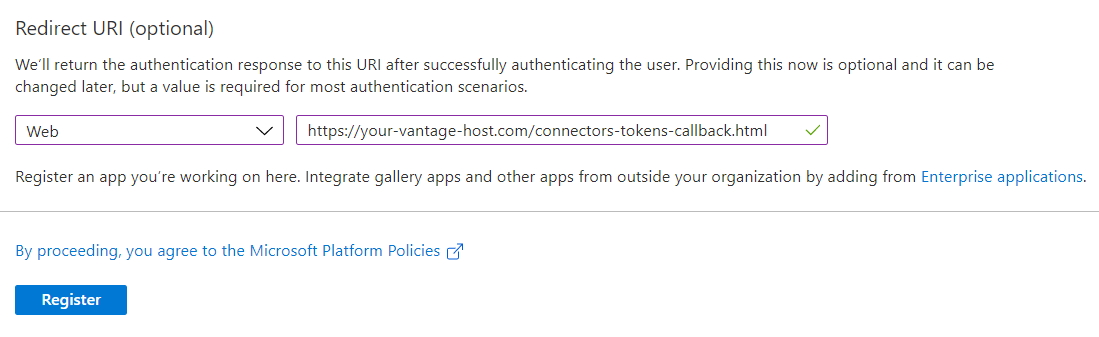 5. Click **Register**.
### Setting Up Application Permissions
1. Navigate to the **API permissions** tab.
5. Click **Register**.
### Setting Up Application Permissions
1. Navigate to the **API permissions** tab.
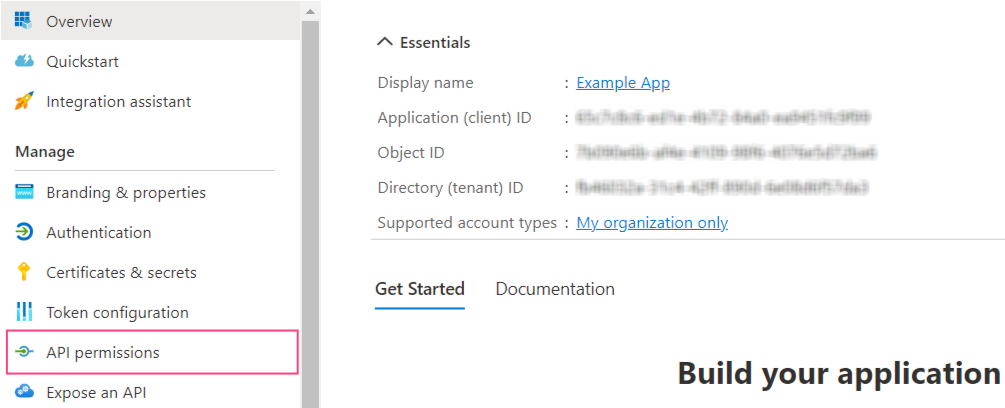 2. Click **Add permission**.
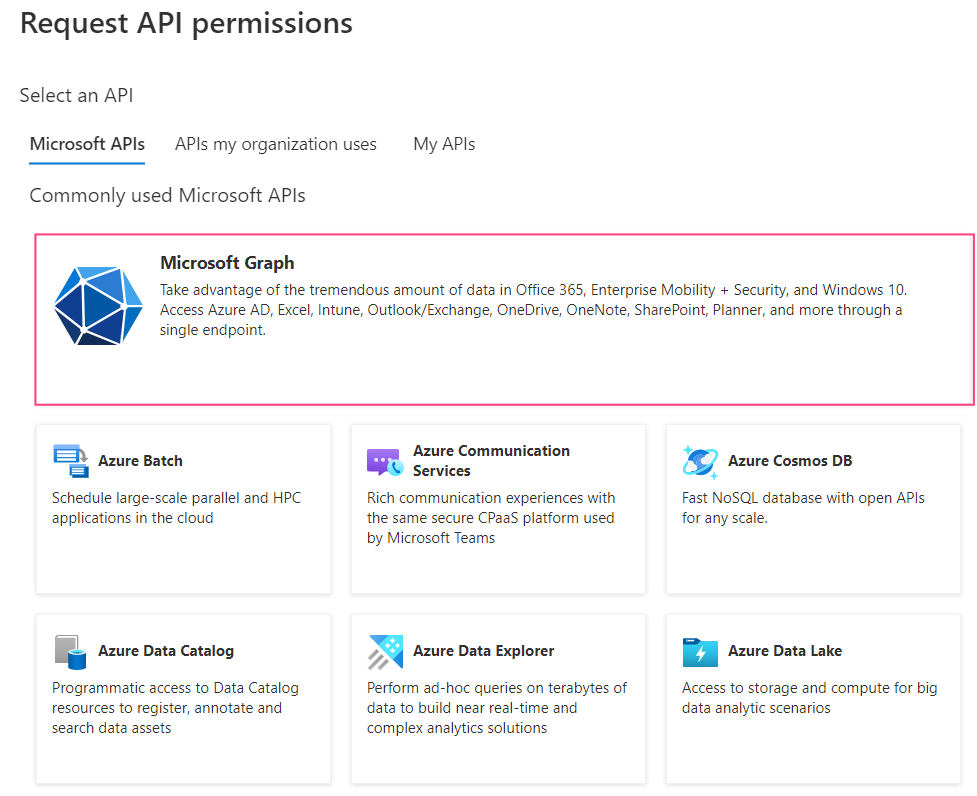
3. In the dialog that will open, select the **Microsoft Graph** section.
2. Click **Add permission**.
3. In the dialog that will open, select the **Microsoft Graph** section.
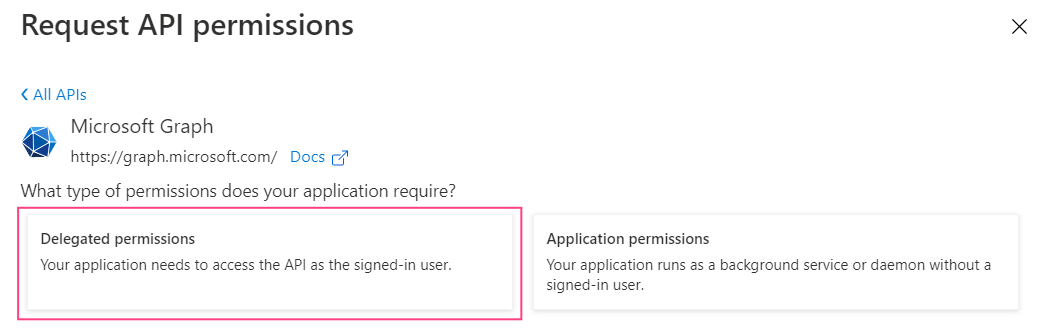
 4. Select **Delegated permissions**.
 5. Add the following permissions:
* `email`
* `IMAP.AccessAsUser.All`
* `offline_access`
* `openid`
* `profile`
6. Click **Add permissions**. This will close the dialog and display the selected permissions.
### Creating Client Secrets
1. Navigate to the **Authentication** tab.
5. Add the following permissions:
* `email`
* `IMAP.AccessAsUser.All`
* `offline_access`
* `openid`
* `profile`
6. Click **Add permissions**. This will close the dialog and display the selected permissions.
### Creating Client Secrets
1. Navigate to the **Authentication** tab.
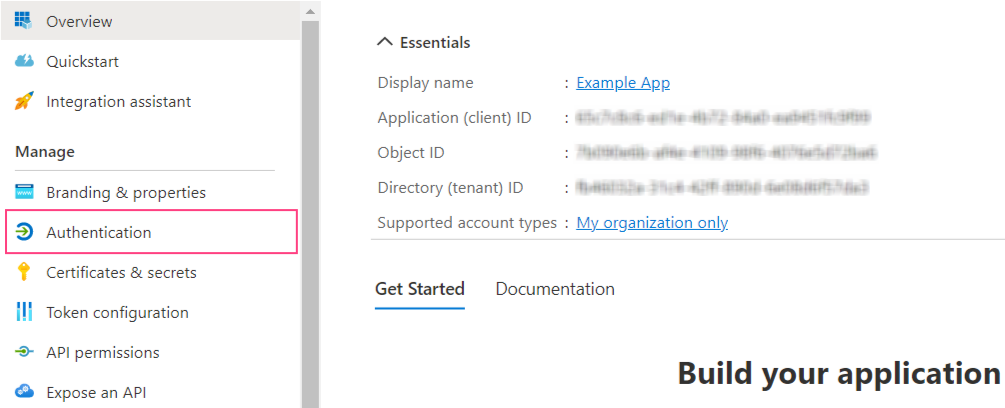 2. In the **Implicit grant and hybrid flows** section, mark **ID tokens (used for implicit and hybrid flows)**.
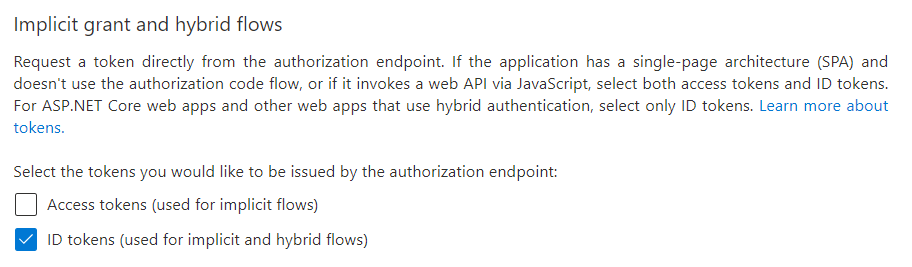 3. Click **Save** at the top of the screen.
4. Navigate to the **Certificates & secrets** tab and click **New client secret**.
3. Click **Save** at the top of the screen.
4. Navigate to the **Certificates & secrets** tab and click **New client secret**.
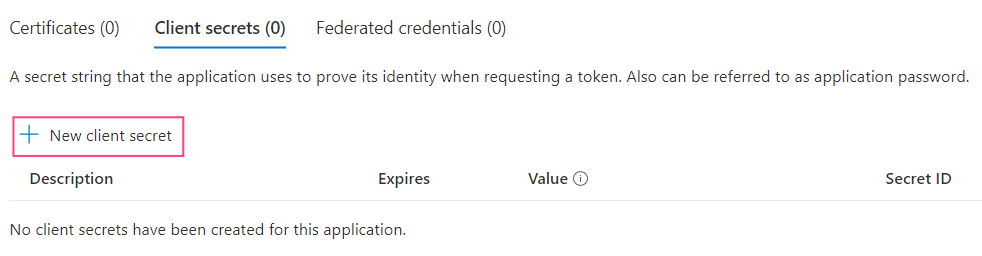 5. In the dialog box that will open, specify a name for the client secret and an expiration date.
The maximum expiration date is 24 months.
6. Click **Add**. This will close the dialog and display information about your new client secret.
It is important that you copy and save the **Value**, since you will not be able to access it again once you close the page. This value is required when configuring the tokenmanagement service in Vantage.
5. In the dialog box that will open, specify a name for the client secret and an expiration date.
The maximum expiration date is 24 months.
6. Click **Add**. This will close the dialog and display information about your new client secret.
It is important that you copy and save the **Value**, since you will not be able to access it again once you close the page. This value is required when configuring the tokenmanagement service in Vantage.
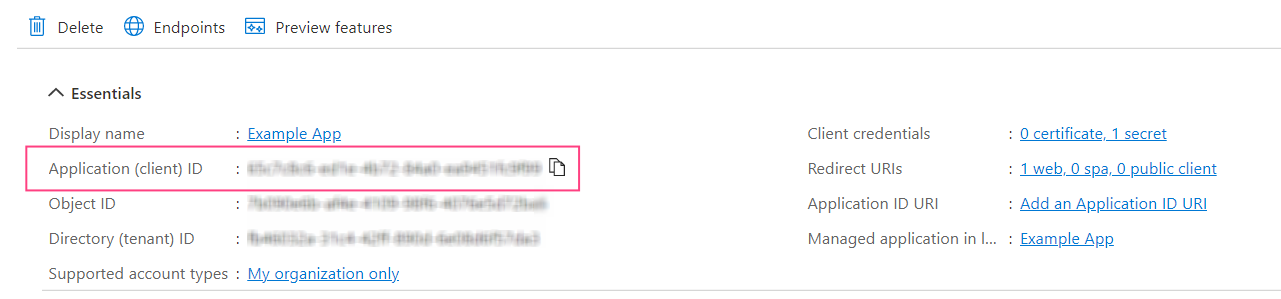
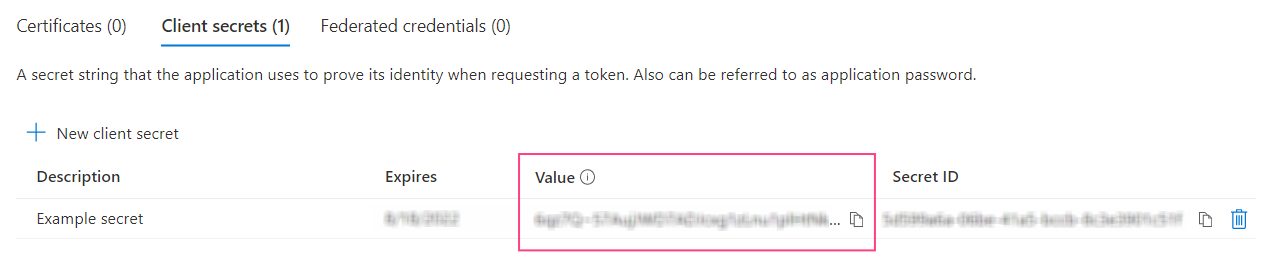 You will also need a client identifier, which can be copied from the **Application (client) ID** field in the **Overview** tab. The copy icon will appear once you hover the mouse cursor over the value of the identifier.
 ### Verifying the Application
To make the application available to users from any Azure AD tenant, verification is required. Verification is not required if accounts from a single Azure AD tenant are used.
Only Microsoft Partner Network participants can undergo verification.
1. Navigate to the **Branding & properties** tab.
### Verifying the Application
To make the application available to users from any Azure AD tenant, verification is required. Verification is not required if accounts from a single Azure AD tenant are used.
Only Microsoft Partner Network participants can undergo verification.
1. Navigate to the **Branding & properties** tab.
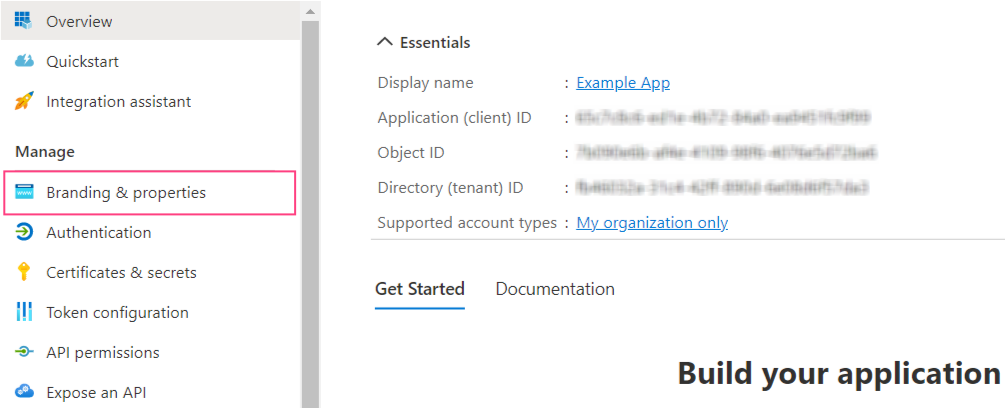 2. Verify that the domain is specified in the **Publisher domain** field. If required, configure your domain by clicking **Configure a domain**.
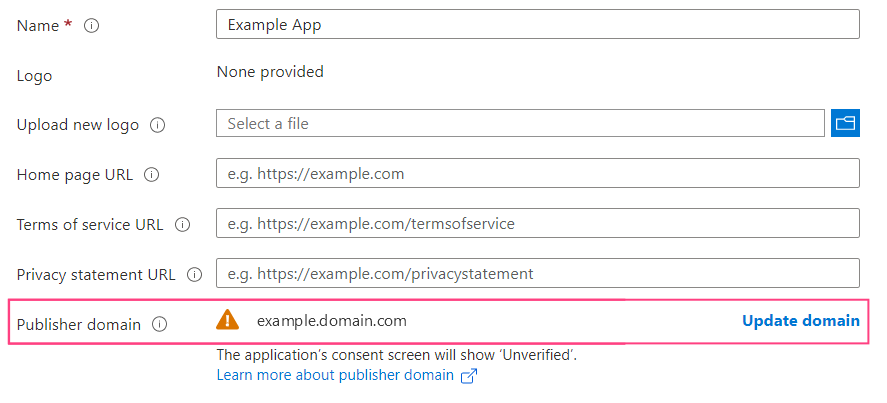 The warning icon displayed next to the domain name means that an application with the specified domain cannot be verified. Click **Update domain** to specify a different valid domain related to the Azure Active Directory tenant. Alternatively, verify a new domain.
3. In the **Publisher verification** section, specify your MPN ID and click **Verify and save**.
If you do not have the required permissions to add an MPN ID, verify that all publisher verification requirements are satisfied.
Once your verification is successful, the appropriate icon will be displayed next to the **Publisher display name** field.
## Passing Credentials to Consul
If Vantage is already installed, you need to use Consul to manually enter account credentials generated for Microsoft and/or Google email service authentication.
Features specific to the OAuth 2.0 protocol are listed in the TokenManagement service.
Before setting up, verify that the kubectl command line tool is installed and that you are connected to the Kubernetes cluster.
1. Get access to the Consul web interface by running the following command:
```bash theme={null}
kubectl port-forward -n abbyy-infrastructure service/consul-ui 8500:80
```
Then navigate to `http://localhost:8500/ui/dc1/kv/secret/`.
2. In the **Key/Value** tab that will open, select the appropriate Vantage deployment scope. Then, select the **vantage** project.
The warning icon displayed next to the domain name means that an application with the specified domain cannot be verified. Click **Update domain** to specify a different valid domain related to the Azure Active Directory tenant. Alternatively, verify a new domain.
3. In the **Publisher verification** section, specify your MPN ID and click **Verify and save**.
If you do not have the required permissions to add an MPN ID, verify that all publisher verification requirements are satisfied.
Once your verification is successful, the appropriate icon will be displayed next to the **Publisher display name** field.
## Passing Credentials to Consul
If Vantage is already installed, you need to use Consul to manually enter account credentials generated for Microsoft and/or Google email service authentication.
Features specific to the OAuth 2.0 protocol are listed in the TokenManagement service.
Before setting up, verify that the kubectl command line tool is installed and that you are connected to the Kubernetes cluster.
1. Get access to the Consul web interface by running the following command:
```bash theme={null}
kubectl port-forward -n abbyy-infrastructure service/consul-ui 8500:80
```
Then navigate to `http://localhost:8500/ui/dc1/kv/secret/`.
2. In the **Key/Value** tab that will open, select the appropriate Vantage deployment scope. Then, select the **vantage** project.
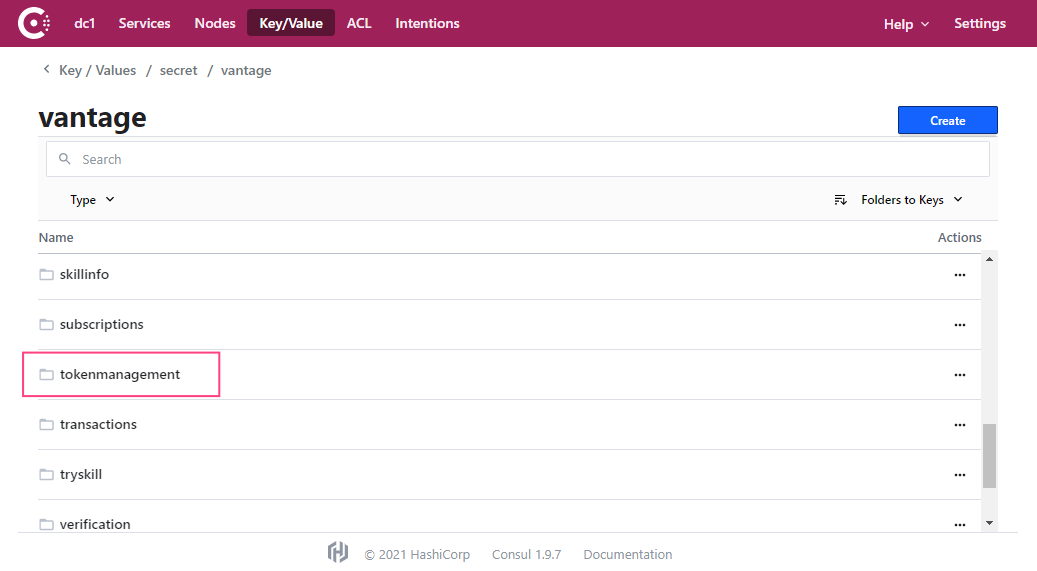 3. Select the **tokenmanagement** service.
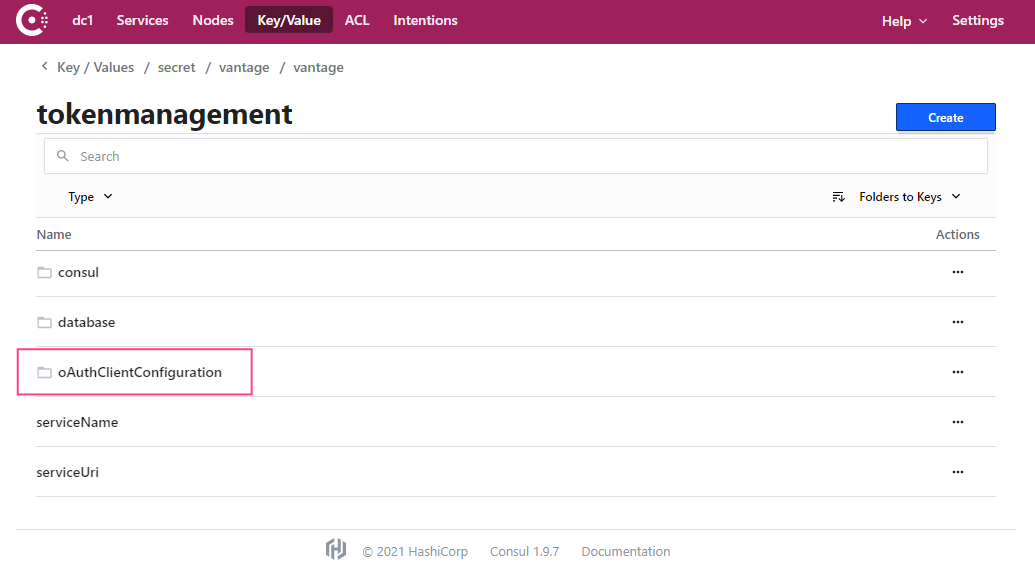 4. Navigate to the **oAuthClientConfiguration** section.
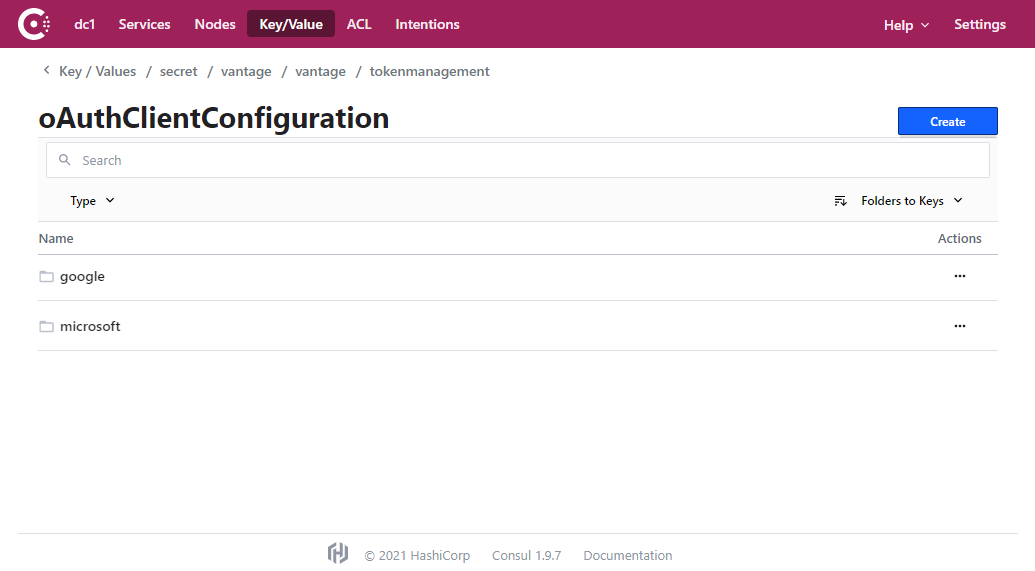 5. Select the service for which you want to specify user data (**google** or **microsoft**).
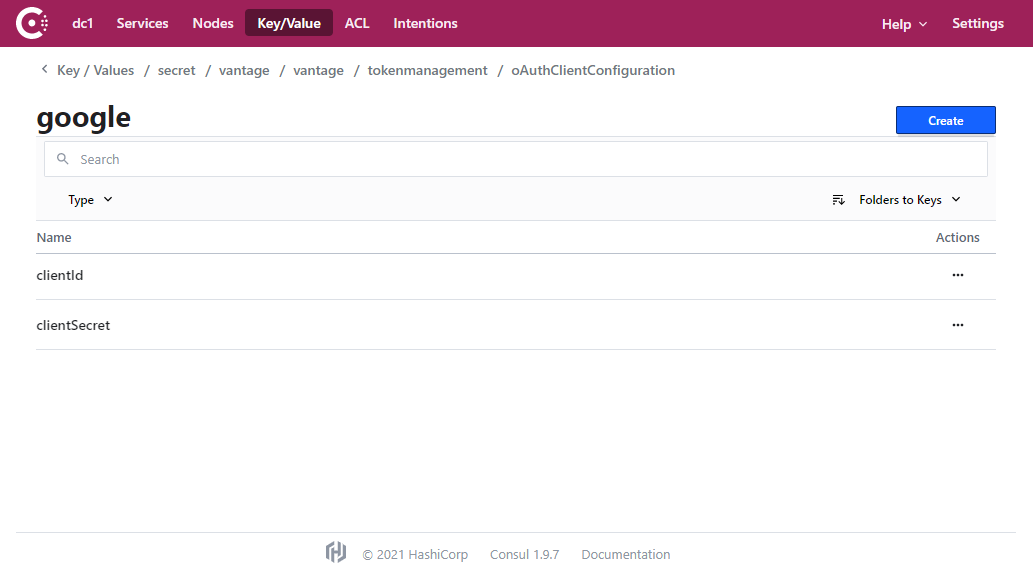 6. Select the **clientId** key.
7. Copy and paste the Client ID value you saved earlier to the entry field and click **Save**.
6. Select the **clientId** key.
7. Copy and paste the Client ID value you saved earlier to the entry field and click **Save**.
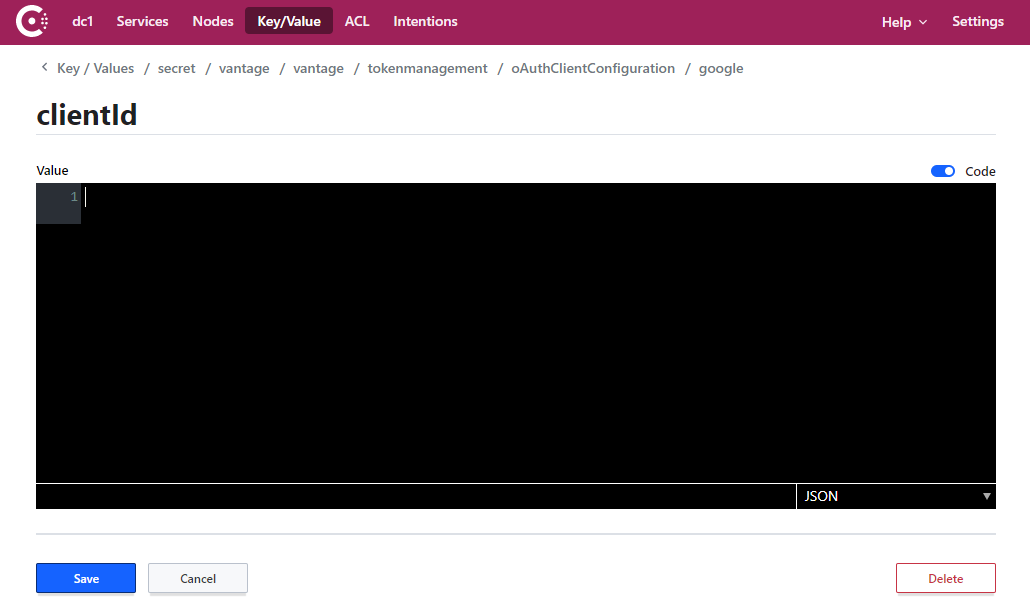 8. Repeat steps 6 and 7 for the **clientSecret** key.
If required, repeat steps 5 through 8 for a different email service.
9. Restart the **tokenmanagement** service by running the following command:
```bash theme={null}
kubectl -n abbyy-vantage rollout restart $(kubectl -n abbyy-vantage get deployments -l app.kubernetes.io/component=tokenmanagement -o name)
```
## Updating Client Secret
The Client secret value is used for server-side client identification and constitutes confidential information. For security purposes, this data should periodically be updated. Some services like Azure Active Directory limit the validity period for such data.
Once a new Client secret has been created, the value of the corresponding Consul key should also be updated.
Once the Client secret is updated, users will need to set up connections to their email service in the Input activity of the Document skill from scratch. Otherwise, Vantage will not be able to connect to the mailbox and import emails from it.
### Updating the Client Secret in Google
1. Navigate to the Google Cloud Console and select the appropriate project.
2. In the menu on the left, select **APIs & Services > Credentials**.
3. In the **OAuth 2.0 Client IDs** section, select the identifier used to authenticate when connecting to the IMAP server.
4. Click **Reset secret**.
8. Repeat steps 6 and 7 for the **clientSecret** key.
If required, repeat steps 5 through 8 for a different email service.
9. Restart the **tokenmanagement** service by running the following command:
```bash theme={null}
kubectl -n abbyy-vantage rollout restart $(kubectl -n abbyy-vantage get deployments -l app.kubernetes.io/component=tokenmanagement -o name)
```
## Updating Client Secret
The Client secret value is used for server-side client identification and constitutes confidential information. For security purposes, this data should periodically be updated. Some services like Azure Active Directory limit the validity period for such data.
Once a new Client secret has been created, the value of the corresponding Consul key should also be updated.
Once the Client secret is updated, users will need to set up connections to their email service in the Input activity of the Document skill from scratch. Otherwise, Vantage will not be able to connect to the mailbox and import emails from it.
### Updating the Client Secret in Google
1. Navigate to the Google Cloud Console and select the appropriate project.
2. In the menu on the left, select **APIs & Services > Credentials**.
3. In the **OAuth 2.0 Client IDs** section, select the identifier used to authenticate when connecting to the IMAP server.
4. Click **Reset secret**.
 5. Click **Reset** in the pop-up dialog box. This will update the Client secret value and recall its previous value.
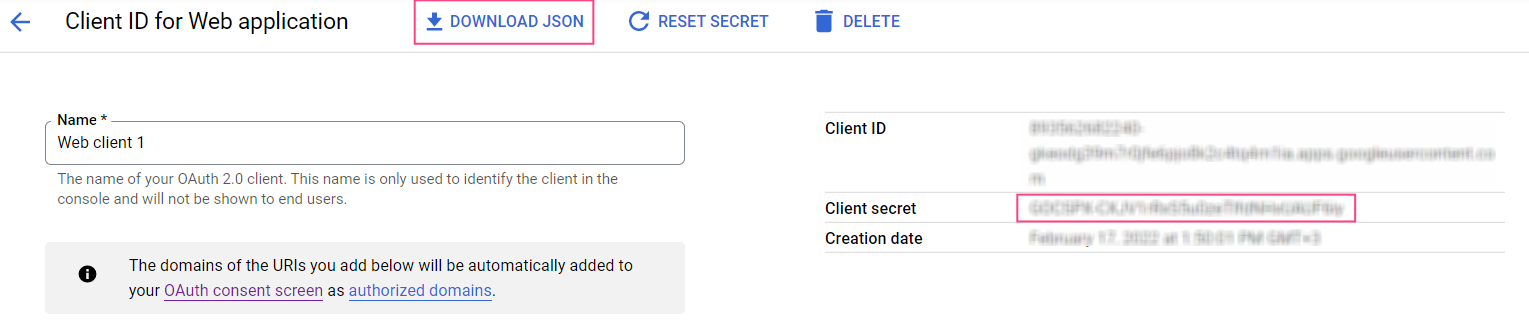
6. Download the JSON file containing the credentials. Alternatively, copy the Client secret value from the right side of the screen.
5. Click **Reset** in the pop-up dialog box. This will update the Client secret value and recall its previous value.
6. Download the JSON file containing the credentials. Alternatively, copy the Client secret value from the right side of the screen.
 ### Updating the Client Secret in Microsoft Azure
1. Navigate to the **App registrations** page and select the application used for authentication using the IMAP server.
### Updating the Client Secret in Microsoft Azure
1. Navigate to the **App registrations** page and select the application used for authentication using the IMAP server.
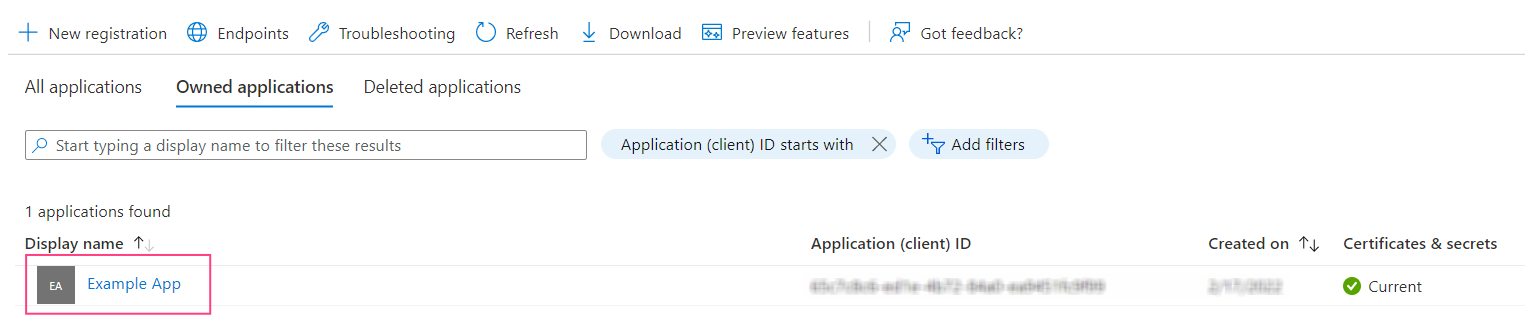 2. Navigate to the **Certificates & secrets** tab and click **New client secret**.
3. In the dialog box that will open, specify a name for the client secret and its expiration date.
4. Click **Add**. This will close the dialog and display information about the new client secret. It is important that you copy and save the **Value**, since you will not be able to access it again once you close the page.
5. If the current client secret has not expired yet, you can delete it in order to only be able to use the new client secret to identify the client.
### Updating the Client Secret in Consul
Follow the steps listed in [Passing Credentials to Consul](#passing-credentials-to-consul), omitting steps 6 and 7 (copying the clientId value).
2. Navigate to the **Certificates & secrets** tab and click **New client secret**.
3. In the dialog box that will open, specify a name for the client secret and its expiration date.
4. Click **Add**. This will close the dialog and display information about the new client secret. It is important that you copy and save the **Value**, since you will not be able to access it again once you close the page.
5. If the current client secret has not expired yet, you can delete it in order to only be able to use the new client secret to identify the client.
### Updating the Client Secret in Consul
Follow the steps listed in [Passing Credentials to Consul](#passing-credentials-to-consul), omitting steps 6 and 7 (copying the clientId value).