如果您設定了外部身分識別提供者,則 Resource Owner Password Credentials 驗證流程將無法使用。
- 設定外部身分識別提供者 (設定 OAuth 2.0 外部身分識別提供者 或 設定 SAML 2.0 外部身分識別提供者) 。準備這些章節中所說明的外部驗證參數。
- 測試 已設定的外部驗證。
- 在 ABBYY Vantage 中,按一下左側窗格中的 Configuration 分頁。
- 按一下 Identity Provider,然後選擇 External Identity Provider。
- 在下拉式清單中選取所需的通訊協定 (OAuth 或 SAML 選項) 。
設定 OAuth 2.0 外部身分識別提供者
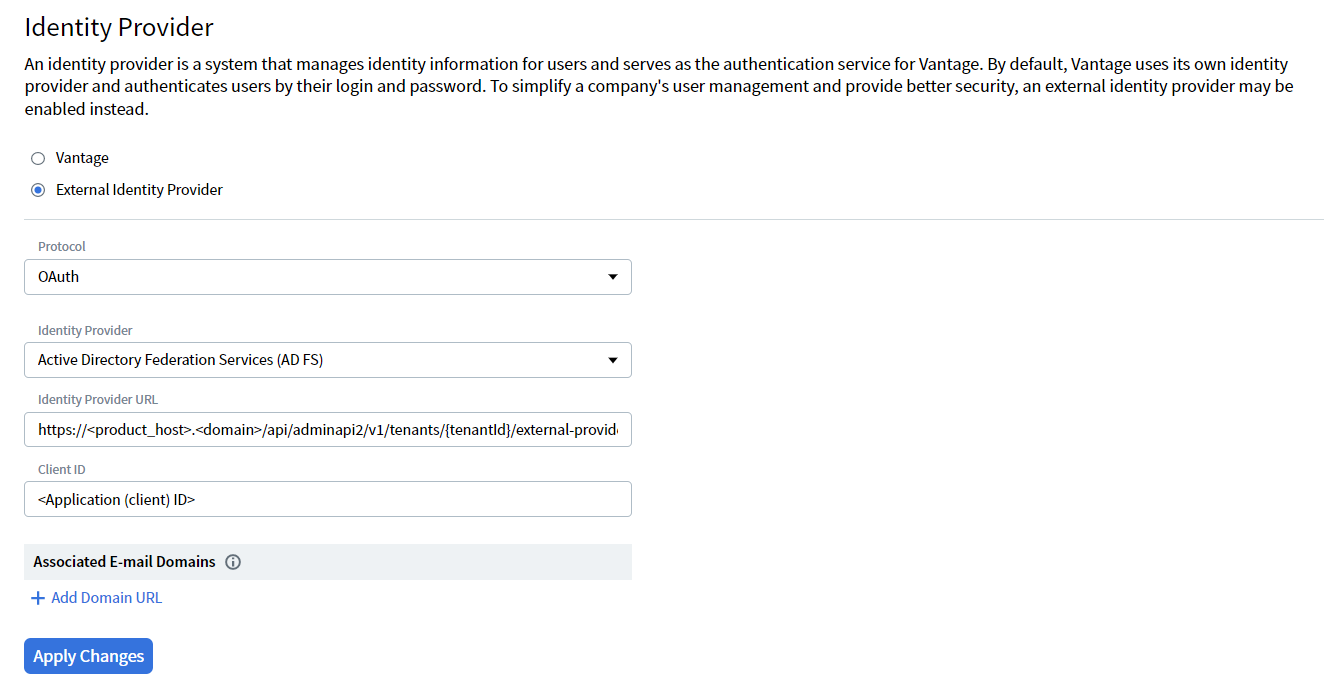
| 欄位 | 說明 |
|---|---|
| Identity Provider | 指定使用 Active Directory 或 Azure Active Directory 身分識別提供者進行登入驗證。 |
| Identity Provider URL | 身分識別提供者的 URL。 此 URL 可在 Azure 入口網站中,您為驗證而註冊的應用程式之 Endpoints 區段中找到。 |
| Client ID | 已設定之 Active Directory 或 Azure Active Directory 身分識別提供者的用戶端識別碼。 |
| Associated Email Domains | 與租用戶使用者關聯的電子郵件位址網域,使這些使用者即使尚未擁有 Vantage 帳戶,也能登入此租用戶。如需詳細資訊,請參閱 關聯的電子郵件網域。 |
設定 SAML 2.0 外部身分識別提供者
| Field | Description |
|---|---|
| Federation Metadata Document URL | 指定透過 Active Directory 或 Azure Active Directory 身分識別提供者進行登入驗證。 |
| Application ID URI | 指定 Azure Active Directory 身分識別提供者的自訂 URI。此欄位為選填。若留空,將會使用已淘汰的 ID api://platform.abbyy.cloud/{tenantId}其中 tenantId 為 Vantage 租戶的識別碼,為 不含連字號 的 GUID 格式 (例如,117489fc1aea41658369d4d18d6557ga) |
| Associated Email Domains | 與租戶使用者關聯的電子郵件位址網域。屬於這些網域的使用者,即使尚未擁有 Vantage 帳戶,也應能登入此租戶。如需詳細資訊,請參閱關聯的電子郵件網域。 |
- 按一下 Apply Changes。
Note: 如果您想重設或改回使用 Vantage Identity Provider,您隨時可以在此頁面選取 Vantage,然後按一下 Apply Changes。這只適用於使用者目前的工作階段 (存取權杖) 尚未過期的情況。若已過期,您必須透過已設定的外部身分識別提供者進行驗證,才能存取該租戶。在此情況下,請聯絡您的系統管理員。
為新使用者設定預設角色
- 在 ABBYY Vantage 中,按一下左側窗格的 Configuration 索引標籤。
- 按一下 Identity Provider,並選取 External Identity Provider。
- 在下拉式清單中,找到 Default Role for New Users。
- 選取一或多個角色,將其自動指派給您的租戶中所有新建立的使用者。
- 按一下 Apply Changes。
- 所選取的角色會自動套用到您的租戶中所有新建立的使用者。
- 對於每一個所選角色,Allow all for current and further skills 切換開關預設為啟用。這會在起始設定中為使用者提供對所有 skill 的存取權限。系統管理員可以隨時在「使用者」設定畫面中修改這些權限。
- 若要進一步了解可用的角色與權限,請參閱使用外部身分識別提供者進行驗證。
在沒有 XML 檔案 URL 的情況下設定 SAML 2.0 外部身分識別提供者
- 在 Vantage API 中完成授權 (詳細資訊請參閱 Authentication 文件) 。
- 使用
Authorization = Bearer <access token>標頭,向https://<your-vantage-url>/api/adminapi2/v1/tenants/<tenantId>/external-providers/傳送 PUT 請求,並在請求本文中包含以下參數:
| Parameter | Description |
|---|---|
| kind | 所使用的通訊協定。此參數的值為 Saml2。 |
| settings.Metadata | 您的 XML 中繼資料檔案的內容。 |
適用於 Windows
適用於 Windows
適用於 Linux
適用於 Linux