
Before you start, check the list of supported input image formats.
Ways to add images
You can feed images to the program in the following ways:- Load previously saved images from files.
- Scan paper documents.
- Import images with one of the image import profiles the Administrator configured earlier. For more information, see Image import profiles.
Add images in a distributed installation
In a distributed installation, images arrive either from a Scanning Station or automatically from Hot Folders. You can also add images to a batch manually, on the Verification Station by the Senior Verification Operator, or on the Project Setup Station. Manual images are added in batch viewing mode.1
Open the batch
Open the batch you want to add images to, or select it in the list.
2
Start the import
Right-click the batch and click the corresponding item on the shortcut menu.
Add images in a standalone installation
1
Select or create a working batch
Select the batch you want to add images to. To create a batch, right-click in the main program window and click New Batch….
2
Open the batch
Double-click the batch, or select it in the list.
3
Start the import
Click the arrow to the right of the import button, and then click one of the menu items.
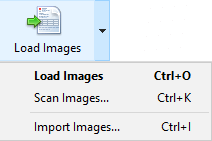
If you add images to a project that has no batches, a batch is created automatically.
Add images from a file
To load images from a file, click Load Images or press Ctrl+O. In the dialog box that opens, select the image files and set the import options:- Create new document – Creates new documents for the added images.
- Add to current document – Adds the images to the currently selected document.
Scan documents
To add images with a scanner, click Scan Images…. Choose a scanner, configure the scanning options, and then scan the document pages.Add images with an import profile
After you click Import Images…, the Select Import Profile dialog box opens. Select a profile from the list and click Import to start importing. In a standalone installation, the names of the profiles the Administrator configured also appear in the menu of the import button, so you can start an import by clicking a profile name directly. In Administrator mode, you can also use the Select Import Profile dialog box to create an import profile or edit an existing one.Import images in the background
In a distributed installation, see Image import profiles. In a standalone installation, image import runs in the background when the import profile is configured for it. To set up a profile to run in the background, open the Project → Image Import Profiles dialog box and turn on the Autochecking option. Images in the Hot Folder are then imported automatically. The program checks the folder for new images at the time interval set in the profile. Monitoring of the Hot Folder starts when a user imports images with a profile that has the Check Hot Folder every option turned on. Monitoring stops when the user quits the project, or turns that option off in the profile properties. For more information, see Image import profiles.To add images from a Hot Folder, the user needs read and write permissions for that folder.