
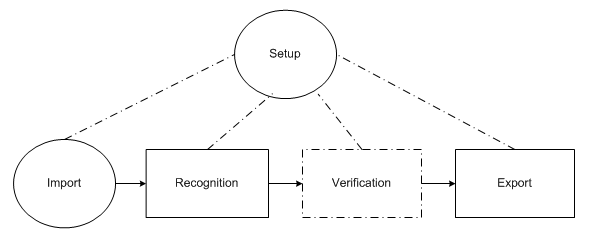
Processing stages
1
Import images
Images arrive automatically from Hot Folders, or an operator adds them on the Scanning Station. The Scanning Operator can scan documents or import images of documents that were scanned earlier. To add images with predefined settings in a single click, the Scanning Operator can create scanning profiles.
2
Recognize the documents
The recognition queue is processed automatically on the Processing Station.
3
Verify the recognized data
The verification queue is processed by the operator of the Verification Station.
4
Export the data
The export queue is processed automatically on the Processing Station.
Separate verification queues
When processing volumes are large, the verification stage can be split into smaller substages so that each operator is responsible for fewer operations. You can create the following separate queues:- Document Assembly Check
- Data Verification – Group and field verification of uncertain characters, and correction of format errors.
- Verification – Rule checks and Document window checks.
- Batch Integrity Check
- Export Confirmation
Who processes which queue
Tasks are processed by the operators who hold the necessary access permissions:- Data Verification Operator – The Data Verification queue only.
- Verification Operator – Data Verification, Verification, Document Assembly Check, and Batch Integrity Check.
- Senior Verification Operator – All queues.
The Data Verification Station lets its operator process only the tasks from the Data Verification queue, regardless of their access permissions.
Receive and manage verification tasks
After you select a project, you can receive tasks. Tasks are received automatically by default. To toggle automatic mode on or off, click the Automatic Task Receive button, or click Task → Automatic Task Receive in the main menu. When automatic mode is off, click Get task to receive a task. The number of available tasks in the Data Verification queue appears in the All Tasks Count column. Click Refresh to update it.Manage a task during data verification
Use one of the following ways:- Reject Task – To stop working with a task, click Task → Reject Task in the main menu. You can either save your changes and publish them for other operators, or discard them.
- Send Task to Exceptions… – Adds the task to the exceptions queue when an unforeseen situation arises. Click Task → Send Task to Exceptions… in the main menu.
Send multiple tasks to another stage
A Senior Verification Operator can send several tasks or batches to another stage at once.1
Switch to the matching view mode
Click Queues for tasks or Batches for batches.
2
Select what you want to send
Select the tasks or batches you want to move to another stage.
3
Open the send command
Use one of the following ways:
- Right-click one of the selected items and use the shortcut menu.
- Click Tasks → Send tasks to… to send tasks.
- Click Tasks → Send to… → Stage to send batches.
- Press Ctrl+Alt+Q.
4
Specify the destination
In the dialog box that opens, specify the stage you want to send the tasks or batches to, an operator, and a processing priority.If the operator you want is not in the list, check that they hold every permission needed to work with the selected batch types at the selected stage.