
Customize the display of data
1
Open the Document Definition editor
Open the Document Definition in the Document Definition editor.
2
Display the data form
Click View → Data Form or press Alt+F2.
3
Customize the data form
Use the shortcut menu commands to customize the data form.
Properties of data form elements
Each type of data form element has its own set of properties. To view the properties of an element, double-click it, or right-click it and click Properties on its shortcut menu.Position tab
- Alignment – Adjusts an element’s alignment along the vertical and horizontal axes. You can also use the shortcut menus of elements to change their alignment.
- Margins – Changes the distance, in points, between an element and the edges of its cell. If you specify a margin of zero, FlexiCapture uses the smallest margin that still prevents the elements from overlapping. You can also change the margins using the element’s shortcut menu commands, by dragging the element inside its cell, and by moving the right or bottom edges of the cell so that they touch the element.
- Set min size – Specifies the minimum width and height of an element. If no minimum size is specified, the size is determined automatically. You can also change the minimum width and height by dragging the edges of the element. To restore the element’s default size, right-click it and click Restore default size on the shortcut menu. Elements whose minimum size is calculated automatically are highlighted in green on the data form; elements whose minimum size is specified by the user are highlighted in red.
- Fixed width – Indicates that the element has a fixed width. This setting works only if the field is large enough to contain at least one character. If a very long string of text is entered into a field whose width is not fixed, the field expands to fit the text. When you specify a fixed width, long text strings are wrapped to the field size.
Format tab (label box)
- Text – The text in the label (usually the name of a field or an explanation).
- Font – Changes the font, size, and font style. The font and font size specified in the Document Definition are used by default. To change these settings, disable the Use default option.
Format and Instances tabs (group properties)
- Display settings for groups of fields – Change the default appearance of groups of fields in the document window. Right-click a group in the data form, open its properties dialog box, select the Format tab, and select one of the following from the Collapse group drop-down list:
- Show border – Shows or hides the border around the group in the document window. If a group contains instances and its border is hidden, rectangular control elements appear to the left of the instances. Use these controls to delete an instance and add a new instance one position above or below the selected instance.
- Show ‘Add new instance’ prompt – Shows or hides a link prompting the user to add an instance for groups or fields with instances.
Data form settings
Font and font size
By default, recognized text uses 10pt Arial. Change the default settings in the Document Definition properties dialog box (click Document Definition → Document Definition Properties and select the Data Form tab).- Field data – Font settings for recognized text.
- Field label – Font settings for explanatory text and field labels.
Display images of fields in the document window
You can display an image of Text, Barcode, Checkmark, and Group of checkmarks fields beneath the recognized data in the document window.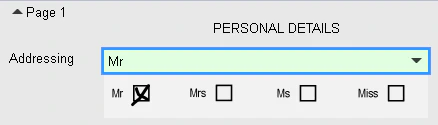
Group elements
Multiple elements can be combined into a group and placed on the data form. Use the shortcut menu commands to align the group and specify margins (delete or reset default values). You can also delete or lock the group; elements of a locked group cannot be moved. To put elements in a group, select them by clicking while holding the Ctrl key, right-click one of them, and click Group Selected on the shortcut menu. To remove elements from a group, drag them outside the group.When a label or an image is added to a field, these elements are grouped.
Column display settings
Table columns that were not detected during recognition can be hidden. You can hide columns in two places:- In the data form – Open the table’s properties and select the columns to hide in the Select columns to hide when empty list on the Format tab.
- In the document window – Right-click the table’s title and select the names of the columns to hide on the shortcut menu.
Use the Move Up and Move Down buttons to the right of the list to change the order of columns in the recognized document. This feature is not available on web stations.
Section display settings
When working with document sets or multi-section Document Definitions, you may want to hide specific sections on the data form. Open the properties dialog box of the section to hide, and disable the Show on verification option on the General tab.Selection order of fields
The default verification order in the document window is top to bottom, left to right. You can change the order in which fields are selected when the user presses Tab, F4, or F8. To change the order, click Tab Order on the shortcut menu of the data form. In the dialog box that opens, select the Custom option and use the buttons on the right to change the order.This feature is not available in web stations.
Zoom the document image
During verification, you can zoom the document image with the mouse or the shortcut menu commands. Double-clicking different parts of the document image changes the zoom level:
You can change the horizontal or vertical order of pages by right-clicking the title of the Document window and clicking Arrange Pages Vertically on the shortcut menu.