
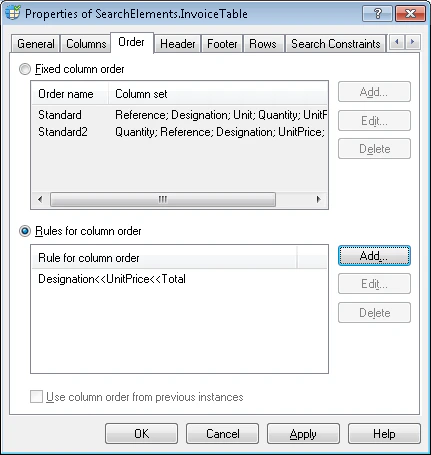
- If you simply list possible column orders, you can specify contradictory column orders, for example: “Column1; Column2; Column3” and “Column3; Column2; Column1”. When matching the FlexiLayout with an image, the program selects the column order that best suits the image.
- If you use a rule to describe multiple column orders, you cannot specify contradictory orders. When matching the FlexiLayout with an image, the program looks for a column order that meets all the conditions. If two rules specify contradictory conditions (for example, “Column1 << Column2 << Column3” and “Column3 << Column2 << Column1”), the program fails to match the FlexiLayout.
List fixed column orders
If the columns have exactly the same order on all of the test images, this order is said to be fixed. For example, a table may contain three columns, say, Date, Quantity, and Price, which are always arranged in this order. Sometimes, you will be able to find several different column orders on the test images. For example, on some of the images the order might be Date, Quantity, Price, while on others the order might be Date, Price, Quantity. You can specify any number of such orders. To specify fixed column orders, select the Fixed column order option. By default, when you create a Table element the program specifies one fixed order of columns by listing all of the columns in the same order as you specified when creating the table block. This order is given the default name of Standard. You can make changes to the Standard order to adjust it to the column order on the test images. You can also add new orders or delete orders from the list.Edit a fixed column order
1
Open the Edit Fixed Column Order dialog box
Select the column order to edit and click Edit….
2
Rename the column order
In the Order name field, enter a new name for the column order. This name is only used to identify the order in the FlexiLayout and is displayed in the properties of the hypothesis for the current Table element. This name helps you identify which of the column orders the program has selected.
3
Arrange the columns
The List1 field contains a list of all table columns. Select the column and click  to add it to the List2 list. Clicking
  adds all the columns to the list.Clicking
  removes a column from the List2 list, and clicking
  removes all the columns from the List2 list. The
  and
and  buttons move columns up and down in the List2 list. Use these buttons to change the order of columns as required and click OK.
to add it to the List2 list. Clicking adds all the columns to the list.Clicking removes a column from the List2 list, and clicking removes all the columns from the List2 list. The and buttons move columns up and down in the List2 list. Use these buttons to change the order of columns as required and click OK.Create a new column order
1
Open the Add Fixed Column Order dialog box
Click Add….
2
Name the column order
In the Order name field, enter a name for the new column order.
3
Arrange the columns
The List1 field contains a list of all table columns. Select the column and click to add it to the List2 list. Clicking adds all the columns to the list.Clicking removes a column from the List2 list, and clicking removes all the columns from the List2 list. The and buttons move columns up and down in the List2 list. Use these buttons to change the order of columns as required and click OK.
to add it to the List2 list. Clicking adds all the columns to the list.Clicking removes a column from the List2 list, and clicking removes all the columns from the List2 list. The and buttons move columns up and down in the List2 list. Use these buttons to change the order of columns as required and click OK.Use rules to specify column order
If analyzing the test images does not allow you to determine one or more fixed column orders, you can write a rule to describe the possible orders. Each rule sets a condition like the following: “The Date column always precedes the Item column” or “The Price column always follows the Item column”. Rules allow you to limit the search areas of columns and reduce the number of possible combinations. To specify the order of columns by means of a rule, select the Rules for column order option.Create a rule
1
Open the Edit Column Order Rule dialog box
Click Add….
2
Arrange the columns and set the order
The List1 field contains a list of all table columns. Select the column and click to add it to the List2 list. Next, select the column that always goes after the previously selected column (but does not necessarily immediately follow it). Clicking adds all the columns to the list.Clicking removes a column from the List2 list, and clicking removes all the columns from the List2 list. The and buttons move columns up and down in the List2 list. Use these buttons to change the order of columns as required and click OK.
to add it to the List2 list. Next, select the column that always goes after the previously selected column (but does not necessarily immediately follow it). Clicking adds all the columns to the list.Clicking removes a column from the List2 list, and clicking removes all the columns from the List2 list. The and buttons move columns up and down in the List2 list. Use these buttons to change the order of columns as required and click OK.<< symbol indicates that one field always precedes the other.
Edit a rule
1
Open the Edit Column Order Rule dialog box
Click Edit….
2
Set the required order
Use the , , , and buttons to arrange the columns, and click OK.
, , , and buttons to arrange the columns, and click OK.