
Create a Database Check rule
1
Open the properties dialog box
Right-click the field and select Properties, or open the Document Definition properties (in the Document Definition editor, select Document Definition → Document Definition Properties).
2
Create a new rule
On the Rules tab, click New Rule. Select Database Check and click OK.
3
Set the common rule options
Type a Name, set the severity, conditions for applying the rule, and any Tags as needed, and click Next. For the full list of common rule options, see Set up rules.
4
Connect to the data source
Specify the data source type and its connection parameters. The following data sources are supported:
To avoid entering the password on each connection, select Allow saving password, or set up the database to require no password (for example, with Windows authentication).
5
Select the schema and table
Select the schema and database table from the dropdown lists, or specify the data set if you are connecting to a data set.
If Find in all schemas is selected and the table is not in the default schema, an error such as
Invalid object name may appear. In that case, specify the schema that contains the table explicitly.6
Set the remaining options
- Select Don’t check if all fields are empty to skip the check when the compared fields have no values, which speeds up validation.
- Establish links between the Document Definition fields and the database fields (see Specify fields to compare). Use Add, Edit, and Delete to manage the links.
- If the source is a data set, select the primary key field from the Field where to save record ID list.
A data set can also be accessed from the data form with a Button control. In the Document Definition editor, select Form → Insert Control → Button. In the Properties dialog box, click the Format tab, select Database Lookup in the Type list, and then select a database check rule you created.
Specify fields to compare
The Field links group on the Rule Settings tab shows the field comparisons. You can set up a Database Check rule for a single field or for a set of fields. For each comparison, specify:
A fuzzy search finds the closest matches (the fewest letters added, removed, or replaced to achieve a match). The number of allowed errors depends on the word length. If more than one value matches, the Operator sees
Too many records found along with a list of close matches to choose from.
The following additional options are available:
Primary keys in data sets
If your project includes a data set (a local copy of an external database) that you source field values from, you can use a Database Check rule to set a field as the primary key (the unique identifier) of a record in the data set. The data on the data form is then equated to data in the data set. When you select a record, all fields are filled from the data set, and you cannot edit values on the data form. If you try to, a dialog box prompts you to select another record or edit the existing record. To add or edit records, right-click a field and select Edit Data Set Record or Add Data Set Record. Deleting data in a filled field with the Delete key also deletes the data in all other fields related to the rule. The rule is re-checked when you apply your changes.How primary keys work
- All fields targeted by the rule must have Enter value from database enabled. Then, if the primary-key field has a value, FlexiCapture fills the other fields from the database instead of searching for their values.
- If the primary-key field has no value, FlexiCapture examines the other fields that had Search enabled in the Field Link dialog box (see Specify fields to compare). If a unique record is found for them, values from the database are used, as in step 1.
- A data set is selected as the source.
- A primary key is specified in the data set (the Primary key option is enabled for a field).
- The primary-key field is not listed in the Field links list on the Rule Settings tab.
Do a database check for a set of fields
FlexiCapture searches the database for a string that matches the values in a set of fields, linking each field to a different column of the matched string. For example, link document fields Fa, Fb, and Fc to database columns Ta, Tb, and Tc:- Fa exactly matches Ta.
- Fb is a fuzzy match of Tb.
- When both conditions are met, the value of Tc is copied to Fc.
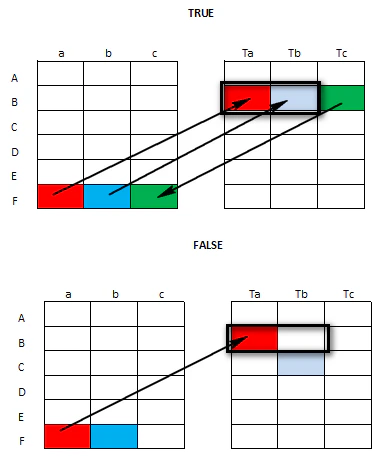
Different combinations are possible: exact, fuzzy, or mixed matches, no autofilling, and any number of fields.