前提条件
- ID を構成する前に、Vantage のテナント識別子を用意してください。テナント識別子を取得するには、ABBYY Vantage で Configuration をクリックします。識別子は General タブに表示されます。
- 認証応答を受け取るための Redirect URI を作成します。URI は次のとおりです:
https://<your-vantage-url>/auth2/Saml2/Acs
セットアップ
クレームの説明を追加する
1
管理コンソールを開く
AD FS 管理コンソールを開きます。
2
Add Claim Description を開く
Service > Claim Descriptions を選択し、Add Claim Description をクリックします。
3
クレームの説明を入力する
次の項目を指定します: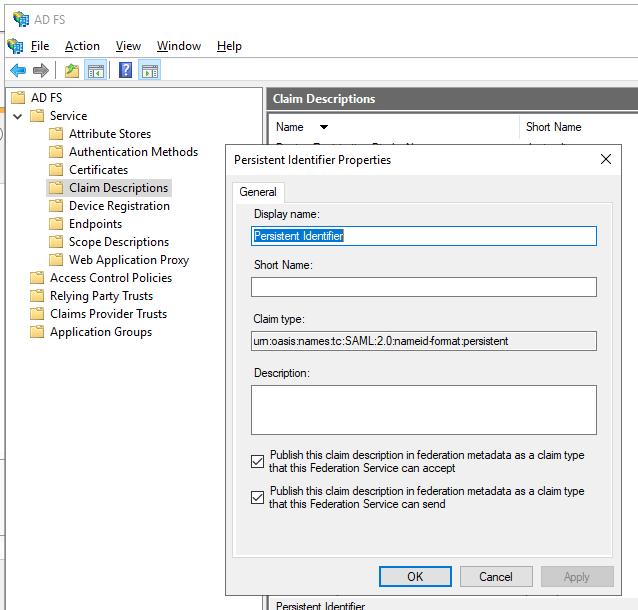
- Display name — たとえば
Persistent Identifier。 - Claim type —
urn:oasis:names:tc:SAML:2.0:nameid-format:persistent。 - Publish this claim description in federation metadata as a claim type that this federation service can accept を選択します。
- Publish this claim description in federation metadata as a claim type that this federation service can send を選択します。
4
確認
OK をクリックします。
Relying party trust の構成
1
Relying Party Trust を追加する
コンソール ツリーで、AD FS の下にある Trust Relationships > Relying Party Trusts > Add Relying Party Trust を選択します。
2
ウィザードを開始する
Welcome ページで Claims aware を選択し、Start をクリックします。
3
データ ソースを選択する
Select Data Source ページで Enter data about the relying party manually を選択し、Next をクリックします。
4
表示名を指定する
Specify Display Name ページで、Display Name に任意の名前を入力し、Next をクリックします。
5
プロファイルを選択する
Choose Profile ページで AD FS 2.0 profile を選択し、Next をクリックします。
6
証明書を構成する
Configure Certificate ページで Next をクリックします。
7
URL を構成する
Configure URL ページで Enable support for the SAML 2.0 WebSSO protocol を選択します。Relying party SAML 2.0 SSO service URL に
https://<your-vantage-url>/auth2/Saml2/Acs を入力し、Next をクリックします。8
ID を構成する
- Relying party trust identifier に
api://platform.abbyy.cloud/tenantIdを入力します。ここでtenantIdは、ハイフンなしの GUID 形式のテナント識別子です (例:117489fc1aea41658369d4d18d6557ga) 。この値は、認証用の Application ID URI として使用されます。この値をコピーしてください。後で Vantage で外部 ID プロバイダーを構成するときに必要になります。Add をクリックします。 - Expose an API タブで、Application ID URI に上で入力したものと同じ値を設定します (例:
api://cccc3333-dddd-4444-eeee-5555ffff6666) 。Add をクリックし、続けて Next をクリックします。
9
Issuance Authorization Rules を選択する
すべてのユーザーに Vantage へのアクセスを許可するには、Permit all users to access this relying party を選択します。特定のグループのみにアクセスを制限するには、Permit specific group を選択し、そのグループを指定します。Next をクリックします。
10
trust を追加する
Ready to Add Trust ページで設定を確認します。Next をクリックし、次に Close をクリックします。
受信クレームを変換するルールの追加
1
Relying Party Trusts を開く
Relying Party Trusts をクリックします。
2
Claim Issuance Policy を編集する
選択した relying party trust を右クリックし、Edit Claim Issuance Policy をクリックします。
3
ルールを追加する
Edit Claim Issuance Policy for <name> ウィンドウで、Add Rule をクリックします。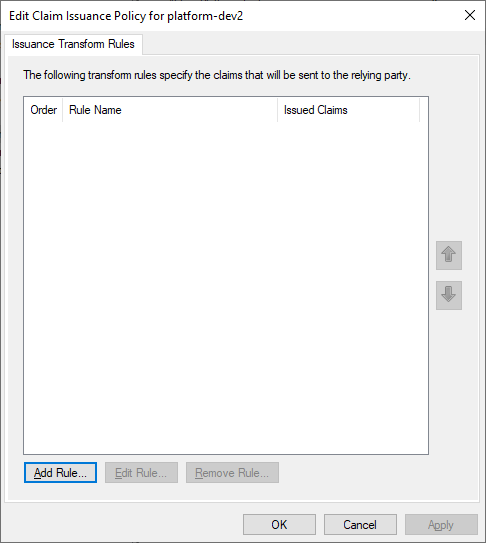
4
ルールテンプレートを選択する
Transform an Incoming Claim クレームルールテンプレートを選択し、Next をクリックします。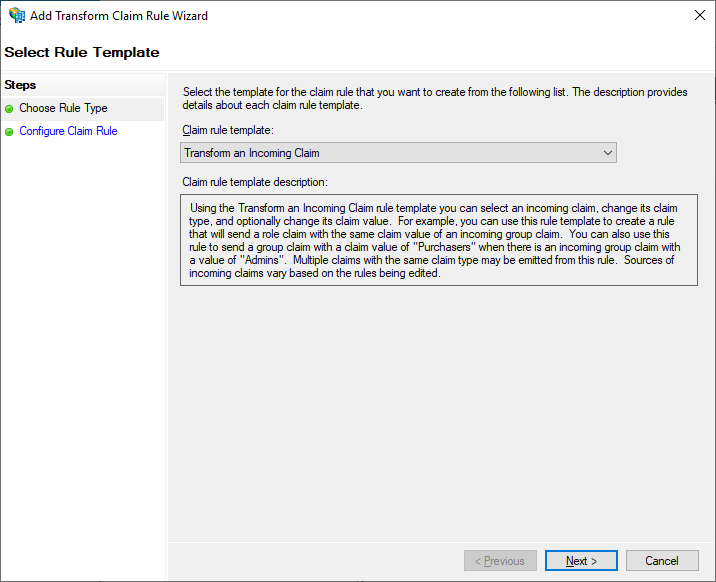
5
クレームルールを構成する
Configure Claim Rule ステップを選択し、次のように指定します。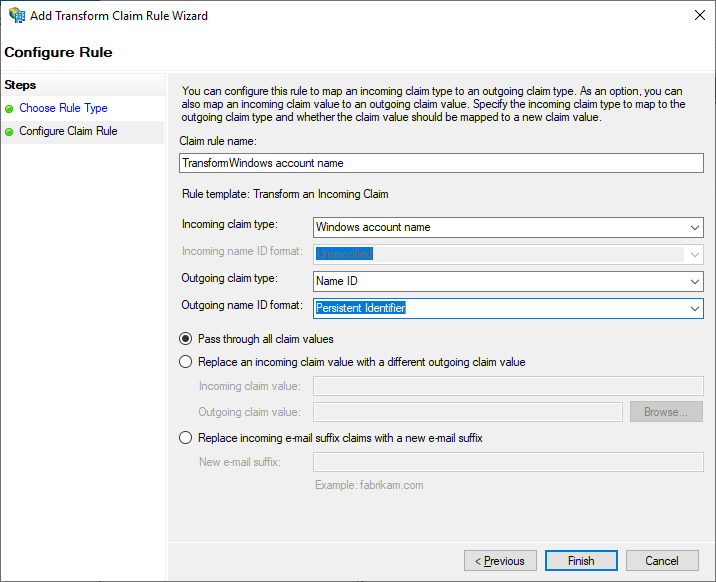
- Claim rule name —
TransformWindows account name. - Incoming claim type — Windows account name。
- Outgoing claim type — Name ID。
- Outgoing name ID format — Persistent Identifier。
- Pass through all claim values を選択します。
6
最初のルールを完了する
Finish をクリックします。
7
Send LDAP Attributes ルールを追加する
発行されるトークンにメールおよび名前のクレームが含まれるように、別のルールを追加します。Select Rule Template ページで、Claim rule template の Send LDAP Attributes as Claims を選択し、Next をクリックします。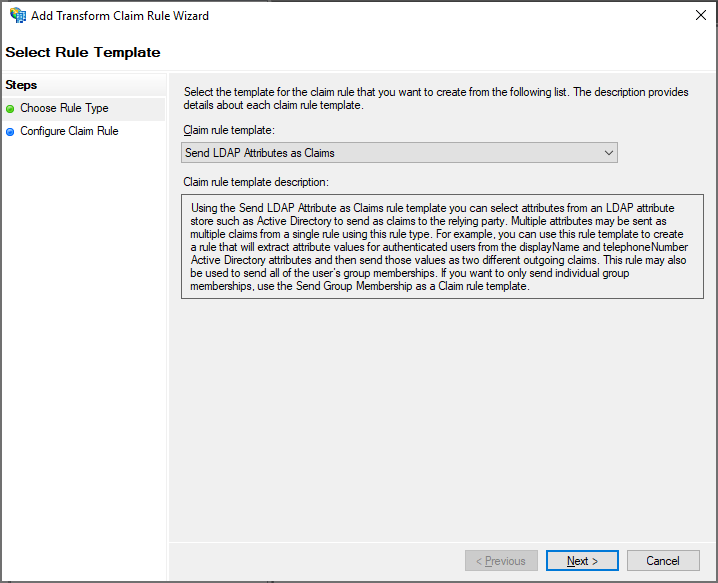
8
LDAP ルールを構成する
Configure Claim Rule ページで、Claim rule name の下にある属性ストアとして Active Directory を選択し、Finish をクリックします。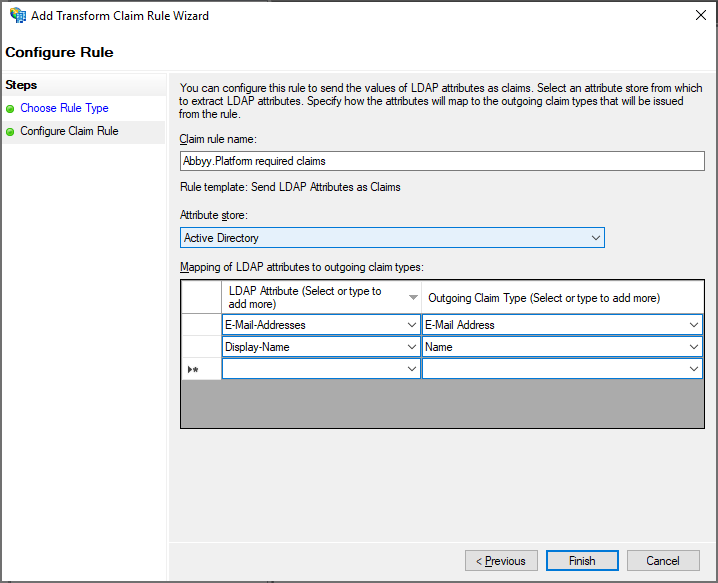
9
ルールを確認する
追加したルールが Edit Claim Rules ダイアログに表示されます。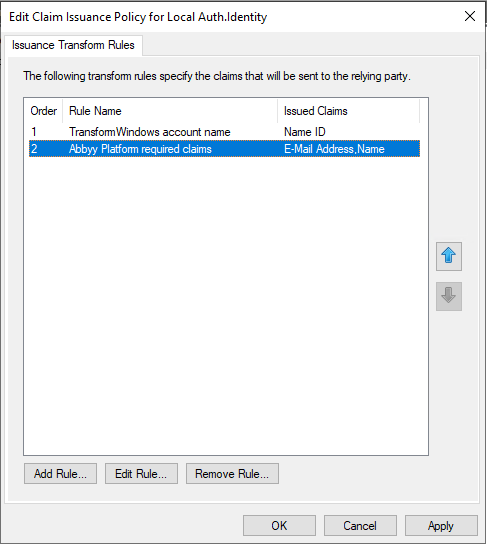
次のステップ
https://<adfs-server-address>/federationmetadata/2007-06/federationmetadata.xml。たとえば、https://adfs.platform.local/federationmetadata/2007-06/federationmetadata.xml のようになります。
Vantage 側の設定については、「テナントの外部 ID プロバイダーの設定」を参照してください。