Working with the document list
You can use the document list to switch between all documents pertaining to a specific task, as well as change the document type for one, several, or all documents. To make navigating between your documents more convenient, we recommend that you use the toolbar located above the list. If needed, you can change the orientation of one or all pages in a document or revert all pages in a document back to their original images. For more information, see Working with document images.Hiding table columns
By default, tables on the data form display columns according to these rules:- If all columns have values, all columns are shown.
- If all columns are empty, all columns are shown.
- If at least one column has a value or contains an error, empty columns are hidden (except the column with a value or error).
Click the table menu icon
Click the table menu icon in the upper left corner of the table. The column display menu opens.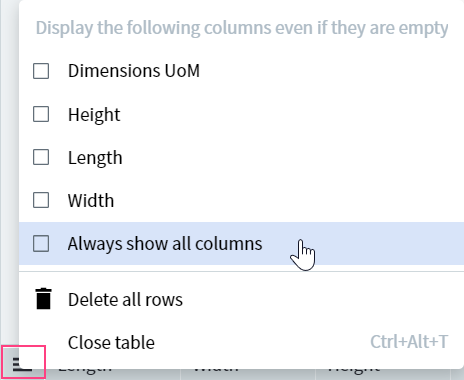
Choose the appropriate option
Select the columns to display in the table. If you enable Always show all columns, all columns appear, including empty ones.
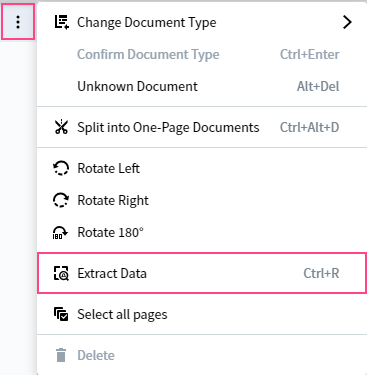
Starting a new extraction
The program prompts you to start a new extraction every time you perform any of these actions:- Changing a document type
- Rotating a document image
- Rotating a document list
- Manually cropping a document
If you do not choose Extract Data, you must manually fill in any empty fields that appear on the data form after you modify the document.
This button is available in the toolbar only if one or several documents are selected in the batch editor.
Sending tasks to a specific stage or operator
Document verification may include several manual review stages, with a different operator responsible for each. For example, a more experienced operator may need to review tasks that were earlier reviewed by a junior operator. An operator can also forward a specific document to another operator who is an expert in that particular type of document. You can send a task to:- Any — any available operator.
- The reviewer of these documents — the operator who reviewed the task earlier.
- Specific user — a specific operator, who automatically receives this task ahead of all other available tasks.
Select a stage
In the Stage drop-down list, select the necessary stage. By default, the first stage in the list is selected.
Assign an operator
In the Assigned Operator drop-down list, select the next operator. By default, Any is selected.
Changing the UI language
ABBYY Vantage supports changing the UI language in the Manual Review Client using a URL in the address bar. For example, this might be necessary when the Manual Review Operator uses a language different to that of the Skill Designer. To change a language directly from the Manual Review Client, specify the necessary language in thelang= parameter of the URL.
If the specified language is not in the list of available languages, the page loads in English.
Related topics
Manual Review Client
Overview of how Manual Review works in Vantage
Working with a task
Receive, resume, and withdraw tasks in the Manual Review Client
Working with document images
Crop, rotate, and restore document images during review
Changing the document type
Update a document’s assigned type when it’s incorrect or low-confidence
Correcting field errors
Fix format and rule errors on the data form using hotkeys
Completing a task
Complete or reject a task and return it to the queue
Standby screen
What happens when no tasks are available in the queue