Review transaction details in Skill Monitor. Filter graphs, sort the transaction list, inspect event logs, cancel transactions, and restart failed ones in ABBYY Vantage.
The Transactions section of the Skill Monitor service displays detailed information about system performance, active and completed transactions, and the stages of transactions for a specific skill.Tenant Administrators and Processing Supervisors can analyze this information to manage document processing for each skill. For example, they can detect transactions with errors, find error causes in detailed event logs, cancel transactions, or get transactions for manual review.
Information in the Transactions section is presented as graphs and a list of transactions. Use the filters at the top of the page to specify the data to display.
Filter
What it selects
Period
The period during which transactions are collected, such as 1 hour, 3 hours, or 3 days. The transaction list shows data filtered by creation date. The Throughput graph shows data filtered by completion date.
Skill
The skill whose transactions you want to see.
Status
All, New, Processing, Processed, Failed, or Canceled.
Stage
The stage whose statistics you want to see: All, Manual Review, or Automatic.
Stage Name
A specific stage, by name.
All active transactions appear even if they do not match the filter.
The data in the graphs depends on the filters you have set:
Graph
What it shows at each point in time
Throughput
The number of transactions completed up to that point.
Queue
The number of transactions not yet completed up to that point.
Duration
The average time taken to process the transactions created up to that point.
To view information for a specific part of the graph, hover the cursor over it. For example, use the peak of the Queue graph to see when the number of uncompleted transactions was highest. Graph information updates every few minutes, and also when you refresh the page or change the selected filters.
The page displays a list of transactions for the selected skill and period. By default, the list shows these columns: Source File Name, Docs, Pages, Created, Stage, Assigned to, Duration, and Transaction (the transaction ID).
To sort the list, click a column name or the arrow next to it. Click again to reverse the order. You can sort by Docs, Pages, Created, Duration, and Skill. The Skill column is hidden by default. To show it, see Customize the columns.To search the list, click the search icon next to Source File Name, Assigned to, or Transaction.
To choose which columns appear, click the more options icon at the right end of the table header, and then select or clear columns in the list. Status, Skill, Source File Path, and Source Type are hidden by default. Use the same list to manage columns for other transaction parameters.To add custom parameters to the transaction table, click the more options icon and select Add column. In the dialog that opens, choose the parameter type, Transaction or Document, and specify a name.
Use additional parameters for in-depth system performance analysis. For example, if documents from a specific source (such as a mobile device) consistently take longer to process than documents from other sources, the skill processing that source may need improvement.
Transactions are deleted after the period specified in the retention policy, regardless of status. All related documents and all recognized and extracted data are deleted alongside them. The default storage period is 2 weeks.Automatic deletion does not affect documents uploaded when setting up and publishing skills (training and demo document sets), because these are considered user data. You can also delete a transaction manually before its storage period ends using the Vantage API.
Tenant Administrators and Processing Supervisors can perform the following actions on each transaction in the list:
Get a transaction for manual review and process it in the Manual Review client. Select the transaction and click Open. If another user has the task open, a warning dialog appears. Use it to either reject or get the task. If you reject, the task returns to the queue. If you get a task another user has open, the system passes it to you, and all changes the other user made are saved.
Send a transaction to the Manual Review stage and to another operator. Select the transaction and click Open. The Manual Review client opens. To send the transaction to the next stage or operator, follow the steps in Manually reviewing documents.
View the detailed event log to identify the event that caused an error. Select the transaction and click Show Log. For more information, see Workflow events below.
Cancel a transaction. Select the transaction and click Cancel. This may be required when a critical error occurs due to a faulty document upload. Completed transactions cannot be canceled.
A Skill Designer can view transactions for all skills, but can’t perform these actions.
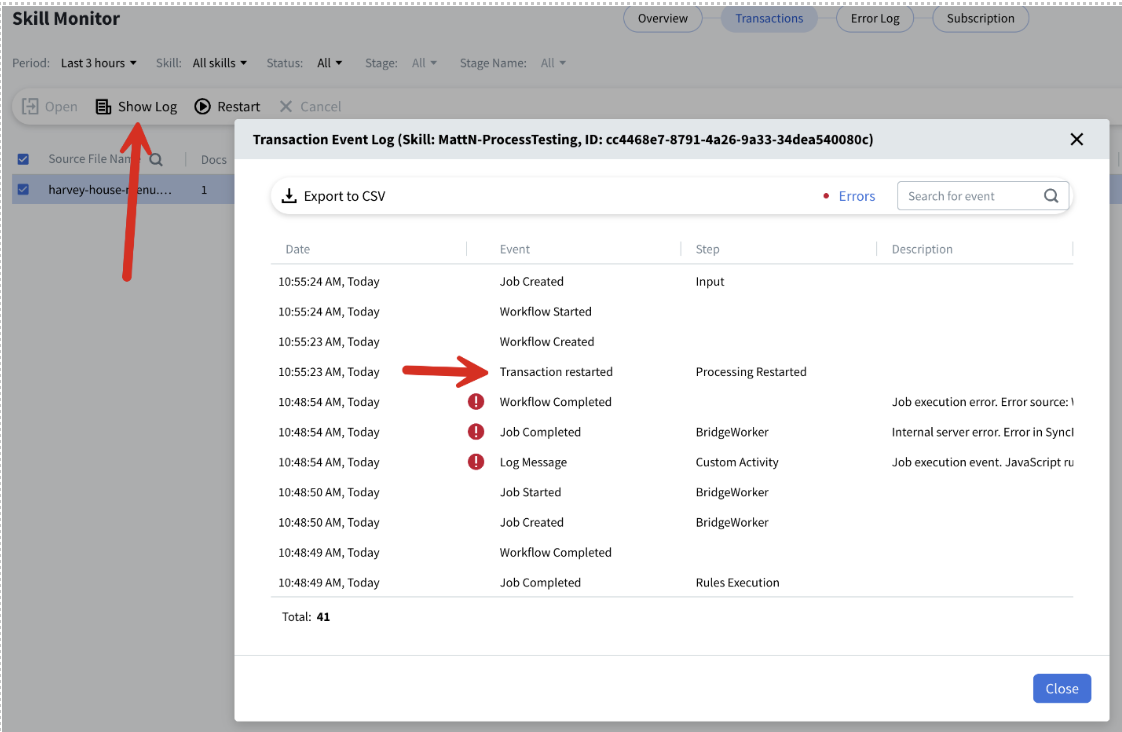
You can view a detailed event log for each transaction workflow. If the workflow is held up at a specific step or has an error, the event log can help identify the cause.To view the event log, select the transaction in the list and click Show Log. The Transaction Event Log window opens with a list of all events for the selected transaction. Use the event log search bar to find an event by name, or use the Errors filter to show only events that have errors.
A processing flow has been created to start a transaction.
Workflow Started
Processing started.
Job Created
A task has been created as a part of a transaction.
Job Started
Task started.
Job Completed
Task completed.
Workflow Completed
Processing completed.
Reprocessing started
Processing restarted, as it was not completed within the allotted time.
Log Message
Log or error messages caused by Context.LogMessage or Context.ErrorMessage methods respectively in Custom activity and External System (Output activity) scripts. Messages written using the Context.LogMessage method are denoted by a warning character, and messages written using the Context.ErrorMessage method are denoted as errors.
To export the event log to a CSV file, click Export to CSV at the top of the Transaction Event Log window. You can then send the file to technical support or your system administrator.
You can reprocess a failed transaction when external issues arise, such as network timeouts, third-party API call failures, or Vantage platform issues. Reprocessing a document does not count against your Page count.Transactions with “Job execution” errors are eligible for reprocessing.
1
Open Skill Monitor
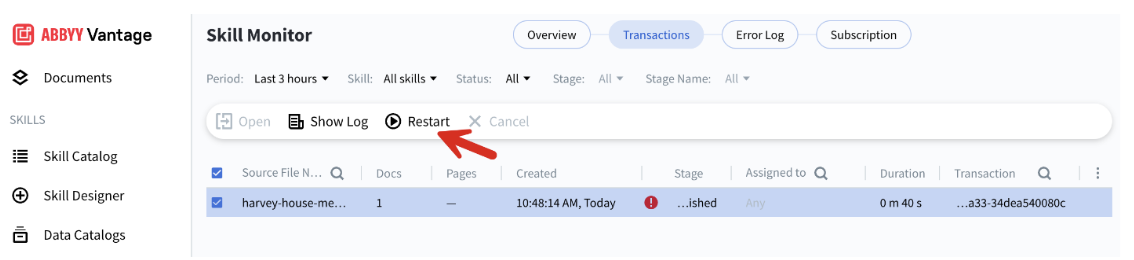
Go to Skill Monitor and find the failed transaction.
2
Restart the transaction
Select the failed transaction, and then click Restart.
Failed transaction with the Restart button
3
Verify the restart (optional)
Click Show Log to confirm the transaction has been restarted and to see more log details.
Show Log option revealing detailed transaction logs after a restart
If the reprocessing is successful, the transaction can no longer be restarted.
If you edit and republish a Process skill, for example to fix the issue, Vantage creates a new skill version. If you then restart the failed transaction, Vantage uses the old version, not the new one, so the transaction is likely to fail again.