
- To the right of and below the field name
- Using a White Gap element to limit the search area from the bottom
- Using a Paragraph element
Create the grAddress group element
1
Create the Group element
In the InvoiceHeader element, create a Group element and name it grAddress.
2
Set the search constraints
Click the Relations tab and specify the following search constraints for the group elements: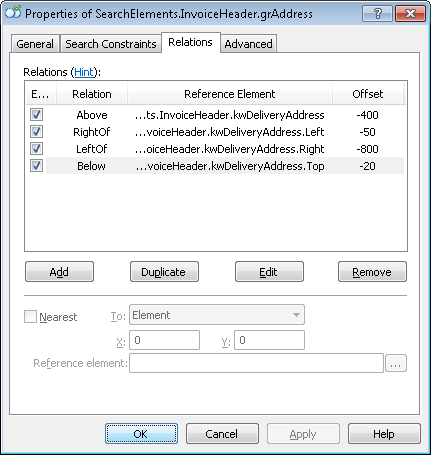
- Above the kwDeliveryAddress element, Offset = -400.
- Left of the right boundary of the kwDeliveryAddress element, Offset = -800, Reference boundary = Right.
- Right of the left boundary of the kwDeliveryAddress element, Offset = -50, Reference boundary = Left.
- Below the upper boundary of the kwDeliveryAddress element, Offset = -20, Reference boundary = Top.
Create the wgAddressAbove White Gap element
A horizontal White Gap limits the search area for the DeliveryAddress element from the bottom.1
Create the White Gap element
In the
InvoiceHeader.grAddress element, create a White Gap element and name it wgAddressAbove.2
Set the orientation and height
Click the White Gap tab. Under Orientation, select Horizontal, and set Min height to 55.
3
Restrict the object type
Because you are looking for a white gap inside a paragraph, under Search among objects of type, select only Text.
4
Set the Rubbish thresholds
Under Rubbish, specify these values: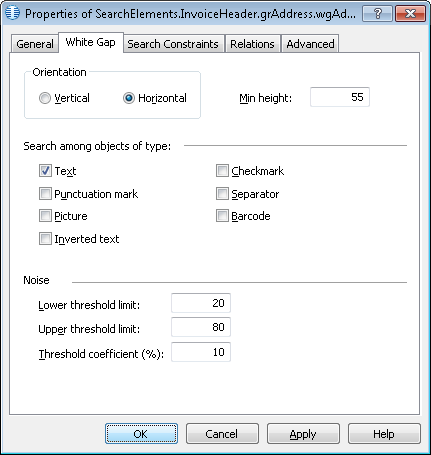
- Lower threshold limit – 20.
- Upper threshold limit – 80.
- Threshold coefficient (%) – 10.
The values for the Lower threshold limit, Upper threshold limit, and Threshold coefficient (%) properties can only be selected by trial and error. Start with the default values. If they do not work, alter them until the white gap is detected on all the test images.
5
Keep the other defaults
Do not specify any additional search constraints, and retain the default values for the other options.
6
Add a position relation
Click the Relations tab. Because the white gap can be located only beneath the keywords of the kwDeliveryAddress name, specify this search constraint:
- Below the kwDeliveryAddress element, Offset = 20.
7
Add the pre-search constraint
Click the Advanced tab. The Delivery Address field is not present on all images, but when it does occur it always appears with its name. In the Advanced pre-search relations field, specify this additional condition: search for the image object only if the kwDeliveryAddress element is detected. In the FlexiLayout language:
8
Match the FlexiLayout
Match the FlexiLayout to see whether the wgAddressAbove element is detected on all images.
9
Constrain to the topmost gap
FlexiLayout Studio sometimes finds more than one white gap in the search area and cannot always select the right one, so impose additional search constraints. The white gap of interest is the topmost gap in the search area. In the Advanced pre-search relations field, specify this additional condition: search for the image object closest to the upper boundary of the first page. In the FlexiLayout language:
10
Verify the match
Temporarily exclude the InvoiceFooter element and match the FlexiLayout.
Create the DeliveryAddress Paragraph element
1
Create the Paragraph element
In the
InvoiceHeader.grAddress element, create a Paragraph element and name it DeliveryAddress.2
Add a position relation
Click the Relations tab. Because DeliveryAddress can be located only above the wgAddressAbove white gap, specify this search constraint:
- Above the wgAddressAbove element, Offset = 0.
InvoiceHeader.grAddress group, so there is no need to specify it again.3
Exclude the field name from the search area
Click the Advanced tab. The name of the DeliveryAddress field is also inside the search area, so exclude it to obtain only the field value. The search area also contains separators and noise that are best excluded. Rather than exclude only the region of the kwDeliveryAddress element, take that region, enlarge it to encompass all the noise, and exclude the resulting rectangle. Specify these search constraints in the Advanced pre-search relations field:
4
Match the FlexiLayout
Temporarily exclude the InvoiceFooter element and match the FlexiLayout.
5
Set the block region
Specify the location of the DeliveryAddress block as the rectangular region of the detected DeliveryAddress element, simplified for clearer display and expanded by 5 dots vertically and horizontally. Select the Expression option and type this expression: