- The following versions of Microsoft™ SharePoint are supported: Microsoft SharePoint 2013, Microsoft SharePoint 2016, Microsoft SharePoint 2019, and Microsoft SharePoint 365.
- Contributor permissions are sufficient to change export settings and to export documents to Microsoft SharePoint.
- Data can be exported to the following types of SharePoint columns: Single line of text, Multiple lines of text, Number, Currency, DateTime, Managed Metadata, ForLookup, or Yes/No (for details, see the Converting data when exporting to Microsoft SharePoint 2013 section below).
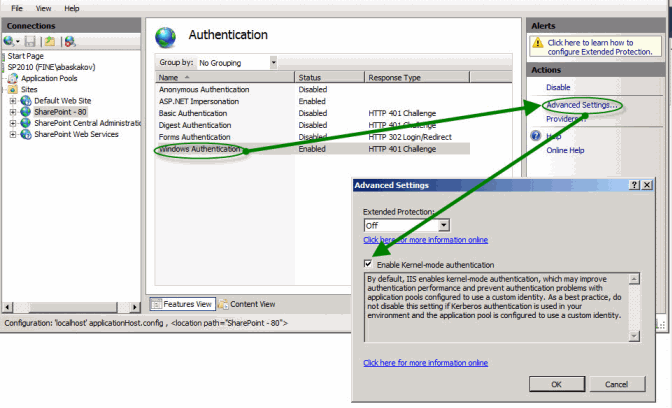
- The option Enable Kernel-mode authentication must be selected for the SharePoint site in the Internet Information Services (IIS) settings.
- In the Document Definition editor, select Document Definition → Export Settings…
- Click Add…
- Select Export to SharePoint in the Type field.
- Specify whether export is obligatory.
- Specify export conditions.
- Specify whether documents with errors, documents without errors, or both should be exported.
- If necessary, specify the field values that should trigger this export profile. To do this, select the Field condition option and click Options…
- Configure your SharePoint connection.
- Server URL Enter the address of the server where your SharePoint libraries are located. Below the server address, the connection status is indicated. If the server is disconnected, click the Connect… button to re-establish the connection.
-
If required, click the Connection Settings… button to set up authentication parameters and proxy settings (the Windows authentication parameters are used by default). To connect to Microsoft SharePoint 365, you will need to select an authentication method:
- SharePoint Online. Specify the SharePoint user’s name and password.
- SharePoint Online OAuth:
- Click Use OAuth Login.
- In the OAuth 2.0 Authorization Wizard, click the link to log in to your Microsoft account. Once you are logged in, the browser window will automatically close.
- Return to the OAuth 2.0 Authorization Wizard and click Finish.
Note: For more information about authorizing with OAuth 2.0, see Authenticating using OAuth 2.0.
- Once you are connected to the SharePoint server, select a library from the Select SharePoint library list.
- Click Browse… and locate the folder in the library.
-
In the Content type field, select the type of content of your documents (supported starting from Microsoft SharePoint 2007). This will allow you to export values to the fields that correspond to the selected content type.
Note: Content type is the list of content types selected in SharePoint. The selected content type determines which SharePoint fields are available for mapping. - Select a file adding mode from the list.
- Now specify which Document Definition fields should be exported and where. Click the Field Mapping… button and select the options in the Field Mapping dialog box. In this dialog box, you must establish a correspondence between the Document Definition fields and the SharePoint document columns. The Document Definition fields are displayed to the left. For each Document Definition field to be exported (with the exception of groups and tables), you can select an empty SharePoint column.
-
Specify image saving options and click Next>.
- If you are exporting data to files, specify the destination folder and click Edit… to specify a file name template. If the folder you specify does not exist, it will be created automatically.
Note: The length of the path to the file (including the file name) cannot exceed the maximum path length permitted by the operating system. The maximum path length in Windows operating systems is 260 characters.
Note: We do not recommend using the following characters in file names: ~, #, %, &, {, }. - If required, specify fields to be concealed upon export.
- If you are exporting data to files, specify the destination folder and click Edit… to specify a file name template. If the folder you specify does not exist, it will be created automatically.
-
Specify image storage options and click Next>.
- Select the image format, quality, and color.
- To change the resolution of the source images, select Change resolution to and select the appropriate value from the list.
- If you select PDF or PDF/A as a storage format, you can create searchable PDF files.
- Enter an export profile name and click Finish.