Skip to main contentYou can change the data form appearance by moving the fields around, changing the set of fields in groups, or resizing fields. To enable tools required for editing the appearance of the data form, click Layout on the toolbar.
Rearranging fields
By moving the fields around with your mouse, you can do the following:
- Reorder fields.
- Place fields side by side in a row.
- Add an existing field to a non-repeating group.
- Move a field from one non-repeating group to another non-repeating group or to the root of the data form.
- Reorder checkmarks in a checkmark group.
The fields are arranged in a grid. When you drag the field, the position at which it will be inserted is highlighted in blue.
You cannot add existing fields to a group or move a field from a group to the root of the data form in the following cases:
- The group is repeating.
- The group or fields were created in Advanced Designer.
- You’re editing a copy of a built-in skill and the group or fields were inherited from the built-in skill.
You can still reorder the fields in all these cases.
All instances of a repeating group have the same field order and layout.
Resizing fields
Minimum and maximum width
On the data form, the Text or Barcode field is displayed at its minimum width and is expanded to fit the extracted value. You can define a maximum width to prevent the field from expanding too far. If the extracted value doesn’t fit the field for which a maximum width is set, a horizontal slider will appear to help you examine the value.
You can set minimum and maximum widths for a selected field of type Text, Barcode, and Image on the Actions pane. You can also adjust the minimum width of a field by dragging its right border on the data form.
Indentation
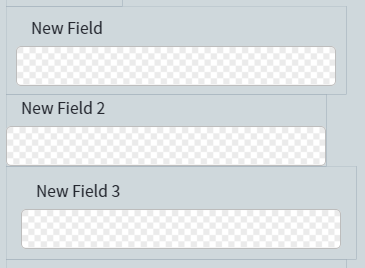
Indentation defines the width of margins around the field. On the following screenshot, the indentation is set to Normal for the “New Field” field, to None for the “New Field 2” field, and to Large for the “New Field 3” field.
 You can configure indentation for any type of field. To do so, select a field on the data form and choose one of the predefined values from the Indentation drop-down list on the Actions pane or choose the Custom value and define each margin manually.
Note: Some features like creating business rules or training the skill become unavailable when data form editing tools are enabled. To disable the editing tools, click Edit layout of fields on the toolbar.

