Select and scan
Open the Select & Scan dialog box
Click the arrow to the left of the Scan button on the Main Window Toolbars and select Select and Scan….
Select a scanner and configure settings
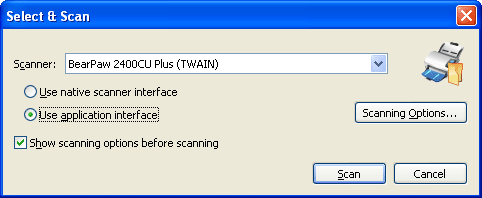
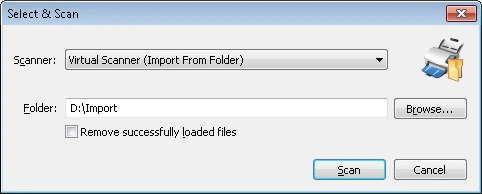
From the Scanner drop-down list, select one of the available scanners. The available settings depend on the scanner type. See Hardware scanner or Virtual scanner.
Hardware scanner

| Option | Description |
|---|---|
| Use native scanner interface | Select this option to use the interface provided by the scanner. Note: If the native scanner interface is used, the Show scanning options before scanning option should also be selected. Otherwise, if scanning settings were not originally specified in the scanner interface, a scanning error occurs. |
| Use application interface | Select this option to use the interface provided by the application. |
| Scanning Options… | Opens the scanner settings dialog box. If you select the scanner’s interface, you see the dialog box provided by the driver of your scanner. If you select the application’s interface, you see the Scanner Settings dialog box provided by the application. |
| Show scanning options before scanning | If this option is selected, the program displays the scanner settings dialog box each time scanning starts. |
Virtual scanner

| Option | Description |
|---|---|
| Folder | Specify the path to the folder to import images from. |
| Browse… | Locate a folder with images. |
| Remove successfully loaded files | Select this option to remove the images from their source folder after they are loaded. |