
Create the InvoiceNumber element
1
Create the Character String element
In the InvoiceHeader element, create a Character String element and name it InvoiceNumber.
2
Remove the alphabet restriction
Click the Character String tab. Set Percentage of non-alphabet characters to 100%, which removes any restriction on characters.
3
Set the character count
In the Character count field, specify this fuzzy interval:
{-1, 3, 20, INF}. This restricts the string length; assume 3 to 20 characters. Any hypothesis outside this range is penalized.4
Set the search constraints
Click the Relations tab. InvoiceNumber occurs only to the right of the kwInvoiceNumber name keywords, no farther than 550 dots from their right boundary, and always on the same level. Set these constraints: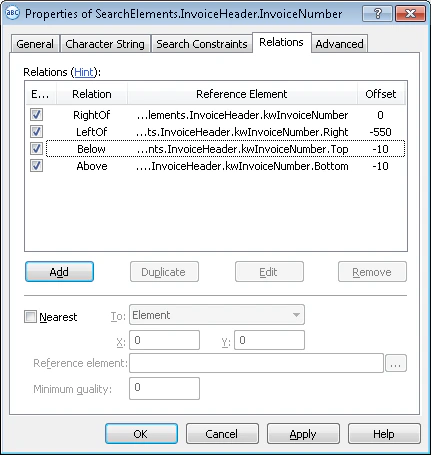
- Right of the kwInvoiceNumber element, Offset = 0
- Left of the kwInvoiceNumber element, Offset = -550, Reference boundary = Right
- Above the kwInvoiceNumber element, Offset = -10, Reference boundary = Bottom
- Below the kwInvoiceNumber element, Offset = -10, Reference boundary = Top
Offset values are selected by trial and error.
5
Verify the match
Match the FlexiLayout with the test images and confirm that FlexiLayout Studio detects the element on all the images where applicable.
6
Set the block source element
To describe the location of the InvoiceNumber block, open its Properties, select Source element, click  , and select the InvoiceNumber element as the source element.
, and select the InvoiceNumber element as the source element.