In order to send files from M-Files to FlexiCapture, an M-Files workflow should be created. In this workflow, you need to create a state where a file sending script will be executed. This script will call methods from the connector libraries, which should be installed on the M-Files server. To install the libraries, complete the following steps:
- Copy the following files from the M-Files Workflow Activity folder in the distribution package into any folder on the M-Files server:
- Abbyy.MFiles.FlexiCapture.Activity.dll;
- Abbyy.Connectors.FlexiCaptureConnector.dll.
- Run the Command Prompt as administrator, go to the folder where the libraries were placed in step 1, and execute one of the following commands (to register the library in the registry):
- If you are using a 64-bit M-Files server version:
%SystemRoot%\Microsoft.NET\Framework64\v4.0.30319\RegAsm.exe Abbyy.MFiles.FlexiCapture.Activity.dll /codebase
- If you are using a 32-bit M-Files server version:
%SystemRoot%\Microsoft.NET\Framework\v4.0.30319\RegAsm.exe Abbyy.MFiles.FlexiCapture.Activity.dll /codebase
Then restart the M-Files Server 2018 service.
To remove the Abbyy.MFiles.FlexiCapture.Activity.dll library from the registry, run the Command Prompt as administrator, go to the folder where the libraries were placed in step 1, and execute one of the following commands:
- If you are using a 64-bit M-Files server version:
%SystemRoot%\Microsoft.NET\Framework64\v4.0.30319\RegAsm.exe Abbyy.MFiles.FlexiCapture.Activity.dll /u
- If you are using a 32-bit M-Files server version:
%SystemRoot%\Microsoft.NET\Framework\v4.0.30319\RegAsm.exe Abbyy.MFiles.FlexiCapture.Activity.dll /u
To update Abbyy.MFiles.FlexiCapture.Activity.dll, you need to unregister the previously registered version of the library and register the new version of the library. For the changes to take effect, restart the M-Files Server service.
If the library is registered successfully, the following keys will be added to the registry:
- HKEY_LOCAL_MACHINE\SOFTWARE\Classes\Abbyy.MFiles.FlexiCapture.Activity.ConnectionSettings
- HKEY_LOCAL_MACHINE\SOFTWARE\Classes\Abbyy.MFiles.FlexiCapture.Activity.FlexiCaptureWebClient
- HKEY_LOCAL_MACHINE\SOFTWARE\Classes\Abbyy.MFiles.FlexiCapture.Activity.MFilesTargetContext
- HKEY_LOCAL_MACHINE\SOFTWARE\Classes\Abbyy.MFiles.FlexiCapture.Activity.RegistrationParameter
The connector distribution package contains a sample vault named “FlexiCapture Demo Vault.” This sample vault already includes a metadata structure for invoices and two preconfigured workflows, one for unattended processing and one for processing with verification. Unzip the FlexiCapture Demo Vault.zip archive. Import this vault to the M-Files server. In the Index file on the server field, provide the path to the file: \FlexiCapture Demo Vault\Index.xml. Next, add to this vault M-Files users that will be working with it. For the scripts in the workflow to work correctly, you must specify your connection settings to be used to connect to the ABBYY FlexiCapture Application Server. These settings should be specified in the head section of each script.
Modify the scripts as follows:
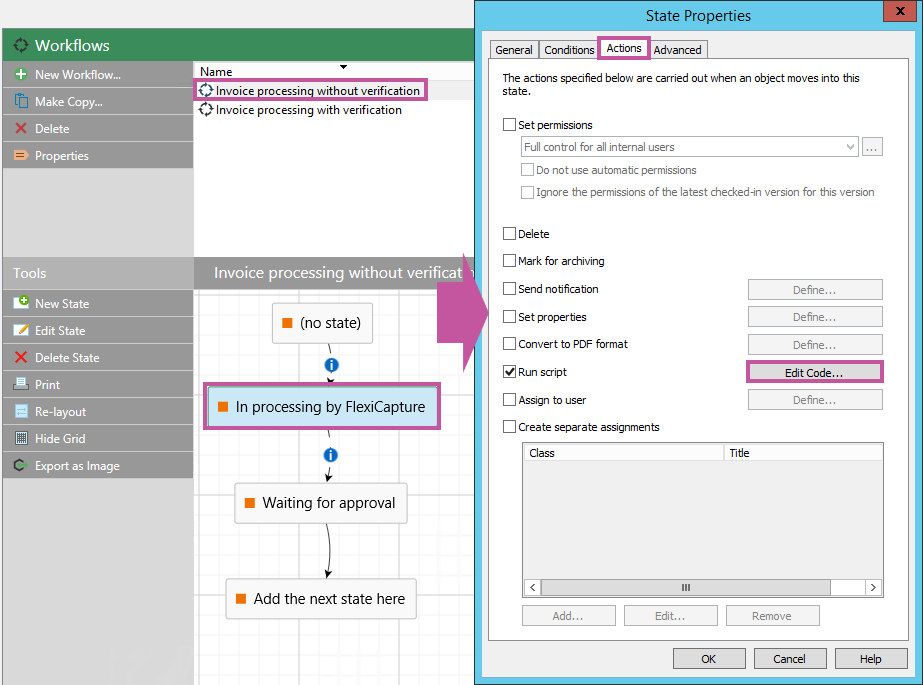
- In M-Files Admin, open the FlexiCapture Demo Vault that you have imported and click Workflows.
- Select one of the workflows and start editing the In Processing by FlexiCapture state. Then click the Actions tab, select the Run Script option, and click Edit Code….
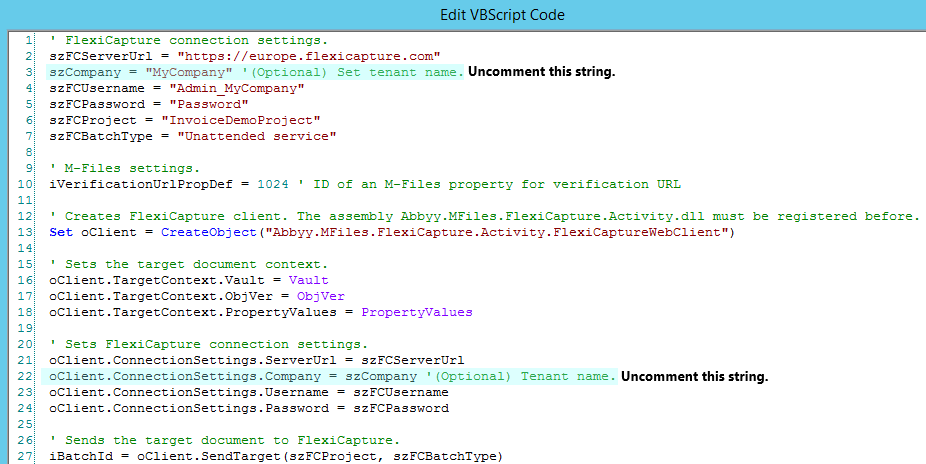
- In the Edit VBScript Code dialog box, specify the following variable values in the code of the script:
If you are using ABBYY FlexiCapture Cloud, modify the script as follows:
- In the szFCServerUrl variable, specify the URL of the FlexiCapture Cloud instance that your company is registered in.
- Uncomment line 3 of the script and specify the name of your company here:
szCompany = "Company" '(Optional) Set tenant name.
- Specify the credentials to be used for your company’s tenant in ABBYY FlexiCapture Cloud:
- szFCUsername = “Username”
- szFCPassword = “Password”
- Uncomment line 22 of the script to use the name of your company when connecting to the ABBYY FlexiCapture server:
oClient.ConnectionSettings.Company = szCompany = "Company" '(Optional) Set tenant name.
Make identical changes in the other sample workflow.
A workflow in M-Files can be configured for either
or
Each configuration requires its own script.
The sections that follow contain scripts used for configuring M-Files workflows. To set batch registration parameters replace the code fragment iBatchId = oClient.SendTarget(szFCProject, szFCBatchType) in this these scripts with the following code:
' --------------- Send target with registration parameters --------------- '
' Set FlexiCapture batch registration parameters.
Set oRegParam0 = CreateObject("Abbyy.MFiles.FlexiCapture.Activity.RegistrationParameter")
oRegParam0.Name = "Name_0"
oRegParam0.Value = "Value_0"
' Set oRegParam1 = CreateObject("Abbyy.MFiles.FlexiCapture.Activity.RegistrationParameter")
oRegParam1.Name = "Name_1"
oRegParam1.Value = "Value_1"
arRegParams = Array(oRegParam0, oRegParam1)
' Sends the target document to FlexiCapture.
iBatchId = oClient.SendTarget_2(szFCProject, szFCBatchType, arRegParams)
' ------------------------------------------------------------------------ '
This code creates Abbyy.MFiles.FlexiCapture.Activity.RegistrationParameter objects for each registration parameter. These objects are assigned the values Name and Value. Next, these objects are sent to an array. To send a file to ABBYY FlexiCapture, the SendTarget_2 method is called, which receives the name of the project, the name of the batch type, and the array containing the registration parameters.
For detailed information about using registration parameters, see FlexiCapture 12 Standalone Administrator’s Help.